Featured Post

The Scouring of the Shire, Part 2: The Ruffians Arrive

Good morning gamers, We're back for scenario two of the Scouring of the Shire campaign and today Bill Ferny is back, leading a ragtag ba...

Monday, May 29, 2023

Defence of the North Inspired Lists: Azog's Legion Revisited

Good morning gamers,

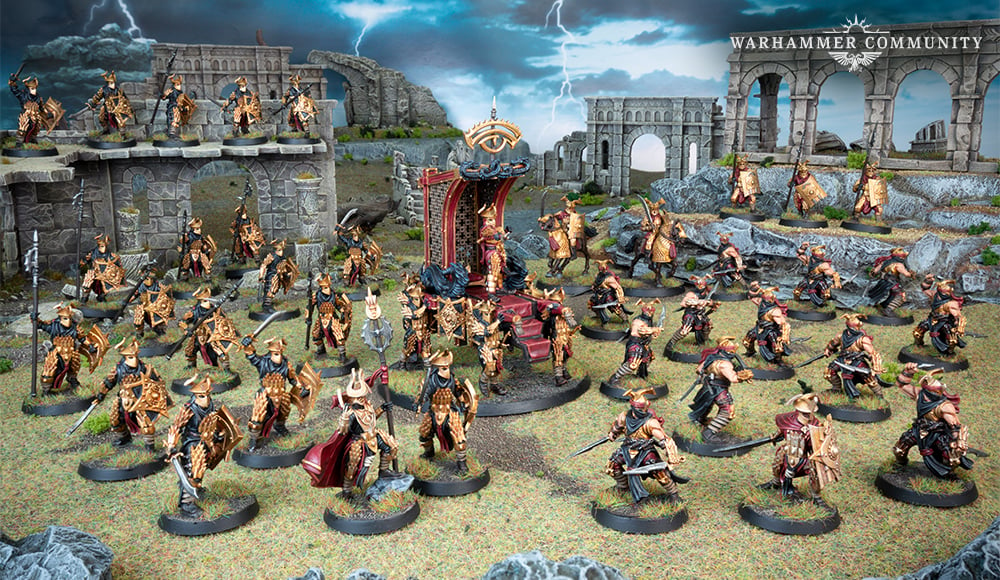
We're almost done looking at different armies you can make with the scenario participants from Defence of the North. Today we turn to a faction entirely represented by models required for scenarios from the Appendices: Azog's Legion. While not a "Legion" in the "Legendary Legion" sense, this faction has an incredible array of models from the scenarios, mostly because they are the only evil faction in the Battle of Five Armies scenario. Regardless of what kind of models you like to run in Azog's Legion, chances are good you'll have the models you want if you collect what's in this book (unless you're like me and you're intrigued by a double-Catapult-Troll list):
  • Azog with everything (including the Signal Tower)
  • Bolg (on foot)
  • 5 Gundabad Orc Captains
  • 2 Goblin Mercenary Captains
  • 30 Gundabad Orc Warriors with shields
  • 30 Gundabad Orc Warriors with spears
  • 24 Gundabad Berserkers
  • 24 Goblin Mercenaries
  • 4 Ogres
  • 6 War Bats
  • 2 Gundabad Trolls with Crushing Clubs
  • 2 Gundabad Trolls with Scythe Gauntlets
  • 1 Catapult Troll
Photo Credit: the Armies of the Hobbit 

You can actually run an Azog's Hunters allied contingent led by Bolg and featuring a mix of 12 Hunter Orcs (but you probably have a box of 24) and 12 Fell Wargs, which is pretty cool. Since you have no other heroes, though, you'll have a max of 16 models from that allied contingent (Bolg and 15 followers). You could also use all those Gundabad Orc Captains to ally in the Hunter Orcs, the Fell Wargs, and up to 8 Mirkwood Spiders from the Dark Powers of Dol Guldur (your choice of Azog or Bolg to lead the Azog's Legion force - either will pick up Master of Battle). This would, admittedly, be quite good too.

However, our list today is going to be pure Azog's Legion because there's one really neat piece I want to use . . . and it won't help the Azog's Hunters units and most of the Dark Powers of Dol Guldur units at all . . .

Thursday, May 25, 2023

REPLY to Tiberius: 5 Things I Love about MESBG (from Star Wars Legion)

Hey Reader!

Tiberius made a post recently talking about things that bother him in Star Wars Legion that underline things he loves about MESBG, and not to be someone who bad-mouths a game I've invested in and do enjoy playing, I do think that Legion illustrates a new game to the scene that is fun to play, but does have some aspects of it that need a rework in the next edition (whenever that comes). 

As someone who plays Middle Earth, Bolt Action, Imperial Assault, and Legion (and have played Warhammer Fantasy 8th Edition, Warhammer 40k, Infinity, and Blood Bowl in the past), this post is mostly just praising 5 things I love about MESBG that are thrown into stark relief by Legion. If you read my post talking about Bolt Action, this will feel very similar.

(Also I've done a prime on my models and a few other colors, but none of them are done yet; probably won't finish my Legion army until after I finish repainting a bunch of my models for the upcoming TMAT tournament this June, so don't crucify me below for having poorly painted models! I agree with you! :P )


I.  Might Points Are AWESOME!

Turrets, like siege weapons, are awesome. It
would be even more awesome with Might...

In fact, extend that: heroic stats in general (not to mention heroic actions) are awesome! If units in Legion had access to heroic stats that allowed them to better fend off attacks, heroes would feel more heroic (because as it stands, rolling more dice is always a good answer in this game, and some units can do it and some cannot), and you feel like you have more control over your force, and by extension the game.

The biggest issue from this perspective in Legion is that it's actually too easy: activate a unit (which I'm not a big fan of how they do unit activations, but more on that a bit later), take its turn, switch to the other player. This means, though, that there's no force concentration where you can move a large number of guys (Heroic Move), or push more quickly to an objective (Heroic March), or slice through a bad guy droid and move on to another target (Heroic Combat) because...I guess that would be too much for people to handle? Even though the Command Cards determining priority is totally easy to understand? Eh, I'll move on.

And it creates a second issue: since both sides "see-saw" in activations until one side runs out (in which case, by the way, they do have a Pass mechanic, but a lot of the time one side will just run out of activations and then the other side gets to finish out with all of their remaining activations), it means that not only can you not get force concentration through strategic planning, thanks to the suppression mechanic (which we will talk about later), there's a heavy incentive to put out a lot of activations just designed to suppress the enemy, which simplifies tactics dramatically. And if you do this with the Confederacy (who can't be suppressed, because they're droids), it's even easier because the opponent can't do it back to you in return.

So if you've ever hated playing against "Gun Line" factions in a game, Legion actively rewards this way of playing due to their activation mechanic: there's no reason not to go for high activation count and then focusing fire on specific units just to panic them off the table.

Monday, May 22, 2023

Defence of the North Inspired Lists: The Halls of Thranduil Revisited

Good morning gamers,

We've come to one of the most involved factions in the Defence of the North book scenarios: the Halls of Thranduil. While there is an entire section of the scenarios dedicated to the defense of Mirkwood in Defence of the North, the Halls of Thranduil appear in the final scenario of the Lothlorien campaign (the assault on Dol Guldur) as well as two of the scenarios in the Appendices (the Defense of Dale and the Battle of Five Armies). This faction is important - and thanks to Legolas being a Hero of Valor, it's pretty common to see at least some Halls of Thranduil models in a Matched Play Game.

Photo Credit: Warhammer Community

For most of the posts in this series (and specifically for this sourcebook), we've seen important models for Matched Play being left on the side lines for scenarios - not so with this faction. In fact, with one exception, you not only get all of the models you'd hope to have for Matched Play, but you also get a LOT of those models for Matched Play. Here are the models we have:
  • Thranduil, King of the Woodland Realm with Elk, heavy armor, and extra sword (based on two scenarios)
  • Legolas (possibly mounted with Orcrist) and Tauriel
  • 1-2 Mirkwood Captains (depending on whether you want to proxy the second Captain)
  • 1-2 Palace Guard Captains (based on whether you chose to proxy)
  • 1-2 Mirkwood Ranger Captains (based on whether you chose to proxy)
  • 36 Mirkwood Elves (12 shields, 12 Elven Glaives, 12 Elf bows)
  • 10 Mirkwood Rangers (though actually 20)
  • 10 Palace Guard Captains (though actually 20 - at least 4 shields, 2 shields and spears, and 4 spears)
  • 3 Wood Elf Sentinels
This is quite the list of models - and with the exception of Mirkwood Cavalry, this is pretty much all you really need for a solid Mirkwood collection. Expensive though it be, good job scenario writers!

Being Elves, however, there's always going to be the question of whether your list would be better with allies - and as it happens, there are FOUR historical allies we can choose from: the Survivors of Lake-town, the Iron Hills, Erebor Reclaimed, and the Beornings. Let's see what they have to offer us:
  • The Survivors of Lake-town:
    • Bard (on foot and mounted)
    • Bard's kids
    • Alfrid
    • Gandalf the Grey (to be scenario-specific, he should be on foot, but we probably have the option for a horse)
    • Bilbo Baggins, Master Burglar
    • 36 Lake-town Militia (12 shields, 12 spears, 12 bows)
  • The Iron Hills:
    • Dain Ironfoot on war boar
    • 2 Iron Hills Captains (1 shield/spear, 1 mattock)
    • 38 Iron Hills Dwarves (12 spears, 12 mattocks, 12 crossbows, 1 banner, 1 banner and mattock)
    • Iron Hills Chariot
  • Erebor Reclaimed
    • Everything in the Iron Hills list above (the Chariot would need to be upgraded to the Champ-chariot)
    • Thorin Oakenshield, King Under the Mountain (technically without Orcrist, definitely without goat)
    • All 12 Champions of Erebor (no goats either)
  • The Beornings
    • Grimbeorn
    • 12 Beornings (8 two-handed axes, 4 great bows)
Well, this is quite the list! It only seems fitting that, instead of just saying, "well, I chose to use this one," we'll walk through some of the decision trades that are in play here, because like the Isengard post we did for War in Rohan, I don't think the "best list" is a given - let's dig right in!

Saturday, May 20, 2023

Fantasy Fellowships: The Erebor Reunion, Part 3c

Good morning gamers,

Today we're continuing the journey of my Fantasy Fellowship with the Warg Attack scenario. This scenario plays a lot like the Wargs in the Night scenario, in that the heroes have to slog through a bunch of grunts and need to not die (I lose if 3/6 heroes die). The game lasts for 12 rounds, but it was unclear to us if models could roll to come onto the board once or if dead Warg Riders could continually come onto the board. Since we'd played Wargs in the Night already (and the wording of the scenario rule was ambiguous - I mean, named heroes can't come back, right?), we decided to not allow "previously slain models" (the terminology used in scenarios like Ambush at Amon Hen, Wargs in the Night, and Escape from Dwarrowdelf) to come back. As you will see, while we probably could have allowed it, I doubt it would have changed much. Let's get into it!

The board was set up as you see below - Hama (represented by my converted Erkenbrand model) begins the game prone and in the center of the board. Gamling (no banner in this scenario) starts on my side of the board within 3" of him, while an Orc Captain on Warg (no shield) and two Warg Riders (Centaur elected to use two throwing spear and shield guys - represented by Wild Wargs) are within 3" on the opposite side of the board. Unlike other narrative scenarios, Evil is ambushing here and gets to start with priority. More than that, my heroes aren't allowed to call Heroic Actions on the first turn (we're surprised and all).


Turn 1: Priority Evil


Well, most of the Evil models, including Sharku (who is represented by my new Gothmog model - the Hunter Orcs on Fell Wargs are Warg Riders with shields, any Warg Riders with shields actually have throwing spears, and I'm using a bunch of Wild Wargs to represent throwing spear models and bow-armed models) got onto the board on the first turn and Evil slammed into my heroes (unsurprisingly). The Captain decided to go after Gamling, leaving Hama to be run over by a Warg Rider with throwing spear. Since the Warg Riders get +1 FV on the charge, this actually isn't looking good for me . . . in response, Theoden and a few Riders didn't make it onto the board, but my other heroes did!


In the Fight phase, Hama lost his fight and was wounded only once (1/2H), while Gamling lost his fight on a roll-off (1/3M), his horse was killed, and then he took a wound (1/2H). With only 1 Fate/1 Wound left on each of these guys, I could be down two heroes by the end of next round . . .

Thursday, May 18, 2023

Five Things I Love About MESBG - Because of Star Wars Legion

Good morning gamers,

My son Gorgoroth has thrown himself heart-and-soul into Star Wars Legion (though his soft spot for Azog is undying). After nearly gluing my fingers together assembling Battle Droids and Droid Commandos (and the likelihood of specialty droids and tanks in our future), I decided to invest lightly in Legion myself (picking up Clones, of course) and give the game a try. I've seen the models for a while, but had never actually played the game (check out the playlist on Zorpazorp if you haven't already - his batreps are excellent and there's a free downloadable campaign in his store). Having played a few games, I've determined one big thing:

Legion is a great game, but it's not as good as MESBG.

Why? Well, five reasons . . .

Reason #1: Dice Quality - When Your Dice (not Your Fight Value) Is the Problem

In MESBG, everyone uses six-sided dice (D6s) - and assuming your dice are fair dice, each model has an equally-likely chance of rolling a 6-high, 5-high, etc. If you want a model to be "better" in combat, you want to roll more dice and ideally have a higher "Fight Value" than your opponent (though this is not a given - see a recent math post I wrote as well as Rythbyrt's older analysis of the relative impact of Fight Value and dice being rolled). Any unit can "beat" another unit if it can just "roll well," though your ability to wound well is tied to how "strong" you are (your Strength stat), how "tough" your opponent is (his Defense stat), and once again, how well you can roll.

Not so in Legion: Legion uses the more traditional tabletop wargaming system of "wounds and saves", ignoring a "To Hit" or "Dueling" roll and instead giving players eight-sided dice (D8s) that have different ratios of blank faces to non-blank faces (which take the form of "hits," "surges," and "critical hits" - hereafter "crits"). Here's the skinny in case you've never played Legion before:
  • White dice (BAD): 1 hit, 1 crit, 1 surge, 5 blanks;
  • Black dice (FINE): 3 hits, 1 crit, 1 surge, 3 blanks;
  • Red dice (GOOD): 5 hits, 1 crit, 1 surge, 1 blank;
A few things can be noted here: first and foremost, unlike other games made by Fantasy Flight Games (which has been bought in the past few years by Atomic Mass Games), the different color dice don't specialize/prioritize different things - their either "good" or "bad." Legion isn't the first Star Wars game from Fantasy Flight Games I've played - Rythbyrt introduced Centaur and me to Star Wars Imperial Assault (which I've invested in heavily since being introduced to it) and Centaur introduced Rythbyrt and me to Star Wars Armada (which I haven't invested in at all). Both games feature different colors of attack dice (D6s and D8s for Imperial Assault and Armada respectively), but each color of dice specializes in something - in Imperial Assault, your dice color either focuses more heavily on damage (Red), surge to trigger special abilities (Yellow), accuracy to hit things from farther away (Blue), or provide a balance of all three (Green). Similarly, the dice in Armada focus on hits/crits at close range (Black), hits at long range (Red), and a very moderated mix of damage and accuracy at medium range (Blue). In these two games, if a unit has a mix of dice in their attack pool(s), you know what the unit is designed to do just by looking at the dice.

Monday, May 15, 2023

Defence of the North Inspired Lists: Assault On Lothlorien Legendary Legion Revisited

Good morning gamers,

If you've been following discussions across the Facebook groups about the state of the game right now, there's one Legion that's shaken up the meta more than any other Legion: the Assault on Lothlorien. This list makes you always play at night (which limits enemy archery range), has tons of creatures that can be buffed by Druzhag/Ashrak, and a bunch of shamanic characters to make their grunts (Goblins, Orcs, Bats, Spiders, and Wargs) go racing without fear into their enemies. Yep, it's a horde that can outshoot better armies and can deal quite the punch where it wants to be.

Photo Credit: Defence of the North 

Since we're walking through the Defence of the North sourcebook and seeing how we can take the forces in it into Matched Play, the Assault on Lothlorien Legion was clearly going to be discussed, but the list you're going to see today is FAR from the list you're likely to see across the gaming table because, as is usually the case, the scenarios don't give us all the models we'd normally want. This doesn't mean the list we're going to look at today is garbage, but rather, it requires a different approach to play.

Our models are a mixture of units available in the Mirkwood missions and the Lothlorien missions (depending on whether you want Orcs or Goblins):
  • Muzgur, Orc Shaman
  • Druzhag the Beastcaller and Ashrak
  • 1-2 Orc Captains (depending on whether you chose to substitute a Taskmaster for an Orc Captain in two scenarios)
  • 1-2 Orc Shamans (see above)
  • 48 Orc Warriors (who also need to be used for Warg Rider dismounts)
  • 6 Warg Riders
  • 6 Orc Trackers
  • 48 Moria Goblin Warriors (who you'll also need to be used for Warg Marauder dismounts)
  • 8 Giant Spiders
  • 12 Fell Wargs
  • 2 Bat Swarms
  • 3 Warg Marauders
This list of models is only missing a few models from the Legion list, but the ones its missing really changes the options you have for its game play. First and foremost, we don't have any Moria Goblin Captains or Shamans, so we're capped at a max of 30 Goblins, Spiders, and Fell Wargs. This is . . . usually not the way you want to run this list. :-) While I usually abandon Ashrak in favor of a Moria Goblin Captain and an Orc Shaman (see my review of the Legion), I think if you only have the models from the scenarios at your disposal, he becomes an auto-include.

Ashrak becomes doubly necessary since we don't have any Wild Warg Chieftains, who provide the biggest muscle of the list, which means you need to lean hard on Giant Spiders to get any kind of punch in the army. If you're going to use spiders, you definitely want Ashrak in the list so they get the upgrade from Poison to Venom (rerolling all failed To Wounds instead of just rerolling 1s To Wound).

Finally, the Spiders are super important in this list because we don't have any Moria Goblin Prowlers. Prowlers not only get bonuses to wound (from their two-handed axes, their Backstabbers rule, and the Legion bonus for outnumbering an opponent). This is pretty nasty when paired with their +1 To Wound with their throwing daggers, but not having them means our skirmishing abilities are going to be really limited. So what kind of list can we run with this? Well, it's actually not THAT different from the list I looked at when I reviewed the Legion - let's see what we have!

Thursday, May 11, 2023

Grim Champs: Converting the Champions of Erebor, Part 2

Good morning gamers,

Last time, we looked at the conversion work I did to turn 6 Grim Hammers and the heads/bits of some of the Dwarves from Thorin's Company into the Champions of Erebor. Today, we're going to take the remaining 7 Dwarves and get them all converted up.


I will note from the get-go that there was one thing I didn't feel brave enough to try: sculpting hair for Kili and Oin. Both of these guys in the Thorin's Company blister have their hoods on, so right now they have hoods up too. When I picked up 24 Warriors of Erebor, I took the 13 helmeted heads from the Grim Hammers that I didn't need for this project, and have added them to many of the Warriors of Erebor without helmets. I'll borrow two of these heads (at least the hair) to fix Kili and Oin ata  later date. Until then, though, this will work. Let's get locked in!

The Casualties of the Battle of Five Armies

Up first are the royals who perished at the Battle of Five Armies: Thorin, Kili, and Fili. Thorin is the king, so naturally, we'll start with him.

Thorin Oakenshield, King Under the Mountain

Thorin is a leader, so I wanted his arm up. One of the Grim Hammer poses has his hand raised, so I thought this would be perfect:


Orcrist was kept and added to the raised hand, but the other sword will be kept for Fili:


He also needed a cloak, so I got some putty and sat down with my Dain model and tried to imitate it as best I could:

Okay, I'll admit it - the guys at ForgeWorld are just better at this than me, alright? Not bad for a first try, though . . .

The king is done - and he turned out alright. Now to work on his nephews . . .

Monday, May 8, 2023

Defence of the North Inspired Lists: The Host of the Dragon Emperor Legendary Legion Revisited

Good morning gamers,

One of the most popular Legions from Defence of the North is the Host of the Dragon Emperor, featuring shiny new models that have revolutionized a faction that everyone loved to look at and no one thought was competitive on its own. If the measure of success for a Legion is making an uncompetitive force competitive, this Legion has clearly succeeded.

One would think that, if you were looking to take your scenario-play armies into Matched Play, the Easterlings would be a pretty good place to start (and since you won't have Amdur or Khamul in your force, you might as well run the Legion) - but when you ACTUALLY look at the models you need, you'll find there are a few problems in your usual list building choices. Let's see what we have to work with:
  • Brorgir the Conjurer and Rutabi, General of the Dragon Legion
  • Easterling Command blister
  • 30 Easterling Warriors (12 shields, 6 shields and pikes, and 12 bows)
  • 5 Kataphrakts and 1 Easterling Captain with armored horse, shield, and sword
  • 18 Black Dragons (9 shields, 9 shields and pikes)
  • 12 Dragon Cult Acolytes
  • 4 Rhunish Drakes
  • The Dragon Emperor
There are several things that we'd usually want in an Easterling Legion army that we don't have here - most notably, we have only 15 pikes and we don't have a war drum on any of our Kataphrakts (and none of them have been upgraded to Black Dragons). Like I did when I was preparing for the Defenders of Erebor post, I looked at this list of models and thought to myself, "Self, we have no drum and we need more pikes - this isn't going to work."

Photo Credit: Warhammer Community

I can't do anything about the lack of a war drum (not within the constraints of this series), but I did get lucky on the pike front. I knew right away that I was going to "cheat" and say, "I need two boxes of Easterling Warriors, so I'm going to use 8 shields and pikes instead of just 6." This is "better," but still not good. As I mentioned in the what-models-do-you-need post, however, I got a second boon on this front: in the second scenario, we need 12 Easterling Warriors with shields, 5 Easterling Kataphrakts, and 1 Easterling Captain with armored horse, shield, and sword - and THAT means we need 18 shield and sword guys. How many shield guys do we get in two boxes of Easterling Warrirors? Only 16. So . . . if we want all dismounts for all our Easterlings . . . we need a third box. :-) And THAT means we actually have . . . 12 pikes. With 21 total pikes to work with, let's see what kind of list we can build!

Saturday, May 6, 2023

Fantasy Fellowships: The Erebor Reunion, Part 3b

Good morning gamers,

We're back in Fantasy Fellowships today and will be covering the Ambush at Night scenario - I know last time I said we'd cover Warg Attack too, but having both in the same post was just too long! This mission is surprisingly NOT about our Fellowship members - Merry and Pippin are playing a mini-game against a depowered Grishnakh, with your victory conditions mostly being triggered by whether you can quarter the enemy (and whether you can get the Hobbits off the board before they're killed - which is much harder to do with Merry and Pippin than when you've got two pretty competent heroes as I have today). Let's dig into the scenario!

Mission #2: Ambush at Night


We deployed our forces as you see - the Isengard force isn't allowed to move on the first turn and Eomer's cavalry are split up into two groups - one led by a Captain of Rohan on horse with shield, the other led by Eomer on horse (yes, he has no shield or throwing spears - who does that, GW, seriously who does that!?!?!?!). The only thing of note from Turn 1 is that Bofur was able to untie his bonds (getting the required 6) on the first turn, so he's free to leg it from here on out!

Thursday, May 4, 2023

Cavalry Charge: Heavy Cavalry and the Battle of Kressenbrun

Good morning gamers,

We're continuing our discussion of cavalry tactics today and we're going to hone-in on heavy cavalry today. Whether they're lancers in heavy armor (like Morgul Knights or Knights of Minas Tirith) or cavalry with high defense but no lances (like Easterling Kataphrakts or Rohan Royal Guards), heavy cavalry are hard to shoot and can pack a punch on the charge (usually). But how do you get these units to get their points worth? Well, let's dig in and find out!

The Battle of Kressenbrun: How to Tip the Scales with Heavy Cavalry

A few months ago, we looked at the Battle of the Marchfeld, which was fought between the Bohemian king Ottokar II and the Holy Roman Emperor Rudolph I and featured German heavy cavalry (as well as some Hungarian skirmish cavalry supporting Rudolph's forces). Today, we're looking at a battle earlier in Ottokar's reign, not long after becoming King of Bohemia. While he would later run up against the elected Holy Roman Emperor, his great enemy early in his reign was the Hungarian king Bela IV. For an excellent visualization of this battle, check out the BazBattles video on YouTube - as always, their stuff is excellent! You can also read a bit about it here.

Both kings contested the rule of the region of Stygia and after a series of revolts drove the Hungarian prince Stephen out, Ottokar was quick to sail in and bring the territory of Stygia back under Bohemian rule. Bela rallied a great host of soldiers from many of the neighboring countries and camped on one side of the Morava river while a Bohemian-allied force led by Ottokar encamped on the other side. With neither side wishing to be caught in the river, Ottokar issued an invitation for Bela's forces to be given free passage over the river and meet on the opposite side in a fair fight. If this sounds like the Battle of Maldon, it should - the situation is nearly the same (you know, if Brythnoth was the one to invite Olaf I to come onto his side of the shore).

While the crossing was happening, young Prince Stephen of Hungary attacked the redeploying Bohemian troops, prompting the Bohemian heavy cavalry to launch a counter-attack. The Hungarian forces that had crossed the river were quickly repulsed and the Hungarian forces lost many units to the charging onslaught and the river itself. The Hungarians were in retreat and didn't pose an external threat to Ottokar during the rest of his reign.

Whether some Bohemian troops lagged behind the rest of the Bohemian force in order to bait Stephen's attack is unclear, but what is evident is that the heavy cavalry in the Bohemian force were able to devastate the mostly light cavalry/light troops fielded by the Hungarians. In MESBG, there are several factions that can field heavy cavalry - and they're often quite expensive. When they see use, getting them to have the impact you want can also be really difficult. So today, we're going to use the principles of this battle to give us some insights into how to use heavy cavalry in SBG. Let's take a look.

Monday, May 1, 2023

Defence of the North Inspired Lists: The Defenders of Erebor Legendary Legion Revisited

Good morning gamers,

To kick off the series of taking your Defence of the North scenario forces into Matched Play, we're looking at what has become my favorite Legendary Legion from that book: the Defenders of Erebor. These guys are NOT crowd favorites - armies like the Assault on Lothlorien, the Host of the Dragon Emperor, the Fell Beings of Mirkwood, and the Beornings are all proving to be popular armies and incredibly competitive (at least at certain points levels). While the Army of Dale has been championed by some players as very competitive (I don't dare disagree with Rob from the Unexpected Podcast team or Jeremy from the Green Dragons - and I've had by butt handed to me by Centaur a few times with that Legion), no one seems to be talking about the sixth Legion from the book (well, besides Sharbie).

Photo Credit: Warhammer Community

So the mantle falls to me - and boy do I love these guys. Usually, my force choices with these guys involve a bunch of "vanilla" Iron Hills Dwarves (who come with shields by default), some spears to back them up (some Dale, some Dwarves), and a bunch of Dale bowmen to run around in skirmish triangles to hold objectives and guard flanks. I also run one of the pairs of heroes and some Champs (starting wtih Bifur), occasionally including a Captain of Dale or an Iron Hills Captain for March. What we have to work with in the "Dale saga" scenarios is . . . well, incredibly limited on these fronts, which made me really struggle with the army list I wanted to make. Here's what we get in the first group of scenarios:
  • Brand, King of Dale
  • Bard II, Prince of Dale
  • One Dale command blister (Captain with shield, Warrior with banner, Warrior with war horn)
  • 6 Warriors of Dale with shields
  • 8 Warriors of Dale with shields and spears
  • 6 Warriors of Dale with Esgaroth bows
  • 12 Knights of Dale
  • Dain Ironfoot, King Under the Mountain
  • Thorin III Stonehelm
  • Iron Hills command blister (Captain with shield and spear, Warrior with banner and shield)
  • 12 Iron Hills Dwarves with spears (and shields)
  • 6 Iron Hills Dwarves with mattock
  • 6 Iron Hills Dwarves with crossbows
Did you notice that we only have 6 Esgaroth bows, no "vanilla" Iron Hills Dwarves, and no Champs to work with? Yeah, me too - it made me really dread having to write a list. After spending some time being bummed about how awful the list was going to be (and considered NOT covering the Legion), I wrote the article we covered last Thursday about what models you need to play everything in Defence of the North and remembered that, like in the Return of the King, there are some wonderful things that can be found in the Appendices . . . and my day got a lot, LOT brighter. :-)