Good morning gamers,
In today's formation post, we're departing from shieldwalls (well, not departing far) and Marching people around and turning towards skirmisher formations. Shooting armies are on the rise and new players who want to get into these armies may be tempted to "just rank up" their models in order to use the formations they already know and apply them to shooting lists. Unfortunately, this can have unintended consequences on their firing lanes and cause their faith in shooting to wane. Never fear, though, we'll go over a very simple formation you can use which is inspired by a strategy used by the Picts back in the seventh century.
The Battle of Dunnichen (and its various other names)
You can watch a short video about the battle here and a longer, more academic video here, but what you'll find from both of these is that scholars disagree on where this battle was actually fought. What we do know for sure is provided in the Ecclesiastical History of the English Nation by Bede, who wrote the following ("that same king" refers to Egfrid, king of the Northumbrians):
. . . for the very next year, that same king, rashly leading his army to ravage the province of the Picts, much against the advice of his friends, and particularly of Cuthbert, of blessed memory, who had been lately ordained his op, the enemy made show as if they fled, and the king was drawn into the straits of inaccessible mountains, and slain with the greatest part of his forces, on the 20th of May, in the fortieth year of his age, and the fifteenth of his reign. His friends, as has been said, advised him not to engage in this war; but he having the year before refused to listen to the most reverend father, Egbert, advising him not to attack the Scots, who did him no harm, it was laid upon him as a punishment for his sin, that he "should not now regard those who would have prevented his death."
You can also see notations about the battle in the Annuls of Tigernach (here, click on T668, then go to T686.4) and the Annuls of Ulster (here, click on U686), though neither is very informative about the battle itself (just that it happened). Ignoring some of the propaganda/commentary from Bede, we see something very simple: the Picts, who didn't use shieldwalls (like the Northumbrians did) pretended to flee so as to draw the enemy into bad terrain and cut them down. Instead of playing to the advantage of the shieldwall, the Picts used their better knowledge of the terrain and maneuverability to force the Northumbrians to fight differently than they would have preferred. The idea of using terrain to slow down an enemy advance so that you can kill them slowly is an all-too-common strategy in MESBG and something that skirmishing armies do quite well.
So how do you do it? How do you make your opponent come after you when he KNOWS you're just going to shoot him? The answer is . . . you change the way your army is formed up to make your army both more flexible and (ironically enough) more inviting to crush.
Skirmishing in MESBG
Lots of armies can skirmish in MESBG - but very few can do it as well as the Rangers of Mirkwood and Rangers of Ithilien Legendary Legions. The thing about both of these lists is that you can shoot with everyone (not Smeagol), but you won't have a lot of guys at low points levels (now that Frodo, Sam, and Smeagol are required for the Ithilien rangers). So how do you keep your army of elite, shooting-capable models from dying in droves? Let's find out with a little example . . .
- Forces of Good: The Rangers of Ithilien LL (500pts, 25 models)
- Faramir, Captain of Gondor on horse with bow
- 9 Rangers of Gondor
- 3 Rangers of Gondor with spears
- INDEPENDENT: Frodo Baggins with Sting, Mithril coat, and Elven cloak
- INDEPENDENT: Samwise Gamgee with Elven cloak
- INDEPENDENT: Smeagol
- Madril, Captain of Ithilien
- 5 Rangers of Gondor
- Anborn, Ranger of Ithilien
- 2 Rangers of Gondor
- Forces of Evil: Angmar (500pts, 40 models)
- Wild Warg Chieftain
- 5 Wild Wargs
- Barrow-Wight
- 4 Angmar Orc Warriors with shields
- 3 Angmar Orc Warriors with shields and spears
- 1 Angmar Orc Warrior with shield, spear, and banner
- 2 Angmar Orc Warriors with Orc bows
- 1 Dead Marsh Spectre
- Barrow-Wight
- 4 Angmar Orc Warriors with shields
- 4 Angmar Orc Warriors with shields and spears
- 2 Angmar Orc Warriors with Orc bows
- 1 Dead Marsh Spectre
- Angmar Orc Captain with shield
- 4 Angmar Orc Warriors with shields
- 2 Angmar Orc Warriors with Orc bows
- 3 Angmar Orc Warriors with Orc bows and spears
Skirmisher Formation: The Compact Triangle Triangle
The Rangers have a measly 6 spears in their list (though some skirmisher armies can't get spears at all) which means we have absolutely no reason to rank up. I have seen many skirmisher detachments rank up though (usually so the archers have some protection from returning fire). Here, there are no heavy troops to stand behind and there are no spears for the second rank. Yes, we could rank these guys up, but what would we gain?
The battle line formation (with the archers in the back) works for melee blocks that want to be pointed at their foes - but for archers, the guys to your left and right who are not in base contact really hinder the visibility of the archers (you can only shoot at what's directly in front of you). This can mean that you get fewer shots each turn because you can't see anyone without risking someone in your own line. I will note that if your archers are in the front rank and are backed up by melee guys with spears, you can see just fine (but you're also a prime target).
Ranking up also makes it harder for archers in the second rank to be able to contribute to melee combats (since there's a wall of friends in the way). While you may have the movement to get to the enemy on the flanks, you might not be able to see the model you can reach. It's pretty tough to get your value when that happens.
So instead of ranking these guys up, put them in triangles. Why triangles? In MESBG, you're allowed to take a shot without having an in-the-way roll from a friendly model if the shooter and the friendly model are in base contact. If you have your models in a double-ranked, line-of-battle formation, each model will have at least one friendly model that it isn't touching - and that limits its field of view. This gets worse as the line extends - consider the following six models:

The center models (Madril and the guy kneeling) have a model to their right, left, and either before or behind them that they can ignore for the purpose of in-the-ways, but the two guys catacorner to them make those angles ineligible for shooting. The guys on the ends have it even worse - the models that are two files away from them completely block firing options, since they would require an in-the-way roll. This isn't good - but by contrast, if we have three models together (everyone is in base contact), we have 360 degrees of vision for our shots - which is perfect for skirmishing (so long as another triangle doesn't get in our way):

To anticipate the comment from Rythbyrt, if we get caught in this formation, we could trap our friends very easily. We know this, so let's not focus on getting caught - let's just back up. Backing away with a triangle is very easy - and you can move this group of guys very simply in one movement (something you might have to set up carefully if you have a 4s formation. Saving time moving models gives us more time to shoot with them - which is the whole point anyway.
But we don't want to just have a random three-man triangle - we want to have several triangles working together. The thing about shooting in MESBG is that in small numbers, shooting rarely does anything - but concentrate a lot of shooting in one area, and you'll be able to do a lot. In this example battle, we will have seven triangles (4 groups of 3 Rangers from Faramir's warband, 1 group of 3 from Anborn's warband, and 2 groups of 3 from Madril's warband) working together - and while each is an independent block for movement, they can all shoot at virtually all the same targets (one triangle is behind the others restricting some rear-focused shooting, but unless there are ambushers or you're playing a maelstrom scenario, there is virtually no restriction on the line of sight for these models). 22 bows split into 7 squads of 3 and a mounted Faramir should get 11-15 hits (depending on whether we move or not) and that should translate into 2-5 kills depending on the defense of our targets - I think we can even the odds a bit if we can buy yourselves a few turns of shooting.

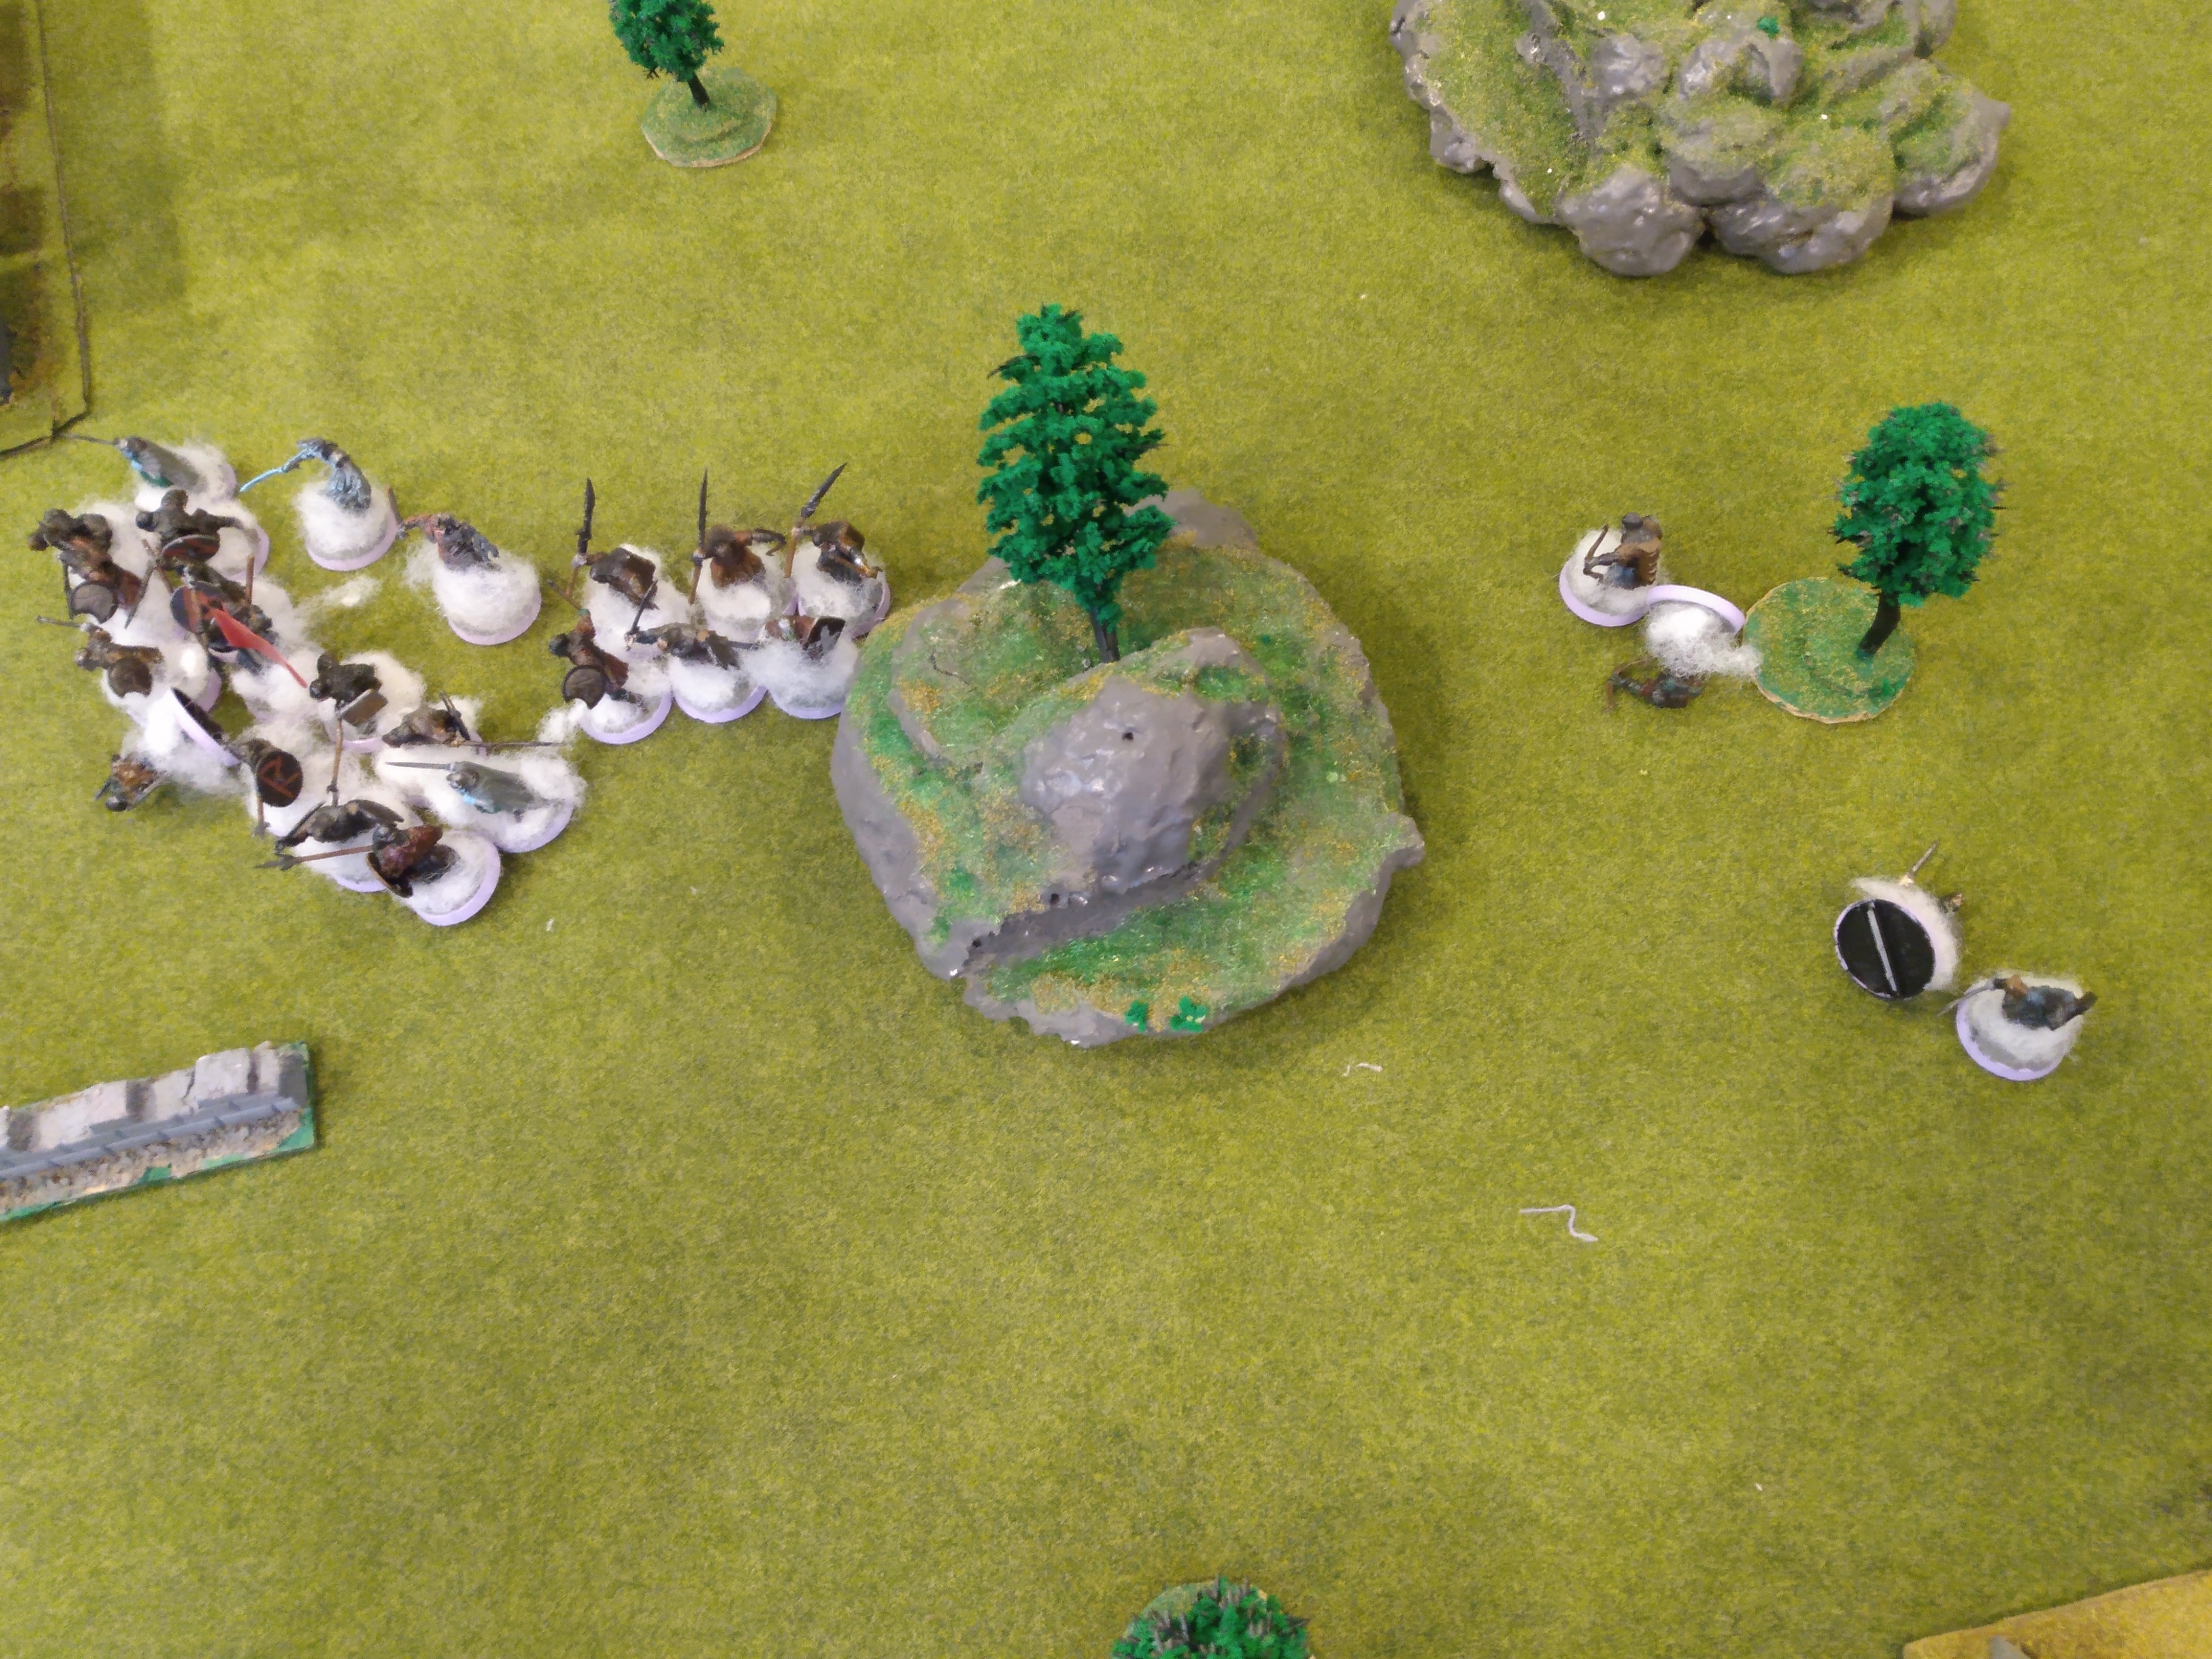
I rolled for a random non-Maelstrom scenario (to make things interesting) and we got Storm the Camp. You can see how the forces deployed, but pay special attention to how the Rangers spread out as they advance - they want to be spread out so the enemy can't send a massive block of Orcs their way.
On the first round, Good got priority and both the Angmar Orc Captain and Madril called Heroic Marches to get their armies in position. One of the triangles of Rangers moved before Madril so they could position themselves on the hill, while the Wild Warg Chieftain and his pack similarly moved before the Captain's March so they could get wide of the main body of the army up their hill - here's what it looked like:

On the second turn, Good wins priority again and advances with a half-speed March this time so they can get into position to shoot this turn (or make the enemy move slower than they could), though two of the triangles moved their full distance and won't be able to shoot. Angmar needs to get up the field, so they call a second March with the Captain to get their army to the center-line:

During the Shoot phase, the Rangers are able to kill 2 Orcs and dealt 2 wounds to the Captain, one of which was saved with Fate (1/2H, 0/1F left). Four wounds isn't bad, considering they need 6s:

Round 3 sees priority stay with Good and they begin to spread out. Evil is just trying to get into the action right now:

In the Shoot phase, Madril spent his last Might point to kill the Angmar Orc Captain, while 2 Orc Warriors with Orc bows and 1 Orc Warrior with shield were killed:

In Round 4, Good gets priority for yet ANOTHER round (they actually want to react - getting priority right now isn't good) and they reposition slightly to get better shots (Madril and his guys drop back a little to help with the impending Warg attack). One of the Dead Marsh Spectres manages to move one of the Rangers 6" forward (not in charge range, but it does block line-of-sight to part of their battle-line):

During the Shoot phase, the Rangers killed 3 more Orcs (9 kills so far), one of which was by Anborn with his free Might point:
As we go into Round 5, Good AGAIN gets priority and is able to move the Ranger that was drawn forward back towards safety. The Orcs advance, dragging another Ranger into the open to screen the Wargs and a Barrow-Wight fails to Paralyze Anborn with 2 Will (snake-eyes, 3/5W left). No kills by the Rangers in the Shoot phase, but an Orc killed a guy up top with an arrow (yaye!):

We had our first fight though - a Warg beat the Ranger who was drawn away from the rest and killed him:

Round 6 saw Evil get their first Priority win (forgot to take the pic, guys) and they charged in with gusto - or at least they would have if Anborn and Smeagol hadn't called Heroic Moves! With the Wargs and main battle lines just out of charge range (one Warg can charge), the Angmar army pushes up as best they can, engaging who they can, while Good counter-charges near Faramir. The Barrow-Wights were active, getting 2 Paralyzes off against Faramir and Anborn - both of which were blocked but at a high cost (Faramir burned 3 Will and 1 Might, Anborn burned his only Will point).
During the Fight phase, Faramir was charged but called a Heroic Combat and managed to kill the Orc who tagged him. He slammed into the Barrow-Wight, who only took 1 Wound. Sam also called a Heroic Combat against a Spectre and after tag-teaming the guy he was fighting, got into Frodo's fight and helped Frodo kill his Orc (so he says - Frodo did all the work). In the rest of the fights, not much happened - a Ranger died, but nothing else:

Now this a really exciting time for Angmar - they've got Wargs pressuring the Ranger's Camp and they're pressing their lines towards the Rangers on all fronts (though the Faramir side is in a bit of trouble for Angmar - especially since Frodo has 2 Might on that side and the Angmar side has none), but this happened:

Yep, gotta stop for breakfast - but hopefully you've seen how the formations were able to maximize their archery because they weren't clouding each other's ways. Instead of facing a big battle line of Orcs, we were able to split up their formation into two groups (three if you include the Wargs) that were much easier to deal with. Could the Rangers pull a win out here? It's possible, but it was always gonna be hard against a list like that - but our shooting was working at a very optimal level (which was our goal today).
Conclusion
If you like running skirmisher armies, let us know in the comments if you found this article helpful and something you want to try out in your next game! If I forgot something that would be useful, comment below with that as well. Next time, we turn to a similar topic: what to do about that flying monster model that seems to be wrecking your games all the time. Is there a way we can form up our army to make a flying monster NOT want to come barreling into us while still providing a strong front to a shieldwall or a horde of warriors? Find out next time - until then, happy hobbying!
No comments:
Post a Comment