Featured Post

So It Begins, Part 4: The Deeping Wall Is Breached

Good morning gamers, We're revisiting a scenario from Fantasy Fellowships in our custom Helm's Deep campaign today. Despite the amaz...

Showing posts with label Easterlings. Show all posts

Monday, September 8, 2025

The New Age Is Begun: The Legions of Mordor Army List

Good morning gamers,

In the Middle-Earth Strategy Battle Game, there are some army lists that have only a few available profiles (like the Harad list we looked at last time or the Depths of Moria list we looked at the week before). The list we're looking at today is not like those lists. There are other army lists that have quite a few profiles to pick from, but they're all limited to a single faction (like the Minas Tirith or Kingdom of Rohan lists). This list is . . . not like those either.

There are a few army lists that serve as a union of what would otherwise be two different army lists, preserving most of their unit choices and hence giving you a really solid list of profiles for both heroes and warriors (like the Defenders of Erebor or the Men of the West). This list . . . isn't like those lists either. There are, finally, a few - very, VERY few - lists that serve as a melting pot of three or more army lists . . . and standing at the very top of all of those lists is the Legions of Mordor army list. That's the one we're talking about today - and frankly, I thought about tackling it AFTER I talked about all of its component parts, but I also think this is a really strong list and so I wanted to give it attention ahead of the other Mordor, Harad, and Easterling lists.

This is one of the few Mordor lists that has really captured my imagination - and that shouldn't be very surprising, since it has such a wide variety of options. I also think this is one of the few Mordor lists that's actually competitive that few people appear to be playing (as of today, September 8,  2025, there were only 102 games logged in Tabletop Admiral with this list and it had a 41.2% win rate with 42 wins and 60 losses - which is higher than the 37.8% win rate back in mid-June when I originally wrote this article). Like the Mordor army lists of yore, part of the reason for this sad win/loss ratio might just be that there is an incredible amount of variability in how these list can be built. As a result, this post will be less of a deep-dive into the army list itself (now that we have several Easterling lists, every unit will have a deep-dive of its own in a different article in this series), but will rather look at the trade space we have to work with and what different units are bringing to the table.

Take a deep breath, guys - I tried to keep this short-ish . . . and I failed miserably.

Monday, June 3, 2024

Top 10 Ringwraith Profile Rankings - Centaur Edition

Hey Reader!

As I was looking at army lists for this year's TMAT Grand Tournament, I took some time to just look over the named wraith profiles again (as it's been a little while since I've looked at any beyond the Witch-King), and I realized that there are some that I really like, and some that I really, really don't like. So as I sat on my couch, and having not used wraiths nearly as much as the rest of the admins, I thought, "Why not: how about we rank these for the fun of it, and see how off we are from he real wraith players," :P

So here you go! I've named this "Centaur Edition" because the other admins may disagree (again: out of all the admins, by far I run these the least), but as a quick note before we begin, here's what I'm ranking them on:
  • We are not ranking Dol Goldur Ringwraiths, mostly because 1) none of them can be mounted, so I feel like there are dramatic disadvantages from a combat perspective for these wraiths that are hard to overcome, and 2) because the whole, "We have 2 wounds, but we might come back from the dead" side of things complicates calculations for resilience, so I figure we can do a separate ranking for those in the future if you're interested (as my favorite of those is probably last on most people's lists).
  • We will consider the typical considerations (resilience, combat effectiveness, casting capabilities), but we will also look at efficiency: does the wraith offer options that are an effective/efficient use of their resources? Does their ability synergize well with what they are built to do? Because wraiths can look good on paper, but then find they are only good for 3-4 turns because they burn through Will Points too quickly.
  • We will not be looking at cost - they are all more or less the same cost, and inasmuch as they are not, it just means more investment if you want the benefits. So yes, that probably gives the Witch-King the biggest boost, but that's fine for this ranking.

And before you tell me, "Centaur, (fill in the blank) wraith is actually great because I played them once and won a match because (insert ability that totally worked and did good stuff for you)," yes: that does happen. That is valid, and I'm glad it worked for you! But I'm judging these based on how likely I think they will be in general to provide you with success, not on one-off exceptional performances. 

And with that, let's get to the rankings!


Friday, December 1, 2023

MESBG Christmas Lists, List #1: The Host of the Dragon Emperor . . . Revamped?

Good morning gamers,

Tiberius: We're doing something special for Christmas this year - I reached out to people across the international SBG community, and asked them to pass along a "Christmas list" that they ran this year and what they liked about it. The gentleman who is providing our first list needs no introduction (but I'm giving him one anyway): if you've interacted at all with the SBG podcasting community or spent any time at all on the GBHL Facebook page or their website, you know the name Harry Parkhill. Yes, it's the Ent, the myth, the Legend himself, bringing us a very fun take on a very dominant list in SBG right now - take it away, Harry!


Harry
: On the first day of advent, SBG game to me . . . "an army of Red and Gold a-gleam . . ."

It was March when I took my Dragon Emperor on his last outing before retirement. Clearly the fearsome general is an imposing sight on the tabletop, regularly reaching top tables and winning tournaments for the formerly pitiful Easterlings. The poor souls in Red and Gold had been unloved by so many for so long but the arrival of Rutabi, Brorgir, Acolytes and the Emperor changed that for certain.

Saturday, August 5, 2023

The Meta is Dead, Long Live the Meta

So next week, Tiberius will have a much more thorough, well-reasoned, dispassionate summary of the latest FAQs and Erratas that dropped on Thursday. 

But while you're waiting, allow me to be dis-dispassionate and express what we're all feeling:

Photo Credit: tenor.com (and The Wizard of Oz, of course)

So I have slightly mixed feelings about some of the changes that were made to a few popular lists (well, okay... one very popular ally choice). But overall, I'm like the rest of you: all my very thematic list ideas are overjoyed tonight that another round of power-creep fad lists have been restored to their proper place: history (or at least the niche pile).

In no-particular-order-of-overjoyness:


No more Lake-Town Spam (well, allied at least)

Like most of you, when I first read The Armies of the Hobbit, I took a look at the Army of Lake-Town, thought "man, that's boring," and kept right on reading. Then, like you, one day I was looking around for something cheap and decent to ally into something very large and cool and expensive (it's usually some sort of list with Gwaihir, isn't it?), and thought "hey, this is a VERY cheap way to get 50+ dudes who aren't complete duds in combat." And then I (like you, maybe) took them to a tournament, felt kind of guilty about it, and then forgot the guilt after kicking other people's butts with them.

Well, no more. At least mostly.

Monday, May 8, 2023

Defence of the North Inspired Lists: The Host of the Dragon Emperor Legendary Legion Revisited

Good morning gamers,

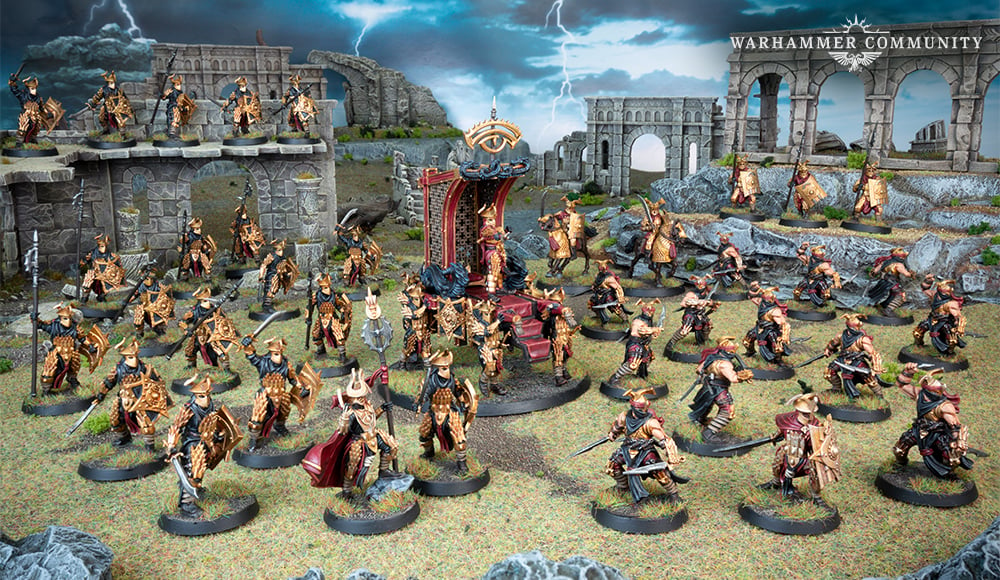
One of the most popular Legions from Defence of the North is the Host of the Dragon Emperor, featuring shiny new models that have revolutionized a faction that everyone loved to look at and no one thought was competitive on its own. If the measure of success for a Legion is making an uncompetitive force competitive, this Legion has clearly succeeded.

One would think that, if you were looking to take your scenario-play armies into Matched Play, the Easterlings would be a pretty good place to start (and since you won't have Amdur or Khamul in your force, you might as well run the Legion) - but when you ACTUALLY look at the models you need, you'll find there are a few problems in your usual list building choices. Let's see what we have to work with:
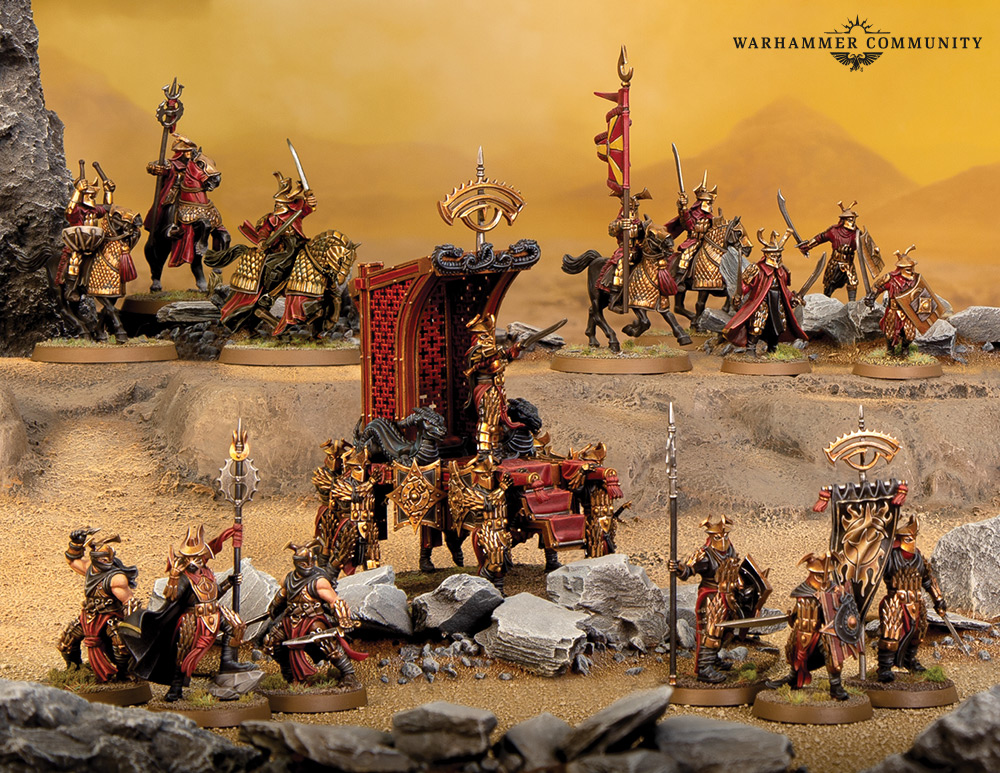
  • Brorgir the Conjurer and Rutabi, General of the Dragon Legion
  • Easterling Command blister
  • 30 Easterling Warriors (12 shields, 6 shields and pikes, and 12 bows)
  • 5 Kataphrakts and 1 Easterling Captain with armored horse, shield, and sword
  • 18 Black Dragons (9 shields, 9 shields and pikes)
  • 12 Dragon Cult Acolytes
  • 4 Rhunish Drakes
  • The Dragon Emperor
There are several things that we'd usually want in an Easterling Legion army that we don't have here - most notably, we have only 15 pikes and we don't have a war drum on any of our Kataphrakts (and none of them have been upgraded to Black Dragons). Like I did when I was preparing for the Defenders of Erebor post, I looked at this list of models and thought to myself, "Self, we have no drum and we need more pikes - this isn't going to work."

Photo Credit: Warhammer Community

I can't do anything about the lack of a war drum (not within the constraints of this series), but I did get lucky on the pike front. I knew right away that I was going to "cheat" and say, "I need two boxes of Easterling Warriors, so I'm going to use 8 shields and pikes instead of just 6." This is "better," but still not good. As I mentioned in the what-models-do-you-need post, however, I got a second boon on this front: in the second scenario, we need 12 Easterling Warriors with shields, 5 Easterling Kataphrakts, and 1 Easterling Captain with armored horse, shield, and sword - and THAT means we need 18 shield and sword guys. How many shield guys do we get in two boxes of Easterling Warrirors? Only 16. So . . . if we want all dismounts for all our Easterlings . . . we need a third box. :-) And THAT means we actually have . . . 12 pikes. With 21 total pikes to work with, let's see what kind of list we can build!

Monday, October 17, 2022

The Stuff of Legends: The Host of the Dragon Emperor

Good morning gamers,

If you've followed this blog for any period of time, you've probably picked up on something: I don't like Easterlings. I don't - I just don't. Or more appropriately, I didn't like Easterlings. I've heard others (like Matt from the Green Dragon Podcast) protest that Easterlings are not "just another version of Minas Tirith but with worse heroes" - but they are. They just are - or more appropriately, they were. With the release of Defence of the North, the Easterlings got three new heroes and two new warrior options - and while their depth chart isn't as developed as Mordor, Minas Tirith, Rohan, or Isengard, they got some key pieces to become a more competitive faction.

The chief among those improvements was the Dragon Emperor and to accompany this new (and very expensive) model was a new Legendary Legion that, in an astounding and brilliant move, didn't invalidate a "normal" Easterlings list. Yes, he'll probably show up in a lot of Easterling lists (and if you're running him, you probably take a good look at his Legion), but allying with Mordor or Khand (or just running them pure) isn't off the table.

The international community has seen this Legion run to deadly effect - especially in the hands of US-renowned player Matt Iverson - and so I've decided to set my personal biases aside, interview guys who love Easterlings (TMAT's own Centaur and Zorro, TMAT friend MinutemanKirk, and the aforementioned Matt Iverson), and give a fair shake to the Host of the Dragon Emperor Legendary Legion.

I will say that this self-proclaimed Easterling hater doesn't hate them anymore - and this Legion has single-handedly done that. Before anyone thinks I'm going to buy these guys, I will cite the $200 price tag on the Dragon Emperor as my primary deterrent to adding Easterlings to my already copious collection of models. Still, the Legion fascinates me - let's dig into what it does!

Part 1: What Do You Need?

Photo credit: Tumblr
Legion Tax: 170pts

In this Legion, you need to include the Dragon Emperor of Rhun, who comes in at a bargain 170pts. Heroes of Legend are usually not cheap (Theoden, Dalamyr, Suladan, and some builds for the Witch-King aside) and 170pts might seem like a lot, but considering that he comes with a banner and basically has a chariot mount, he's actually quite cost-effective. In the Legion, he doesn't pick up that many buffs - he gets a reroll on one of his dueling dice (two with his banner if his palanquin is still on the board) and gets to upgrade warriors in his warband to Black Dragon for free (nothing wrong with that at all - and when you factor the 36pts saved on the Black Dragon upgrades and the 25pt+ banner, he's closer to 110pts for everything else). Despite not gaining that much, he's the perfect centerpiece to your army and while slow and on a big base, he is integral to the success of (I'll go out on a limb here) any Easterling force.

Thursday, June 16, 2022

So...Let's Talk about That Dragon (Emperor)

Photo from Gamespot - still one of the best movies ever made

Hey Reader!

So Defence of the North is finally here! We've been hearing about this supplement for quite some time, and as someone who has collected Easterlings since 2012 and has wanted to collect Dale for quite some time (I like Erebor as well, just not a high priority right now), I am so excited to finally have my hands on this book! Shipping across the Pond takes a while, but grateful for the team at GW for their work to get it through customs to us.

One of the most previewed models from the supplement was The Dragon Emperor, with constant discussions about what his profile should look like, what his special abilities should be, and how to fit him into an army that already has good mounted heroes (Amdur and Khamul), good secondary damage heroes (Dragon Knights and now Rutabi), and the balance between mounted forces and an infantry pike block (oh, and archers - believe it or not Easterlings have archers, too). And as information slowly trickled out two things became clear:

First, they were trying to sell a new model. Now it should be noted that I don't mind this, as GW is a company, and they need to sell models. Totally down with him having bonkers stats and abilities both in-world as he's the best that the Easterlings will probably ever get, and also out-of-world from a business perspective. So I've got no issues with the mercantile reasons for making a new power hero for the Easterlings: everything checks out.

And second, and perhaps more so, he's a very interesting fit for Easterlings, serving as a "centerpiece" model (not that Easterlings lacked that before - more on that later) that has both offensive firepower and support abilities (not that Easterlings lacked that either, but we're getting ahead of ourselves).

So how does he hold up? Is he worth the monetary and points investment (as both are high: $190 USD and 170 points in-game)? And is he actually undercosted as some have claimed? Let's take a look.

Monday, May 2, 2022

In Defense Of: Easterling War Priests

 Hey Reader!


Today we're continuing the In Defense Of series, and Tiberius asked me to jump in and chat about the Easterling War Priest, as they have been a staple of Easterling army supports for a while, but now with the arrival of Brorgir there's a question as to whether you need these guys anymore in your army. I think you do.

We will start by looking at why people tell you not to take this model, then we'll discuss why you should take it, and then close out by discussing how to make it work effectively in your army list.

Why NOT To Take an Easterling War Priest

One of the first shamans I ever bought, painted c. 2012.
I really need to go back and redo these guys, XD

For starters, the war priest is unique among shamans in that it lacks control tools that other shamans typically have, and it costs more than shamans typically do for only marginally better stats. At F3 S3 the war priest is on-par with orc shamans, slightly ahead of goblin shamans, and behind uruk shamans, and yet it is more expensive than all of them. It still only gets the 3 Will Points, and while it has two spells like other shamans, instead of combining Fury with a control spell like Transfix, the war priest exchanges the control spell for a support spell: Bladewrath.

Bladewrath is a good spell: it increases the odds that a character wounds a target by at least 1 face, not to mention changes its Strength for the rest of the Fight Phase, so if you can sneak in an extra combat it lasts until all fights are resolved. The issue is that control spells are far more useful for neutralizing an enemy hero, as one round of maybe wounding someone on a better roll (as you have to win the fight first to roll to wound) is generally not as good as one round of a big hero not performing strikes at all.

And this doesn't even compare the war priest to shamans that get unique spells like Flameburst (with rechargeable Will, in the case of Kardush), Shatter, and Wither, all of which have their place and can dramatically change the battle on a 3+ (which is basically the same casting value as Bladewrath), often for a fraction of the cost of a war priest.

Monday, February 14, 2022

In Defense Of: Easterling Captains

A humble captain on foot, who is amazing when he's not alone

Hey Reader!

Today we're continuing the In Defense Of series, and Tiberius asked me to jump in and chat about the Easterling Captain, a model I've used a good bit. We will start by looking at why people tell you not to take this model (as well as the variant of this which is, "just take one for March," lol), then we'll discuss why you should take it, and then close out by discussing how to make it work effectively in your army list.

(Also, obligatory "Centaur isn't a great painter, and this army was first painted in like 2012, so he's getting back around to touching this one up to make it look better," :P )

Why NOT To Take Easterling Captains

So to start off, yes: many players will tell you, "Oh: just take one of these for Heroic March so that you can get to places faster." Here's the issue: 1) you don't always need to call March in a scenario (Contest of Champions comes to mind), and 2) even then, is that really the only reason to spend 50-65 points on a hero? So I want to start by saying I reject this premise: I don't think that's a good reason to spend this many points (sure: 40 points for a Moria Goblin Captain just to March the balrog is a great reason to spend those points), and I will not be using that line of reasoning in my discussion below.

If you come from this school of thought, great: chalk up one more reason to take these guys. But I'm not going to use that reasoning below, so feel free to lay some gravy on the horribly overbaked entrees you find below. :P

Thursday, February 3, 2022

Fyrd Formations: Breaking Shieldwalls and the Battle of Brunanburh

Good morning gamers,

Have you ever played a game where both you and your opponent brought S3 armies that were trying to crack through a D6 shieldwall? Is it frustrating to spend all of your game locked in the middle of the board trying to get an advantage over your opponent and failing? MESBG tends to reward armies for having high Defense (or compensate for having lower Defense by fielding far more models) - but how did armies historically break through shieldwalls? While the Svinfilking was a strategy in England, old poetry tells us a few other tidbits as found in an old song (filled to the brim with propaganda) about the Battle of Brunanburh.

In today's formations post, we're digging into the historical text (however accurate) and seeing what nuggets of wisdom can be found from the account. We'll then look at ways you can employ the strategies used historically to MESBG (which, as we all know, don't adequately reflect reality - but still). Let's get right to it!

The Battle of Brunanburh - How To Break Shieldwalls

If you have 12 minutes and want to see a visualization of the battle, check out the YouTube video from Baz Battles (the whole channel is great - I love their stuff). As a brief history lesson, King Aethelstan of the Anglo-Saxons was receiving tribute from the Kings of Alba (Scotland) and Strathclyde (western Nuthumbria), but the kings eventually joined forces (and allied with the Hiberno-Norse from Dublin) and invaded Aethelstan's lands. Aethelstan met them outside the city of Brunanburh and strove to become the first King of Great Britain by defeating their armies. The text we have of the battle can be read here, though I'll be highlighting excerpts from it below.

Monday, November 2, 2020

Mastering Magic: Fury

Good morning gamers,

We come to it at last - the final spell in all of MESBG. We've talked about damage spells (Sorcerous Blast, Area-of-Effect damage spells, and precision spells). We've talked about augments (auric bonuses, stat/resource restoration, magical protection, and damage enhancers). We've talked about debuffs (stat/resource reduction, neutralizing with Immobilize et al, and breaking gear). We've talked about spells that scatter enemy models.

Today, we wrap it all up with one of the first spells I ever used and the spell that (in my opinion) has changed the most from the Legions era to the current MESBG gaming system: Fury.

Ah, Fury. As I've stated in many posts, I got started playing the game with the Mines of Moria starter set and one of the first things I learned was that I needed a Moria Goblin Shaman - Goblins just can't charge Gandalf or gang-up on Boromir reliably without one (that, and they seem to run away a lot)!

Back then, Fury didn't require you to have a Will point to keep it alive - you just had to not lose a fight (which, if you were spear-supporting from the second rank OR standing in the third/fourth rank, was pretty easy to pull off). Even if your opponent had a Ringwraith who could cast Sap Will on you and you lost all your Will, the Fury train kept on chugging. While it was active, all models of the same race as the caster passed all Courage tests and got a 6+ save against all wounds.

When the Hobbit SBG system redid the way magic worked, Fury became dependent on having a Will point in your store. Like the previous version of the rules, friendly models of the same race passed all Courage tests and got a 6+ save against all wounds, but you could channel the spell to improve that spell to a 5+ save. Moria didn't have to do this, as they could take Groblog (whose crown made Fury give a 5+ save so long as he was on the board).

In the newest edition, things have changed yet again - let's look at what Fury does, and to help me with this discussion, I've asked the other members of the TMAT team to help me out a few things based on their experiences (and if you haven't heard our podcast on Evil Spellcasters, I highly recommend you check that out for our extended discussion on Fury).


What Does Fury Do?

Fury is an exhaustion spell that is cast on the caster himself and affects all friendly models within 6" of the caster that have certain keywords (specified by the spell). For the most part, these keywords match the race and affiliation of the caster (Mordor Orc Shamans have "Fury (Mordor Orc)" and so won't help your Black Numenoreans - who aren't Orcs - or your Cave Trolls - who are not Mordor models). Affected models automatically pass any Courage tests they need to take. If channelled, affected models may roll a die for each wound they are dealt and ignore a wound they would have suffered for each roll of a 6 they get.

Monday, October 26, 2020

Mastering Magic: Augmenting Damage Spells

Good morning gamers,

We've only got two more posts left in this series - and today we have some really fun spells: Bladewrath, Enchanted Blades, and Enrage Beast. These three spells are held by only five models - three with Enchanted Blades and two special models who alone have Bladewrath and Enrage Beast. While we've looked at spells that do damage (either as a blast, in an area, or to a single model), restore stats/resources, remove stats/resources, protect friendly models from magic, breaking items, neutralizing enemy combatants, scattering models, and provide auric benefits (either by enhancing nearby models/the caster OR by scattering models), today's spells are the only ones that make you more lethal in combat (though I guess a channelled Shroud of Shadows counts as well).

Fair warning, I only have two of the models in this list, so pictures will be scarce . . .


What Do These Spells Do?

The most common of these spells is Enchanted Blades. When cast normally, the caster picks a friendly model within range (6" for all of them) and if cast successfully, the model is allowed to reroll all failed To Wound rolls it makes. When channelled, the target model also receives a bonus of +1 To Wound (which is cumulative with similar rules, such as the bonus provided by using a two-handed weapon or having the Backstabbers/Hatred special rules).

Bladewrath allows a caster to pick a friendly model within range (6" as well) and that model makes Strikes in the Fight phase at Strength 6. If channelled, this is improved to Strength 10. It's important to note that the model itself doesn't become S6/S10, but rather resolves Strikes at S6/S10 (otherwise, this would be a great counter to the Rend/Hurl Brutal Power Attacks or special rules like Monstrous Charge).

Finally, Enrage Beast picks a friendly Bat, unridden Warg, or Spider model within range (12" this time) and increases the target model's Fight, Attacks, Strength, and Courage values by 2 until the End phase. Because this boosts the model's characteristics, this IS a good counter to the Rend/Hurl BPAs and rules like Monstrous Charge. When channelled, the target's characteristics are increased by 3 (instead of 2). While this is a powerful augment, the friendly model then suffers a S10 hit at the end of the round because of how exhausting being awesome can be (most models will be wounded on 3s - which still means a 33% chance of avoiding any damage at all).

All three of these spells are useful - especially if you are using units that "have problems wounding." Adding someone who has these spells can increase your overall damage, but picking the right model to augment is often the difficulty with these spells (and making sure they stay within range). To help with this, let's understand who has these spells and how best to use them.

Monday, October 19, 2020

Mastering Magic: Call Winds and Instill Fear

Good morning gamers,

Well, we've been plowing through magical spells for a while now, but we come today to the last spell in the arsenal of MANY evil spell-casters (causing us to wrap up a LOT of models today). While Ringwraiths (and other evil casters) have neutralizing spells in the form of Transfix/Compel, a precision damage spell in Black Dart, and the ability to reduce enemy resources/stats via Sap Will and Drain Courage (the Witch-King also has access to Your Staff is Broken), Ringwaiths have a very iconic spell in the game that can scatter enemy models: Instill Fear.

While Instill Fear is a good scattering spell, we'll be talking about a more precise scatter spell as well: Call Winds (which is only available to Galadhrim and High Elf Stormcallers).

Nazgul: "I'm casting Instill Fear - SCREEEEEEEEECH (or is that Transfix now? oh well, whatever!)!"

What Do These Spells Do?

Instill Fear is an area-of-effect scatter spell that affects all models within 3" of the caster (not because the spell says it's 3", it's just always 3" for all the models that have it). All enemy models within 3" of the caster have to pass a Courage test or make a full move directly away from the caster (or until they run into something/someone) and are afterwards unable to move (basically, they run in fear). If channelled, the models that test for Courage have to roll three dice and use the lowest two dice (which, if you haven't seen the math for it, is pretty brutal for anything that is below Courage 5 - and even C5 models are only 60% likely of passing). Add to this that most models with Instill Fear have some kind of Harbinger of Evil/Ancient Evil special rule attached to them, models really have to be Courage 6 to have a better-than-not chance of passing this channelled spell . . . ouch.

The models test in the order the caster wants, so it's pretty common to test with the models furthest from the caster first, then working your way inward. You can cast this spell a few milimeters from a model (aka within an enemy model's control zone), but after the scattering, you will need to complete the charge against whatever model you entered the control zone of first.

Call Winds is a precise scatter spell, targeting a single model and pushing that model back D6" (2D6" if channelled). The model stops if it hits an obstacle (but not models) and is Knocked Prone. Unlike previous versions of the game, models aren't forced to stay on the ground for the rest of the turn (which is sad). Like Sorcerous Blast, the Strength of your target doesn't dictate whether the model can be knocked Prone - anyone is fair game. This spell is different from Sorcerous Blast in two ways, though: first, this spell doesn't knock any other models Prone if they're in the path of the scattered model. Second, no damage is done to the target (or anyone else the model would pass through - even when channelled). While not a damage spell, it certainly changes the way an enemy model can behave for the round (and usually the next round as well).

Monday, September 28, 2020

Mastering Magic: Precision Damage

Good morning gamers,

Today is our seventh post in our series on magic and we turn our attention to spells that do precision damage (that is, damage to a single target). While we've already covered Sorcerous Blast and area-of-effect spells, these spells require a lot of thought to use well - just plucking off a Wound here and there or sniping a random warrior could leave you drained by the end of the game without doing enough for the cost you pay. The spells we'll be covering today are the feared Chill Soul, the deceptively alluring Black Dart, the cool (mostly for Kardush) Flameburst, the very-much-hated Paralyze, and . . .

BANISHMENT!!!! Credit: Quora.com

As I was preparing this post, I didn't see a lot of places that needed pictures, so I've passed on them again. Call me lazy, I guess.

What Do These Spells Do?

Two of these spells do Wounds: Chill Soul does 1 Wound against whoever the target is (need to specify if the mount or rider is the target if the model is a cavalry model), while Banishment does 1 Wound against a target Spirit model. If Chill Soul is channelled, you add 6" of range to the spell, which means you'd only want to do this if you need that range (more on this later). Banishment moves from doing 1 Wound to doing D3 Wounds against your target. This could mean one-turn-killing many Spirit models in the game (even if they pass all their Fate). As has been discussed in previous posts, sometimes that D3 roll will still result in a single Wound - whatever.

Two of these spells do Strength-something hits: Flameburst does a Strength 6 hit (which is a pretty decent hit - any model in the game will be wounded on a single die, most warriors will be wounded on a 3+ or a 4+, heavily-armored troops and most combat-oriented heroes will be wounded on a 5+), while Black Dart deals a Strength 9 hit (which will wound most things on a 3+, really tough things on a 4+, and Sauron on a 5+). While you have to specify the mount or rider for Black Dart, Flameburst damages both mount and rider.

When channelled, the Black Dart deals D3 hits instead of one hit, which (again) means that sometimes your channel will do absolutely nothing because you will roll a 1 or 2 and end up doing 1 S9 hit. Flameburst, when channelled, adds Set Ablaze to the target (mount and rider), which deals an extra S9 hit and a S5 hit at the end of each turn until the model a) lies down and crawls (aka, chooses to be prone for a turn), b) walks through water (aka, risks drowning or is entering difficult terrain), or c) dies. This can be REALLY useful at forcing an enemy hero to step away from the fighting for a turn or two, but more importantly, this will make whoever you're facing think twice about whether their hero can just press through and kill stuff. 

Finally, Paralyze on its own doesn't do any damage, but functionally, models that are Paralyzed will take damage from whoever charges them. As we discussed in our podcast on evil spell-casters, when you choose to cast Paralyze, you need to make it count - charge that model with strong stuff, beat the model into a bloody pulp, and move on. Paralyze, at the moment, cannot be channeled - it's channelled version is cool, but not game-altering (each turn the model is Paralyzed, they take a S5 hit - this would be really good in some cases, but since most of the targets for Paralyze tend to be big models that you don't want to deal with, you probably aren't wounding on better than a 5+ each time).

Monday, August 10, 2020

Historical Formations in MESBG: Tercios, Testudos, and Cantabrian Circles

Good morning gamers,

Before we begin our series on magic, I thought we might take a short digression into a really fascinating thing I’ve been trying in my games recently: trying to replicate real-life military deployment formations in the MESBG system. Yes, not all things are reflected the way they work in real-life in the MESBG system (pikes don’t get any bonuses against cavalry models, for example), but the principles of real-life tactics should be able to be applied at least in part to any kind of tactical deployment game.

If you read my post on Shieldwall, I went through a few different historical formations that can be used in certain situations by units with Shieldwall (Schiltron, Warped Wall, English Formation). Those real-life examples got me thinking about how you can use other real-life formations to better effect in MESBG (or if they even work). Today, we’ll be looking at three different formations – the Spanish Tercio (mixed melee/ranged infantry formation), the Testudo (melee infantry formation), and the Cantabrian Circle (skirmish cavalry formation).

Monday, July 6, 2020

The Bare Necessities, Part XXVII: Khand

Good morning gamers,

As we continue the part of the series where we discuss armies I don't intend to collect, we will be looking today at the Variags and Khand and how you can run these lists with a balanced list in mind. Khand has some really cool mechanics that, by all rights, I should love (as many bows as you like so long as they're mounted on horses, fairly inexpensive heroes with lots of bite, and chariots that run things over). The drawback, of course, is the expense to get started collecting (though chariots can be acquired from various historical ranges and Khandish warriors look a bit like Samurai or Ashigaru troops). 

Credit: Scott's Wargaming

Money for me is a huge factor in what I collect - I might be willing to drop $200 on an army over time, but if getting to a starting place costs $200+, I'm probably not biting (and with a single chariot costing more than $40 at the moment and the horsemen coming in metal blisters, this army won't be on my radar . . . ever). Still, Khand is pretty popular and you can learn a bit about these guys online (the Green Dragon Podcast featured a discussion on Khand - check that out, they interview a Kiwi who has had great success with them).

While I have never run Khand and never fought Khand, my good mate MinutemanKirk (as well as someone I met in a Facebook SBG group) was willing to answer some questions on Khand for me. Here's how our discussion went . . .

Interview Questions with MinutemanKirk and JS (some edits for clarity by Tiberius)

T: Is there ever a time you would run Khandish infantry?
MK: Alright, so I expounded a little bit on my guest blog post. I don't think Khand is a very viable army on its own (right now anyway, fingers crossed for more units/heroes!). I think the situations I would run infantry is if I was trying a horde approach, didn't have the models for more mounted units, or wanted to have a scrub unit for holding down objectives. None of those, apart from not having enough models, are compelling enough for me to run Khand infantry en mass.
JS: No. Never. Except for scenarios or when there are a few points left to boost numbers in warbands. Basic thinking does not work on Khand - your Khandish Horsemen are your infantry and your Khandish Chariots are your real cavalry.

T: Since you can run Khandish Horsemen with an unlimited bow limit (assuming you keep your army bonus), are these horsemen good to run? If so, how many do you run (and what is the ratio of horsemen to chariots)?
MK: Khand cavalry are surprisingly efficient: Fight 4, Strength 4 (using Piercing Strike), and a bow for only 13 points. It allows them the flexibility to be pure skirmishers (although Serpent Horde would be a better choice for that) while also enabling perfectly legitimate melee attacks. The problem with focusing on skirmish while also wanting to use chariots is chariots are inherently NOT skirmishers with their unique movement rules: you can't just stop and run away if the enemy makes a run at you. Their movement rules also make it difficult to skirmish wit chariots on terrain-heavy or other movement-restricted boards. If I had unlimited time and money to run a Khand force, I would probably go for a 2:1 or 3:1 rider to chariot balance. Chariots are great, but they need a little screening and when one or two go down, it leaves a massive hole in the line (and a thirty point loss each). Despite the in-the-way requirement, I've found charioteers are extremely squishy.
JS: Typical warbands would look like this: 1 Khandish King on Chariot + 1 Khandish Charioteer + lots of horsemen. Repeat, repeat, repeat.

T: Chariots are awesome, but how do you keep them from running into each other? Are there issues you've ever run into when facing armies that feature Command/Compel?
MK: I've never had an issue with them running into each other, but then I've also never run more than four chariots at a time. You want to avoid getting them in a column formation whenever possible, because, if a chariot doesn't kill something, the whole column stops. Avoid that and it's relatively easy to avoid friendly tramples. I've also not had an issue with Command/Compel as long as it only comes from a single caster. When using Easterlings with Khand, most opponents either can't get to a chariot before it gets into close combat, or is focused on neutralizing Amdur/Dragon Knights. So far as I understand the rules, even a Command/Compel must follow their movement rules. Thus, if you get a chariot into close combat, a Command/Compel isn't worth the effort since you'll be running over your own guys anyway. (T: so far as I know, that's correct as well - more on this discussion in a few weeks, :-) ).
JS: Your chariots are your cavalry. You want them on the flanks to crush enemy static lines (having them bruise over bowmen blocks is very efficient). Well played, they will never touch each other. You should have on each side one Charioteer/King on Chariot. Your anvil line is composed of your cavalry, shooting while moving, then crushing with Piercing Strike the enemy lines while your Chariots are disturbing spear supporters.

T: Is it worth taking bows on your charioteers instead of axes?
MK: Personally, I would never take a chariot with a bow to skirmish with.
JS: No, never. You want them to run over enemies, then in melee use Piercing Strike. Even if the enemy wins the fight against you (which is not that easy with Monstrous Charge and your 6" banner from the King) he still needs to overcome your shield (your Chariot). Classic charioteers should pick up softer targets. Your King has to deal with the heavier heroes.

T: Any additional thoughts?
MK: Kings are always better to take than Chieftains unless you don't have the models or you don't have the points. You absolutely lose nothing (King's have Heroic March too), and the extra Attack and Defense in close combat are literally lifesavers.
JS: Khand can't do a spear-and-shield formation, but it's best not to find a work around for this - work with what you have. Yes, it is a very non-classic play style, but played correctly, it can be even stronger.

Thanks guys - we'll be looking at a list I derived from this discussion, with a few lists from MinutemanKirk (and a follow-up post from me) at the end of the post.

Monday, June 29, 2020

The Bare Necessities, Part XXVI: The Easterlings

Good morning gamers,

We've recently viewed the factions of Barad-Dur and Arnor and how you can run these lists with a balanced list in mind. Today, we continue observing lists I don't intend to collect by looking at one of the most iconic armies in the game, beloved by one of the largest fan-bases in the game, and often critiqued for "not having enough teeth" by everyone in the game (especially its fan base): the Easterlings.


I don't like Easterlings - I've made that abundantly clear in numerous posts. That being said, my son has taken a fancy to Easterlings, and far be it from me to crush his little dreams and aspirations. So, I reached out to our resident Easterling players to get their feedback on how you'd build an Easterling army with a balanced list in mind. My good mate MinutemanKirk has already shared thoughts on Easterling list builds, so check that out if you haven't already read it. Below are some tailored thoughts from Centaur.

Easterlings List Building Principles with Centaur
  • Fast Models: So, the natural option are kataphracts; while they are heavy cavalry they do move at 10", but what makes them unique is that you can take a drum on your cavalry. This, as far as I know, is the only civ that has this option. So you can save Might by not calling Heroic March, or move even faster by calling Heroic March. And since all of your heroes work well mounted (personally I don't like mounting war priests, but you could), this could also be filled by your heroes if you don't want to buy a ton of kataphracts.
  • Banners: You can take banners on foot or on horseback, so plenty of options for banners. And at c. 32-34 pts [if you put the banner on an Easterling Warrior], not that expensive either.
  • Models: With most of your infantry costing 8-11 pts, and even your cavalry only costing around 14pts, it's not hard to get numbers with an Easterling Force. The fact that your captains only cost around 50-55 pts also helps (assuming you're not mounting everyone).
  • Ways to Neutralize Enemy Heroes: You have two really good neutralizing options on its face: Khamul (for Transfix and Compel, not to mention area denial in case you mount him and they don't want to be charged) and Amdur (free Heroic Strike if an opponent calls one, and F6 with an elven-made weapon if they don't call one). In addition, though, with heroes who are hard to knock down and the ability to pike support, they also reduce the kills a hero/monster gets in a match and forcing the spending of more Might, which I would contend is a way to neutralize heroes.
  • Ways to Augment Your Models: This is primarily done by heroes: war priests provide both Fury and Bladewrath and Amdur provides a banner rule. Naturally you have drums and banners among the warrior options, but that's about the extent to which they augment their models. So not a lot of options, but the options they have are what the army needs.
Thanks guys - we'll be looking at Centaur's Easterling list (it's a pure list), with other lists following at the end.

Monday, November 4, 2019

Last Month on TMAT... (October 2019)


October's in the books, which is hard to believe. If you, like me, found yourself with a busier month than you planned and haven't had a chance to catch up on TMAT's content, we've got it all for you in one convenient location!

Wednesday, October 2, 2019

Axes and Shields: Easterling Tactics in MESBG

Hey Reader!

A few weeks ago we got a question on our Easterling army post from Memento, who noted that he was having trouble keeping up with kill count with Easterlings, as they have some of the fighting stats and capabilities of Gondor, but with less power units (and, when you consider the heroes that Gondor has access to, that makes a lot of sense). And truthfully, this has always been a problem in our gaming group, and I suspect across the globe: how do you kill stuff with Easterlings?

Some have just teamed in a power hero or an alliance (Shagrat has made an appearance in our group, and Khandish chariots are a natural choice), but in today's post I want to stick with a fully Easterling force for two reasons. First, I don't know what models you have access to, so I'll plan on you just having access to Easterling models. Second, I don't want you to think, "Easterlings have a massive flaw, so I need to supplement it": Easterling just fight differently from other forces, and that's something that it took me a while to discern.

Easterlings are a very forgiving army, with D6-7 on most of your units so you don't die easily (and even against units that wound on Courage, you're sitting on C4+ for everyone, and +1 after your army breaks). What frustrates Easterling players is that, while their army can hold in a slog against most everyone, they can't kill things very quickly, which results in a brutal loss after a valiant attempt to hold the line. And that's what we're going to address today.

So let's begin with the nuances of how Easterling combat differs from other groups, and then discuss some specific tactics and unit combos to make this happen.

Saturday, September 14, 2019

Armies of Middle-Earth SBG: The Easterlings in the Middle-Earth Strategy Battle Game

Photo Credit: Warhammer Community

Updated September 2023: Having wrapped the forces of good at Pelennor Fields (MinasTirith, Rohan, the Fiefdoms, the Rangers of the North, and the Dead of Dunharrow [coming!]), it’s time to get evil again. While Mordor took center stage, they had a host of allies at their beckon call. Today we look at their heavily-armored allies from the north-east, the Easterlings of Rhun (even if they only made a single, brief cameo).

I’ve always liked the look of Easterlings aesthetically (like I’ve said before, I’m a sucker for heavily-armored infantry of any kind), red-gold color palate is remarkably rich. They’ve been a staple in the TMAT group for a long time (check out our pre-MESBG resources at the end), one of my sons has played them extensively in Battle Companies (chosen solely because of the Rhunish Drake), and in 2022 the faction got several major additions in the Defense of the North supplement... so yeah, they're in a really good spot now. Marshall the gleaming  horde!

Army Quick(ish) Hits
  • Strength: Combat Heroes with Renewable Might. There aren’t that many that can field multiple three-attack heroes, and the ones that can almost always have to field a bevy of expensive named legends. They’re the armies you expect: The Fellowship (Aragorn, Boromir, Legolas, Gimli), Thorin’s Company (Thorin, Dwalin, Gloin, Dori), Erebor Reclaimed (Thorin, Dain, Dwalin, Gloin, Nori, Dori), the Army of Thror (Thror, Thrain, young Thorin, Dwalin), Thranduil’s Halls (Thranduil (usually), Tauriel), the White Council (Elrond, Glorfindel, Celeborn, Galadriel), Azog’s Hunters/Legion (Azog, Bolg, and potentially Ogres/Trolls), the Three Trolls (all the trolls), Minas Tirith (Aragorn, Boromir), Rohan (Eomer, Theodred), Rivendell (Gil-Galad, Elrond, Glorfindel, the twins (sometimes)), Ents, Khazad-Dum (Durin + King’s Champions), Moria (Balrog, Dragon, Drake, Watcher, Cave Trolls), Isengard (Lurtz, Mahur), Barad-Dur (Sauron, Witch-King, Troll Chieftain, Mordor Trolls), The Serpent Horde (Suladan and Raza), Angmar (Witch-King, Burhdur, Cave Trolls, usually Ghulavar), and of course Mordor (Witch-King, Khamul on Fell Beast,** Shagrat, Zagdush, Mordor Troll Chieftains, Mordor Trolls, and Gorbag sometimes). The Easterlings are on that list, too, with Amdur, Lord of Blades, Dragon Knights (plus Khamul, if you take him on Fell Beast and take the +1 Attack buff each turn), and now Rutabi and the Dragon Emperor. Plus, the fact that Dragon Knights aren’t named heroes means you can take as many of those 3 Attack heroes as your points level will allow (most other lists can’t do that, though there are some exceptions). Amdur has a fantastic stat line for dueling enemy heroes: Fight 6, Strength 4, Defense 6/7 if mounted, 3 Attacks, 3 Wounds, and 3/3/1 Heroic Stats with Heroic Strike, plus an elven-made hand-and-a-half sword for winning those crucial drawn combats. The Dragon Knights have a pretty good stat line as well (Fight 5, Strength 4, Defense 6, with 3 Attacks, 2 Wounds, 2 Might, and Heroic Strike), and are very inexpensive points-wise even when mounted on armored horses (cash-wise is a different story). Unyielding Combat Stance is great on Amdur and the Dragon Knights in case they get charged by a cavalry model or have their horse shot out from under them (4+ save whenever knocked prone, even if Knocked Flying), but the star of the show is Blood and Glory, allowing them to regain a Might point any time they slay an enemy hero. Given their stat-line, a Dragon Knight should be able to deal with most generic captains with ease, and Amdur (who gets to counter-call Heroic Strikes for free, thanks to The Lord of Blades) is a striking machine. Last but not least, those 3 Attack Striking Dragon Knights can shield, even though they have no shield (Shield of Blades), which can make them very difficult to chew through.