Featured Post

The Scouring of the Shire, Part 2: The Ruffians Arrive

Good morning gamers, We're back for scenario two of the Scouring of the Shire campaign and today Bill Ferny is back, leading a ragtag ba...

Monday, November 27, 2023

Nemesis: How to Fight Against the Goblin King

Good morning gamers,

Today is our last post (for now) in this series on how-to-fight-against-those-models-that-are-not-fun-to-fight-against. Our contestant today is a model that I have never used, but have had to face many, many1 times: the Goblin King. Yes, it's the dreaded monster from Goblin-town and all his lovely entourage! While this post will be focusing primarily on the Goblin King himself, there will also be thoughts on the other models that are in his list, since their presence make him MUCH more difficult to deal with. Let's get into the discussion of one of the nastiest profiles around!

What Makes the Goblin King So Hated?

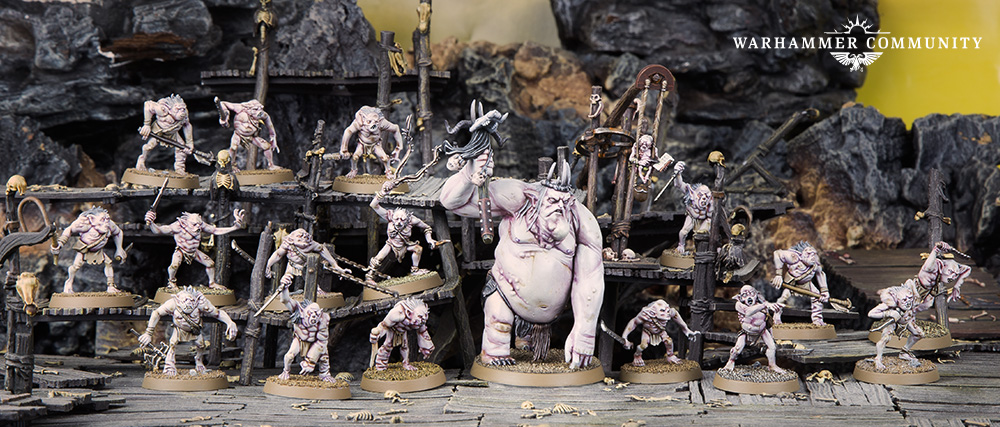
There's a lot to unpack with this guy, but it's probably best to start off with his combat profile. The Goblin King has a pretty mediocre stat line compared to most monsters, but it's a lot of the numbers you want - Fight 6 with Strength 5/3 Attacks is incredibly good for most heroes in the game, and with 3-Might-and-Strike, you're at least on-par with other heroes. This is made even better by his two-handed pick and the Burly special rule, which allows him to be S5-6 with +1 To Wound - at effectively S7-8, he's doing as well or better than most monsters in the game!

Photo Credit: Warhammer Community

Many of the monsters who rival him (The Balrog, Smaug, Dragons, the Watcher in the Water, Cave Drakes) have really big bases, but the Goblin King has a 40mm base (on par with Buhrdur, Sauron, and Cave Trolls - the Troll guys are envious of this guy's profile and Sauron is . . . really expensive in comparison). This gives him incredible mobility, especially since he's got the Relentless Advance rule, that allows him to move through his own models and squish/potentially squish them to get where he wants.

The greatest critique of the Goblin King can be based on his defensive stats, but even here, he cheats: he's "only D5" with 3 Wounds/1 Fate, but thanks to his Blubbery Mass rule, any wound he takes that isn't caused by a magical power or an Elven-made weapon can be saved on a 3+ BEFORE he has to spend his Fate point. While there are models out there with 6+ saves (the Bears in their Legion, Durin, Fury/Oblivious to Pain) and even one model who can give out a 5+ save (Malbeth the Seer), getting a 3+ save is not only BETTER than having infinite Fate points, but is only comparable to Thror with the Arkenstone (which will save once on a 3+ and can save multiple times on a 4+) and Goroth's "Look Out, Sir!" rule that allows him to bounce a wound onto a friendly model nearby . . . which is good for Goroth, but not great from his friends. Yep, when it comes to shrugging off punishment, there's no one who does it better than the Goblin King.

Saturday, November 25, 2023

Fantasy Fellowship Deep Dive, Part 7

Good morning gamers,

There's only one scenario left in Fantasy Fellowships: The End of All Things. This scenario is nuts: it's massive, it takes all day to play, and it has a lot of rules. It's also weird because . . . the part of the board that has virtually all the models on it doesn't matter that much - and both players have a lot to think about on one board and a lot less to think about on the other. So, let's unwrap this mega scenario and see what's important for our Fellowship members as they finish their journey together!

Part 7: The End of All Things 


With the exception of Boromir (which I feel was a missed opportunity), we've got everyone - Frodo and Sam haven't had a rest point since Ithilien and everyone else is coming off the bench fully rested - but boy do we have our work cut out for us! Here's who we have to work with: 

  • All eight remaining Fellowship members 
  • Eomer (no extra gear) 
  • 25 Warriors of Minas Tirith (standard war gear and a banner guy) 
  • 25 Warriors of Rohan (standard war gear and a banner guy) 

Opposing us are the following models - many of them we've fought in the previous part: 

  • Mordor Troll Chieftain (new kid on the block) 
  • The Mouth of Sauron on armored horse (another new kid) 
  • Gollum (NOT Smeagol, but basically the same profile) 
  • 3 Morannon Orc Captains with shields 
  • 50 Morannon Orcs (48 with standard gear and two banner guys) 

Oddly enough, there are actually MORE Good models at the start of the game than evil models - but as is usually the case, Evil gets to bring back its Mordor Orc models that are killed (Morannons and Morannon Orc Captains), so you'll be outnumbered eventually.


Thursday, November 23, 2023

Fantasy Fellowship Deep-Dive: Ranking Sample Fellowships

Good morning gamers,

We've spent the previous four posts in this deep-dive analyzing which models have been ranked the "best" for each of the different roles of the Fellowship in Fantasy Fellowships. One of the things I liked the most about the Quest of the Ringbearer supplement was seeing the example Fantasy Fellowships at the back of the book from the design team. Naturally, I figured it would be good to wrap up this discussion of Fantasy Fellowships by viewing those sample lists (which were released before everyone started playing Fantasy Fellowships - and before the release of the models that were introduced in Defence of the North) and "ranking" them based on how their selected models did in my analytic model.

A quick note: some of these Fellowships were formed with specific themes in mind - they were not made to be optimized. Fantasy Fellowships don't need to be optimized at all (my Fellowship worked pretty well, but I didn't optimize it very much - heck, I could have fit 25 more points in it without dropping Sting/the Mithril Coat from my initial Fellowship!), but this ranking is intended to view how well these Fellowships are optimized (even if optimization wasn't in the creator's mind) according to the analytic model I built as a means of comparing what the creator wanted to use and what is actually required of the unit. With fun and much charity in mind, let's dig into it!

Contestant #1: Rob Alderman
  • Ringbearer: Young Bilbo (#2, 2.433)
  • Companion: Balin the Dwarf (#14, 1.933)
  • Friends: The Master of Lake-town and Alfrid (#16/27, 2.517/1.917)
  • Wizard: Radagast the Brown [with Sebastian?] (#1, 3.5)
  • King: Beorn (#7, 4.25)
  • Shooter: Tauriel (#28, 3.7915)
  • Fighter: Gloin the Dwarf (#44, 3.4165)
  • Doomed: Kili the Dwarf (#51, 3.322)
We're not told which character plays Merry or Pippin, so I'm going to assume that Alfrid will be taking the Merry slot (since the Master will be slightly better in the Minas Tirith scenarios, seeing as how Alfrid can't give anyone Might and only has 1 Attack). Radagast and Bilbo are excellent choices and Kili (like many characters) scored pretty well as a Boromir character (though his numerical ranking doesn't reflect this). Balin is useful, though I do question how two 1A characters will fare late in the campaign.

The choice of Beorn (who is great in the Aragorn slot - whether he can change forms or not), Tauriel (who isn't a better archer than many of her competitors but is excellent in scenarios where you'll be outnumbered), and Gloin (both versions of him are good) are excellent, netting Rob a good final utility score of 27.08. When I dropped these guys into my spreadsheet builder, I noticed that Rob has only spent 745 of his total 750pts, so I assumed that he started Radagast with Sebastian instead of starting Bilbo with Sting. This is a great Fellowship to start with and, assuming Bilbo and Balin don't get eaten by Shelob, I think this Fellowship has a good shot at making it to the end.

Monday, November 20, 2023

Nemesis: How to Fight Against Mumakil

Good morning gamers,

One of the great things about collecting the models I need for the Quest of the Ringbearer sourcebook is that I "need" to buy not one but TWO Mumaks. After having gotten a second-hand Mumak from Centaur (a kingly gift, indeed), I decided to play around with them this year. Our gaming group has actually had a Mumak or two in the mix for a while, but they rarely show up on the table - and the fear of them showing up is often enough to get into the heads of even the most veteran players. So what can you do against such beasts if you see them (especially if there's more than one of them on the table)? Well, these things might not be viewed as competitive options, but they certainly do pose problems to unprepared players - so join us today as we walk through why these things can be deadly (and how to beat them). Let's dig in!

What Makes Mumaks So Hated?

For a refresher on what Mumaks do, you should check out our article from earlier this year on how War Beasts work - it was informative for me to write and hopefully will be informative for you to read. It's no secret - the most dangerous thing about a Mumak is that it Tramples. The Trample rule for Mumaks in particular is nasty - at least three Strength 9 hits to everyone it comes into contact with! If you pay 20pts for the Tusk Weapon upgrade (or have the Mumak War Leader, who begins with the Tusk Weapons upgrade), you increase this to four Strength 9 hits - which may seem like overkill, but it's surprising just how many times not getting that elusive 3+ crops up. 

Photo Credit: Warhammer Community

Since both the rider and the mount take these hits if it's a cavalry model, it's not hard for most heroes in the game to be killed or very much crippled after a Mumak runs into them. There are some monsters who are less worried about being outright killed (like Sauron, the Balrog, or Smaug), but even THESE guys don't want to be battered by a Mumak over multiple turns - and if it's the Mumak War Leader doing the trampling in the Grand Army of the South Legion, he's quite likely against these specific monsters to be able to call a free Heroic Strike . . . that may not be a guarantee of tying/beating their Fight Values, but it's certainly possible for that Mumak to be higher than F5.

The second complicating factor of Mumaks is that the Mumak itself and its howdah are listed as Siege Targets. Great Beasts of Gorgoroth have been clarified to be battlefield targets, so any siege weapon that can get a direct hit on them and scores a single wound will kill it in one go - OUCH! Mumaks . . . not so much. A 10-wound Mumak will require 10 wounds in order for it to die (for most siege engines this is an expected 22.5-60 turns, depending on the siege weapon being used - the Minas Tirith Bolt Thrower is the only one that can do it in less than 10 turns, but it also has the shortest possible range) - most siege engines aren't going to have that kind of time on their hands. While siege targets aren't harder for normal bows to wound, any D7-8 target (depending on whether the Mumak has the Tough Hide upgrade or not) is going to be hard to bring down with shooting - and if it's good shooting, you can't target the darn thing once it's Engaged with a friendly unit.

Thursday, November 16, 2023

Fantasy Fellowship Deep-Dive: Optimizing Your Characters, Part 4

Good morning gamers,

In our fourth and almost-final post in this mini-series, we're covering who are the "best" characters to fill your Aragorn, Legolas, and Gimil slots in Fantasy Fellowships. Obviously, you should run the models you like - and there's nothing wrong with picking whoever you want - but we're going to look today at the models I think are the most optimized to perform well against the opponents we're actually going to face in Fantasy Fellowships. These three characters have to do a lot of the killing work - and they're almost always going to be together. As a result, there are going to be options for who takes what slot, but only minor situations where the hero you choose for one slot will be better than an option in another slot. Let's start off with Legolas and Gimli.

The Helpers - Scoring Criteria

As we discussed last time when we looked at the Boromir character, the Legolas and Gimli characters need to be pretty competent fighters - they're going to have to fight Wargs, Goblins, and Uruk-Hai Scouts, of course, but they also need to be able to fight Warg Riders, Uruk-Hai Warriors/Berserkers, and Morannon Orcs. While you can rely on your Boromir character to "just handle the grunts," your Legolas and Gimli characters probably need to be capable of handling the bigger foes on the board as well (a Wild Warg Chieftain, a Cave Troll, the Balrog, and a Mordor Troll Chieftain - all of whom cause Terror and are properly big). As such, there's going to be some overlap with our requirements for the Boromir character, but our bar is going to be higher because we're not mostly fighting F2-3 foes.

Dueling Profile

The dueling requirements are going to be stricter this time, since we know that the Legolas and Gimli characters will need to face a lot more Uruk-Hai than the Boromir character does - and boy is the Deeping Wall scenario harrowing! As such, we're going to require that models reach a minimum of F5 and 3 Attacks if they want full marks, have F5 with 2 Attacks OR F4 with 3+ Attacks in order to get half marks, and give limited value to models who are F1-4 with 1-2 Attacks. We want beaters in these spots, so we need to be able to beat things - no F4/2A heroes for us in these slots please!
  • Utility score of 1: F5+/3+ Attacks
  • Utility score of 0.5: F5+/2 Attacks OR F4/3+ Attacks
  • Utility score of 0.1: F1-4/1-2 Attacks
Wounding Profile

This is very similar to the wounding rule we covered last time for our Doomed Companion - we want to be at least S4 (whether that's "actually S4" or S2-3 with +1 To Wound) so that we can wound most of the Goblins we'll face and all of the Wargs we'll face on a 4+. It's also valuable to be S5, but not that much more than it is to be S4 (since only a handful of models will be D5 - admittedly, this includes a good chunk of the Uruk-Hai and Morannon Orcs we'll be facing). If possible, we want to be S6 or above (or effectively so once you factor in bonuses To Wound), but we'll take being S4-5 (acceptable) and give minimal points to those who are S1-3.
  • Utility score of 1: Effective S6+
  • Utility score of 0.5: Effective S4-5
  • Utility score of 0.1: Effective S1-3

Monday, November 13, 2023

Nemesis: How to Fight Against Legolas

Good morning gamers,

We're back to the Forces of Good and this time, we're looking at one of the first heroes I used in the game (and a hero who remains one of my favorites to put on the board): Legolas Greenleaf. Legolas has two profiles in the game (one for the Fellowship and a "slightly better" profile in the Halls of Thranduil - more on this later) and appears in SIX Legendary Legions (the Grey Company, the Return of the King, the Men of the West, the Breaking of the Fellowship, the Defenders of Helm's Deep, and the Rangers of Mirkwood) - and with the Halls of Thranduil being Historical or Convenient allies with basically everything in the game (a Halls of Thranduil list without Thranduil will be Impossible Allies with Grimbeorn and his squad of Beornings . . . why?!?!?!?!), it's not hard to see Legolas at an event or on the other side of the table, regardless of your points level.

The famed archer who was epic in the Lord of the Rings films and defied all natural laws in the Hobbit films is easily the best archer in the game (though I ranked the Bolt Thrower higher when we did our Sniper podcast) and knowing how to beat him is something every general should know. What makes this guy such a powerful piece, such a great leader for an allied contingent, and so annoying in certain scenarios? Well, let's take a look at this Elf among Elves and find out . . .

What Makes Legolas So Hated?

Photo Credit: Warhammer Community 

It should come as no surprise that Legolas is most dangerous when he's shooting. Shooting has been critiqued by various crowds in MESBG as contributing to a negative play experience, mostly because your opponent has no say about it once he's done moving his models. There's no opposed dueling roll, there's no resist test, and there's no armor save (for most units - some units grant saves of various kinds and heroes might have Fate points) - once you're done moving models, the other guy gets to shoot at you . . . and you have to take it. Legolas does this better than any other model, since his Deadly Shot special rule allows him to either perform three shots hitting on his normal Shoot Value (3+ if he hasn't moved, 4+ if he's moved up to half his max movement) OR perform a single shot that hits on a 2+ and ignores all modifiers (to include the move-and-shoot penalty, negative modifiers like Blinding Light, in-the-way rolls, and even the rule that prevents a Good model from shooting into a friendly combat). Yes, Legolas can do the shooting thing all the time.

While getting 3 shots each turn would appear to be his most deadly quality (and I've killed 2-3 models in a single turn plenty of times with him), it's the second part of his Deadly Shot rule that gives most competitive players pause. Usually, if you have an important support piece that you don't want to lose (a Goblin Scribe, a Dead Marsh Spectre, or a low-Defense/low-Wound army leader), you just tuck them behind 3-4 guys or a wall/rock and you're feeling pretty good about them not getting hit from enemy archers. But if Legolas can see the model, he can hit the model on a 2+ - even if he's moved that turn! Furthermore, if Legolas wants to hit the MOUNT of a big hero, he can choose which part of the model to target with the 2+ To Hit and if he's willing to spend Might to make it work, there are very few mounts in the game that can survive for long when Legolas is on the other side of the board. This is particularly true for any of the multitude of heroes who lacks Horse Lord and has no way to prevent wounds on their mounts. Oh, and Blinding Light won't make that mount any more safe . . . it's annoying.

Saturday, November 11, 2023

Fantasy Fellowships: The Erebor Reunion, Part 6c

Good morning gamers,

There are some scenarios that feel like they're horribly weighted towards one side (Good or Evil). There are some scenarios that look downright impossible to win for one side. There are some scenarios where you look at the scenario rules and just say, "Yeah, I just gotta kill everything and I'll finish the scenario objectives later." We've seen a bunch of these scenarios in Fantasy Fellowships . . . and this is going to be another one. :) The technical win conditions for the Docks of Harlond scenario is to get your Aragorn character and either your Legolas or Gimli character off the Evil player's board edge . . . but we can do this really easily by just killing everyone. And so, this scenario is yet another example of the best scenarios in Fantasy Fellowships: line up the enemy and smash them! Let's get into our last Pelennor scenario - and get back to the beater heroes in my Fellowship!

The Docks of Harlond

The plan here is simple: because we don't have Heroic March in our Fellowship, we're just here to kill lots of guys. The Orcs don't respawn in this scenario, so it's 40 of them against 30 of us - and we have FAR better heroes (and way more points) than they do! So yeah, we're just gonna kill things - and if they're running away from the back board edge and don't want to engage, we'll have Nori and Dwalin (because he's a diva and I can't trust him) run for the gate . . . because why not . . .

I don't have 20 Warriors of the Dead (with no extra gear!) or 6 Riders of the Dead, so I used my 10 Warriors of the Dead, 10 Nazgul of Dol Guldur/Castellan proxies, and my 6 Ponies of Equestria. To make this post a bit more interesting, I'll make some random comments about how well the ponies do.

Turn 1-3: Priority Good, Good, Good 

Good automatically starts with priority in most scenario missions and I won the priority roll on rounds two and three, so I advanced with my guys while Centaur held on the center for a turn and then retreated towards the more restricted deployment of the Rammos Echor gate . . . here are some pics:

The army of the Dunharrow advances towards the enemy, with the ponies driving up the right flank

We continue to press forward as the Orcs begin to fall back - the ponies stayed outside of 12" (so they couldn't be charged) . . .

The infantry continue to advance as the Morannons back up towards the gate - the ponies once again stay outside of 12" to avoid being charged on Turn 4 . . .

Thursday, November 9, 2023

Fantasy Fellowship Deep-Dive: Optimizing Your Characters, Part 3

Good morning gamers,

This is our third part in this mini-series on which characters are the "best" choices for Fantasy Fellowships - at least with the analytic model I've made. We've already looked at the Ringbearer and Companion slots, as well as the Rohan/Gondor "friend" slots, and today we turn to the Wizard and "Doomed hero" slots (or "who's going to replace Gandalf and Boromir"). Let's take a look!

The Wizard - Scoring Criteria

As we covered in a previous post, this character has fewer missions than almost any other member of the Fellowship (only Boromir has less screen time - and we're getting to his slot later in this post). Besides the Ringbearer slot, this is also the most constrained slot in your Fantasy Fellowships, since you have to pick a hero from one of the following ten characters:
  • Gandalf the Grey (not Gandalf the White)
  • Saruman the White
  • Radagast the Brown
  • Galadriel (not Lady of Light)
  • Elrond, Master of Rivendell
  • Celeborn
  • Cirdan
  • Arwen Undomiel
  • Gildor Inglorion
  • Thranduil, King of the Woodland Realm (presumably with the Circlet of Kings so he actually has some magical powers, but this isn't ACTUALLY required)
The list is basically the three wizards, two Elves who act like wizards (possibly three, depending on who else is in your Fellowship) and five (or four) other Elves who happen to have magical powers (or can get magical powers with a piece of war gear, in Thranduil's case). Given that they will only be participating in the four scenarios of the Moria Sequence (with a very critical role in the Bridge of Khazad-Dum scenario), one scenario in Rohan (Eomer's Return), two scenarios in Minas Tirith, and the End of All Things scenario to close out Fantasy Fellowships, here are the five categories that are important to them.

Dueling Profile

It's no secret - most magic casters in MESBG aren't great in combat. Usually, you want a few ranks of warriors standing in front of these guys to make sure they don't get torn apart by something big and nasty or a horde of really puny grunts - but that isn't an option in Fantasy Fellowships. Your wizard character might have 20+ guys to keep him safe as you ride to save Helm's Deep or defend the walls of Minas Tirith, but during the early missions, you're going to have a few brave souls to keep the pain off this guy - and with at least a few of those characters being Hobbits, even some of THOSE guys can't be relied upon to keep your wizard alive. As such, I've made this metric simple (perhaps overly simple - see the discussion below on this) and given a utility score to each character based on the number of attacks the hero has (in a few cases, this can be modified by their war gear):
  • Utility score of 1: 3+ Attacks
  • Utility score of 0.5: 2 Attacks
  • Utility score of 0.1: 1 Attack
  • Utility score of 0: Unarmed

Monday, November 6, 2023

Nemesis: How To Fight Against Ringwraiths

Good morning gamers,

So far in this series, we've looked at specific monster models (that usually show up in a single list, maybe two) or specific Legendary Legions that everyone seems to hate fighting. Today, we're turning to a model type that's pretty ubiquitous across the forces of Evil and units that don't look all that dangerous until they're neutralizing your heroes and chewing them up. Yep, it's time to turn to the Witch-King of Angmar and all his Ringwraith friends! I love these models (and have written quite a bit about them), so let's go in-depth today (fair warning, this post is LONG) and look at all the grisly bits about Ringwraiths, shall we?

What Makes Ringwraiths So Hated

Photo Credit: Warhammer Community

Part 1: An Overly Pedantic Study of Ringwraiths

You can't start talking about Ringwraiths without going over a brief taxonomy of the ten Ringwraith profiles that we have and how they're usually fielded. Despite there being nine Ringwraiths in total, the generic "Ringwraith" profile (which you can actually take nine of - you don't have to run the Witch-King!) provides a nice "blank slate" version of a Ringwraith for you to customize to your liking. These guys have decent-not-good combat stats (F5/S4/1A with 0-2 Might) and decent-not-good defense stats (D8/1 Wound/0-2 Fate). As far as Heroes of Fortitude for Evil go, they are great for keeping your army in the field should you break with Courage 6 and with 7-14 Will points, they have the potential to cast magic and/or fight for a long time (but don't think this means they have a lot of Will - read my post on Multi-Purpose Will Casters for more information on this). Though they look fragile, the Terror-Harbinger-of-Evil combo (something we've talked about before) can make charging them particularly difficult.

Besides the Might/Will/Fate on these guys, you can also take mounts for your Ringwraiths in the form of horses (10 points - a good cheap option for increased speed, slightly increased damage when you charge, and an easier time getting the casting direction/look-angle you want on a target), Fell Beasts (50 points - slightly more speed with more maneuverability options, greatly increased damage when you charge, and opportunities to get casting directions/look-angles that are not present when you're on a horse), and Armored Fell Beasts (70 points, which just seems like too much to pay for +1 Defense on your Fell Beast . . .). While you "can" field these guys for 55 points each, I think it would be unwise to leave home without adding 2 Might points, at least 1 Fate point, and a horse (which brings these guys up to 80 points). Personally, I normally throw in 2 extra Will points (9 total) for a tidy 90 points, but 7 Will can be just fine (it just means you're casting for one fewer turns).

When you compare these basic Ringwraiths to the "named" Ringwraiths, there are some differences. First and foremost, each of the named Ringwraiths is a Hero of Valour (or Hero of Legend in the case of the Witch-King in the Mordor/Angmar army lists, as well as in the Black Riders Legendary Legion). While generic Ringwraiths have both Heroic March and Heroic Channelling for their specialized Heroic Actions, most of the named Ringwraiths just have Heroic Channelling. The Witch-King and Khamul are exceptions to this - both have Heroic Strike, and the Witch-King also has Heroic Resolve, Heroic Strength, and Heroic Challenge. For most players . . . yeah, you're probably sticking to Heroic Strike/March and the occasional Channel.

Thursday, November 2, 2023

Unexpected Military Formations: 3 Formations for Fighting Against War Beasts

Good morning gamers,

Today we've got a very special formations post for you - different formations you can use to fight against war beasts (and particularly Mumaks)! War beasts are a special kind of unit in MESBG (see my Back to Basics article from a few months ago for what makes these guys special) and it's often daunting to fight them, since you know they could walk all over your army (quite literally!) and wreck your day.

In preparation for our recent The Hunter's Red October (THRO) tournament, I very strongly considered borrowing a Mumak and running two of these things - and BOY was that fun (and scary for my poor testing buddy, Gorgoroth). But as scary as being stepped on is, there are actually some very simple formations you can employ to defeat them - and they're primarily based on the following principle: manage how many models can be stepped on. Let's take a look at a few of them.

Formation #1: The Scattered Triangles

I've referenced an article about running "skirmish triangles" a lot this year - and it's because I love shooting and I love not having my shooting be constricted by the way I deploy/maneuver my models. Any three shooting models that are standing base-to-base in a triangle have 360 degrees of visibility (since you can "look over the shoulder" of a friendly model that you're in base contact with) and so skirmish triangles are a great starting point for whatever archers you want to run to harass a Mumak.


Having three models standing together and moving around the Mumak does a few things for you. First and foremost, they present enough of a threat that the Mumak has to deal with them (either with the guys in the howdah or by moving the Mumak itself). Having a lone warrior here or there isn't going to pose much of a threat, but having two or three triangles (6-9 shots) coming from a single direction can force a Mumak to actually do something (and this is especially true if the war beast is a Great Beast of Gorgoroth, since it has fewer wounds and its shorter height could mean that elevated archers don't have the howdah in-the-way for the Orc archers on its back - I was wrong, the howdah is always counted as in-the-way).