
Today we're going to look at the first three missions of Fantasy Fellowships for my Fellowship. Our last post walked through what we have to face in these missions (Ringwraiths and Barrow-Wights), so let's see how we did!
Mission #1: Buckleberry Ferry
My team of "hobbits" wants nothing to do with hiding from some lowly Ringwraiths - nope, go in fast, take them down one at a time, job's done. The players I have are:
- Ringbearer: Old Bilbo Baggins with Sting and the Mithril Coat
- Companion: Farmer Maggot with Grip, Fang, and Wolf
- Rohan-bound Friend: Bofur the Dwarf
- Gondor-bound Friend: Bifur the Dwarf
With a Fellowship that wanted to get locked in quickly, I lined up my guys as far forward as possible and were ready to rush for the southernmost Nazgul straight away:
 |
| It's surprising how close you can start to these guys if you really want to fight them . . . |
I charged headlong forward and the nearest Nazgul got a 6 for his sentry roll, moved into position to see us, and immediately sounded the alarm:
 |
| SSSCCCEEEEEETTTCCCHHH!!! |
On the following turn, I got priority and gang-rushed the Ringwraith and sent my dogs ahead to hedge off the next one. The second nearest Ringwraith attempted to cast a Black Dart on one of my dogs, cast the spell on a 6, and then got a 1 To Wound (because my dogs are invincible):
 |
| The fight at the bottom-left is 4:1 in terms of models, 7:1 in terms of dice, plus Heroic Strike and a fair bit of Might to boost . . . this should be quick . . . |
In the Fight Phase, I called a Strike with Bifur (1/2M, got to F5 only) and a Combat with Bilbo (1/1M) and unsurprisingly killed the Ringwraith (though it did go to a roll-off):
 |
| A bit closer than I wanted, but it was quick . . . |
On the next turn, the Nazgul got priority, declared the Cry of the Nazgul was active (reducing our Courage dramatically), and backed away, casting at us as we approach (one Black Dart failed to go off, the other got a 1 To Wound - again!). We obliged by fanning out to corral them into a kill zone:
 |
| Ring around the Ringwraith is a lot more fun with dogs and axes . . . |
On the following turn, we rushed in and tagged the rear Ringwraith while swarming the closer one - and boy was being C5+ helpful. Wolf failed a Courage test, but everyone else made it:
 |
| Wolf (bottom-right) watches his buddies fight . . . the coward . . . |
With Bofur two-handing and with a great roll from the dog, the Ringwraith we trapped went down. Grip lost to the Ringwraith, but didn't die (because dogs):
 |
| Are we okay? Yes? Good . . . |
The following turn . . . well, we got the last guy with Bofur doing the heavy lifting on the dueling roll despite the two-hander penalty and Maggot doing the heavy lifting on the wounding roll:
 |
| Bilbo: "What's all that racket?" Everyone else: "Nothing, Mr. Bilbo . . . no seriously, it was nothing!" |
And at that point, Mr. Bilbo walked over to the ferry and took off for Buckland with his friends. While unnecessary (because of the impending rest point at the house of Tom Bombadil), our Bravest Companion was definitely Maggot, though Bifur's two Heroic Strikes and Bofur's killing power and immunity to magic were also quite good. The Fool of a Took would have been Wolf for failing to charge (though he can't be chosen, I don't think).
Mission #2: Fog on the Barrow-Downs
Rested after hanging out with Tom Bombadil, the Fellowship advances through the Barrow-Downs and encountered four Barrow-Wights:
 |
| Well, THIS looks like a perfectly normal place to be hiking . . . in a fog . . . |
Just like in the last mission, we just rushed forward - but I did forget to roll to see if I could control everyone, not that it mattered much (as you will soon see):

The Barrow-Wights advanced towards us and paralyzed Fang (rude):
 |
| You wretched zombies, you paralyzed a DOG!?!?!?!? #ItsOnNow |
On the next turn, we rushed forward, but both Bifur and Bofur were arguing about hats or something and failed their Courage tests. I rolled for Tom to arrive and he obliged on the first roll (well, THAT was easy). Poor paralyzed Fang got charged by a Barrow-Wight:
 |
| The wight on his back just fell over - he's fine . . . |
In the Fight Phase, Maggot smashed the Barrow-Wight he trapped in a Heroic Combat with Bilbo. Maggot and Bilbo rushed the next Barrow-Wight while Grip and Wolf raced down to help Fang:
 |
| That Maggot fellow is nasty when he rolls to wound! |
In the ensuing fights, Maggot and Bilbo lost the duel but didn't take any damage, while Grip and Wolf not only won against the Barrow-Wight, but got two 6s To Wound and killed it (because dogs). To make my life even better, we got a natural 6 for Goldberry to arrive:
 |
| Dogs are loyal to everyone - especially each other #FangWeGotYou |
Evil got the next priority and managed to Paralyze Bilbo. Maggot got tagged while the other Wight rushed over to drag Bilbo away:
 |
| Yellow charged Maggot, Blue swept in to drag Bilbo off . . . |
We responded by heading off their escape route and positioning for a good charge. Maggot and Bofur lost their fight but weren't wounded. Fang roused from his stupor:
 |
| Get back over here - we ain't done with you, punks! |
We got priority on the next turn and proceeded to charge and wrap the enemy (though Fang just barely couldn't charge, so he just staggered over):
 |
| This feels awfully familiar . . . |
These went how you would expect and we killed both Barrow-Wights. What was really important was I remembered (at Centaur's reminding) to try to get the axe head out of Bifur's skull and I succeeded in wounding, so now Bifur will be giving my team free Heroic Moves for many, many games (or at least, we assume the axe-head stays out for subsequent games because why would I put it back in?!?!?!?!).
At this point, Tom was about to be in range of the Fellowship, so we rolled for Refreshing Song from him and Goldberry over and over again as we simulated walking towards the board edge until my Fellowship was back up to full stats (it was kind of like a second rest point). Our bravest Companion would definitely be Wolf, who assisted in killing three of the Barrow-Wights (and one of those with just his buddy Grip while protecting his other buddy Fang). Bifur and Bofur share joint Fool of a Took credit, though thanks to Tom, all of this is moot.
Mission #3: Weathertop
As we start the third mission, we're ready for a fight. As you can see, thanks to Tom and Goldberry, we're going into this mission with full stats:

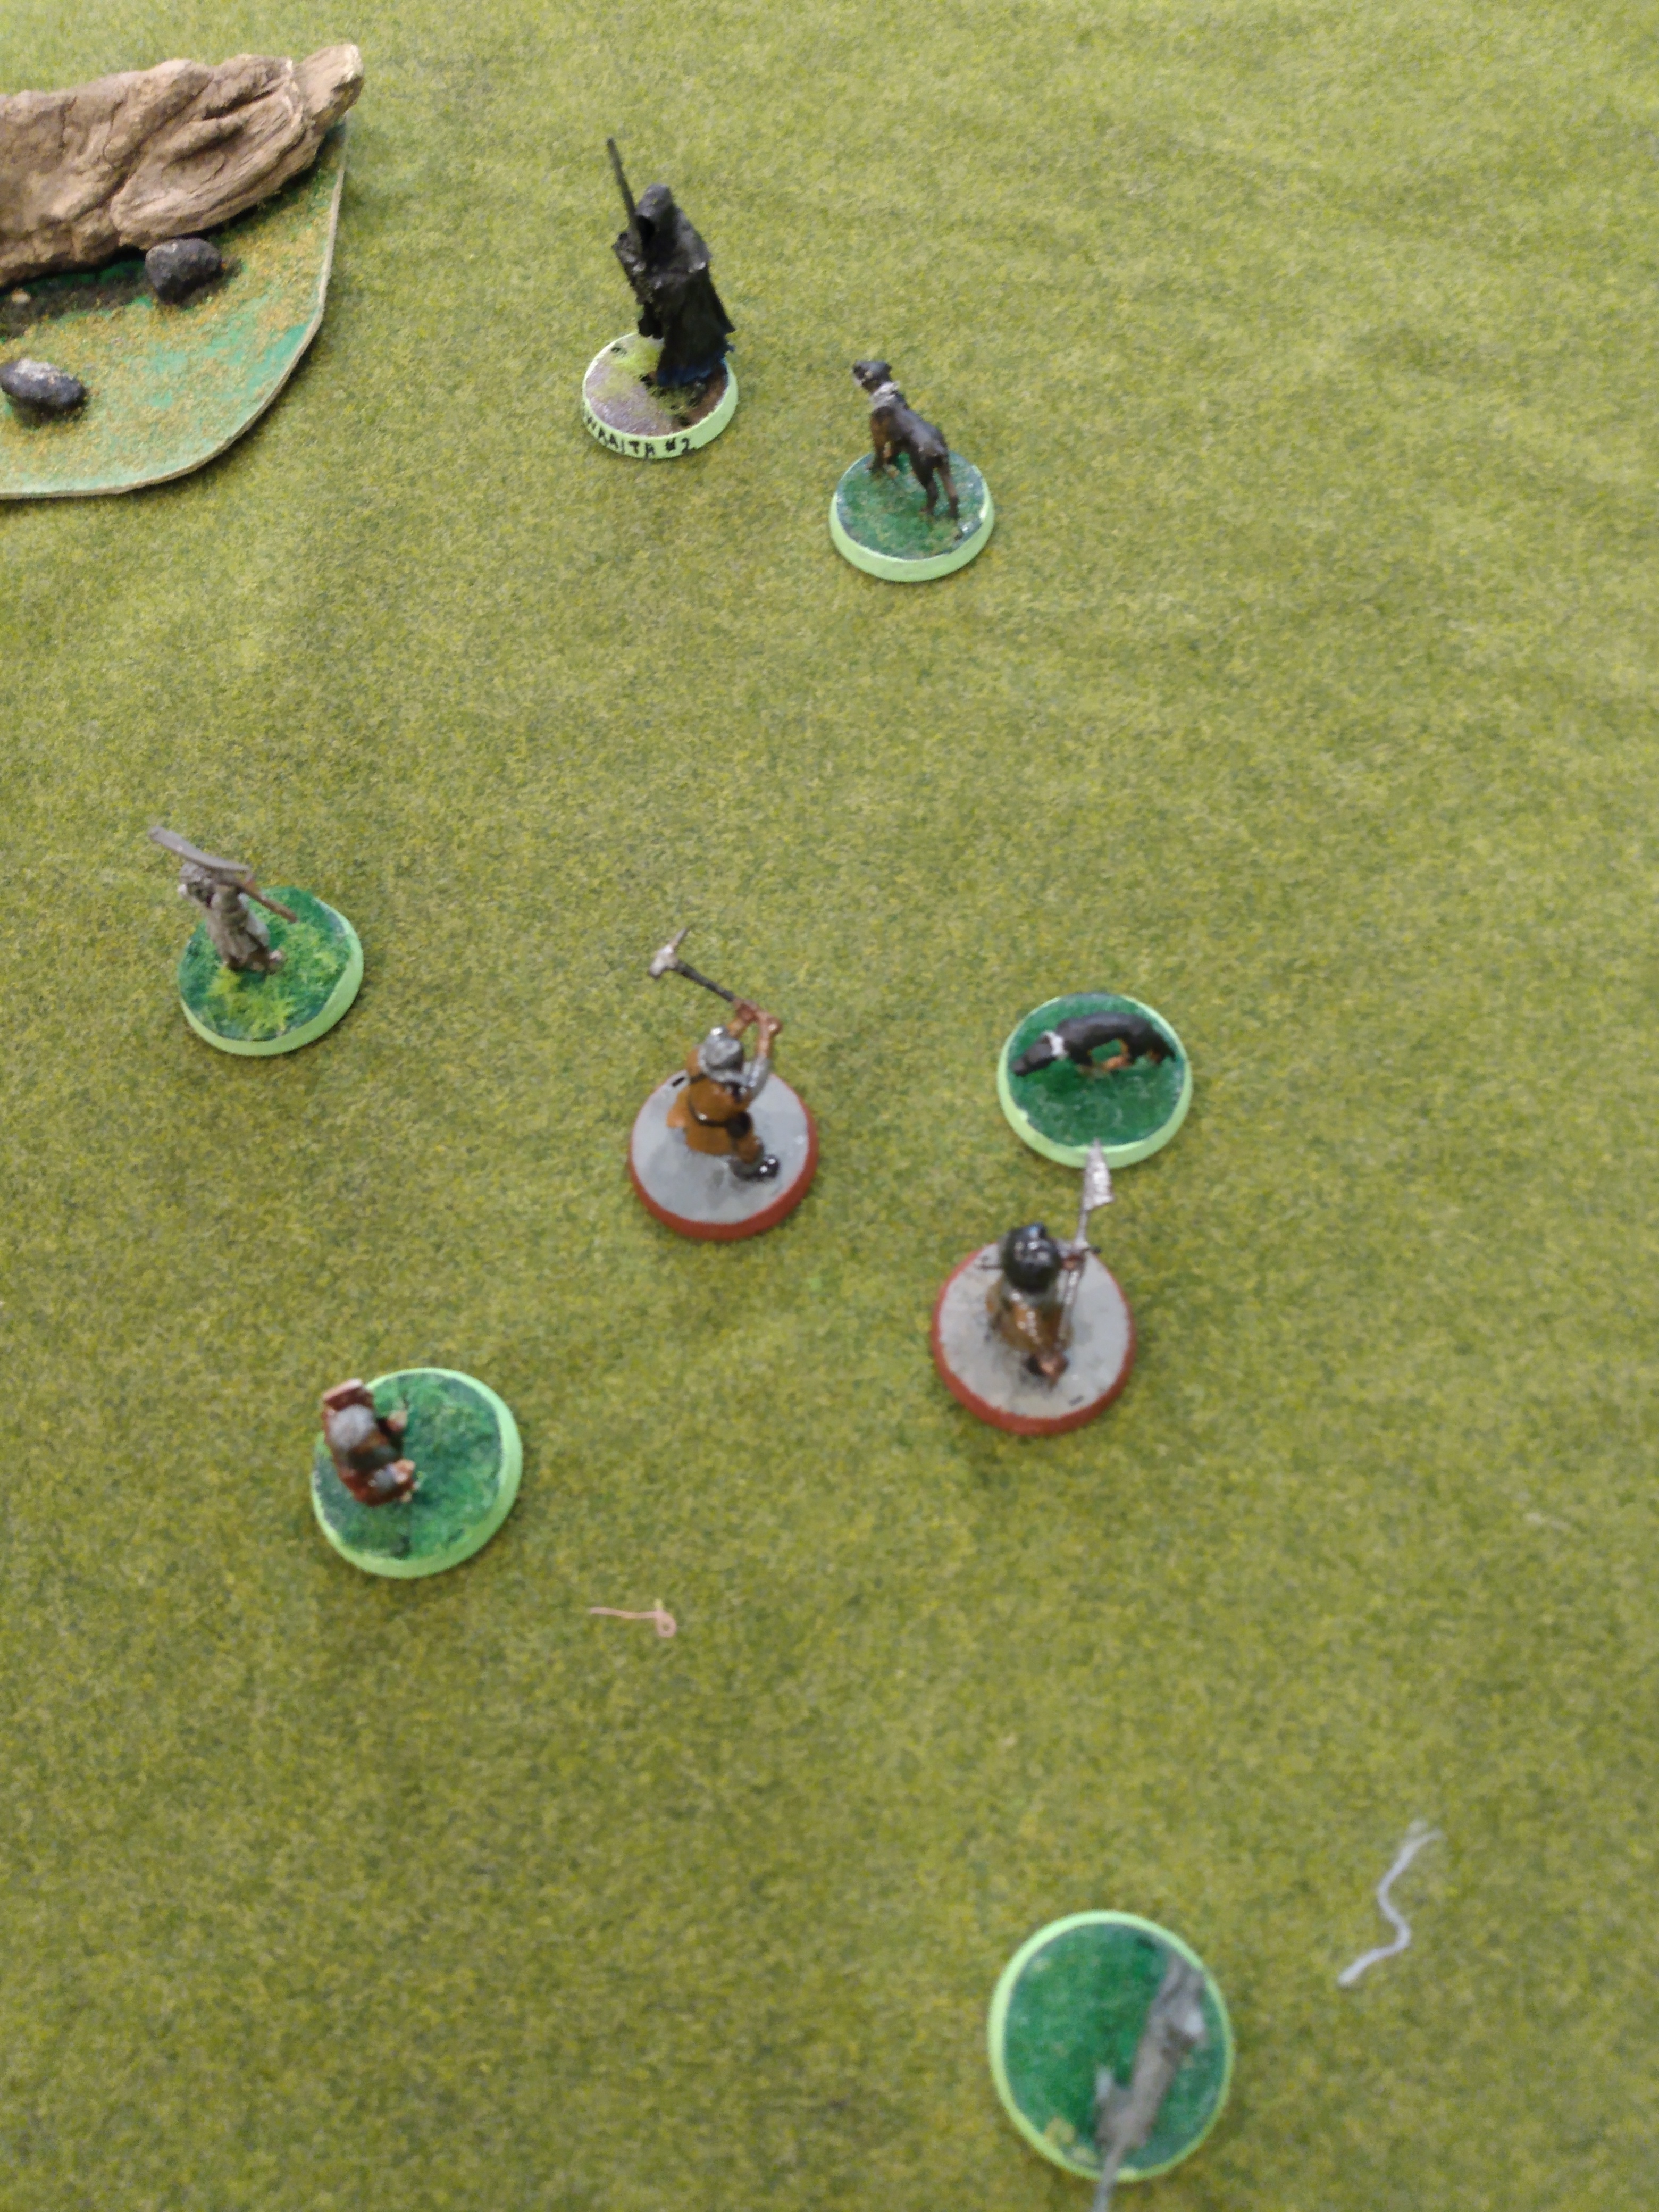
With five Ringwraiths on the other side, we're planning to rush forward quickly and take them out as fast as possible. We deployed in the center as required and the Ringwraiths deployed on the periphery.

We advanced and charged two of the Ringwraiths with dogs, and while a few models were charged, the most interesting move was that Maggot got compelled by a Ringwraith:

In the Fight Phase, Grip and Fang both got wounded and we kind of forgot that Maggot was compelled . . . so he killed the wraith he was fighting. :-)

On the following turn, the Ringwraiths got priority and Bifur called a free Heroic Move - and the charges began (though I burned all the Might and Will on both Bifur and Bofur to pass Courage tests so my other guys wouldn't be swarmed - those dingbats). At the end of the Good Move Phase, Nori arrived (on the stairs - which were a little out of the way).

In the Fight Phase, Wolf was also slain, but between a Heroic Strike from Bifur and a Piercing Strike from Maggot, a second wraith was killed.

On the next turn, SSSCCCRRREEEEEETTTCCCHHH! With C2-3, we were surprisingly good at passing Courage tests. Nori was regrettably just shy of charging in . . . and with Bofur and Maggot on the Witch-King, it's unlikely that there will be much for Nori to do:

Both Bifur and Bilbo lost their fights (and were wounded), but the Witch-King got gronked by Maggot (who is 3-for-3 against the wraiths - though admittedly, one of those shouldn't have counted):

We won priority, got some posturing in, and charged one wraith (who died), but Bilbo lost again and burned 2 Fate to survive:

On the following turn, Bifur called a free Heroic Move but failed a Courage test, so Bofur and Nori got into the wraith, freeing Bilbo from having to fight this round:

. . . and the wraith didn't die . . .

. . . take two (with Maggot this time) . . .

. . . and Maggot goes 5-for-5!

And that's a wrap! My Bravest Companion was clearly Maggot and my Fool of a Took was Bifur (though admittedly, the free Heroic Moves were awesome).
Take Aways From Part 1
Centaur played the first two missions with his Fellowship the same night I did and the games were surprisingly different - the Ringwraiths stayed as sentries in the Buckleberry Ferry mission for quite a few turns and rolled a lot of 1s and 3s (one wraith basically walked to the eastern board edge for most of the game and another guy would stumble 3" this way or that while pausing to "eat mushrooms" for several turns between moves). It was comical, but eventually ended the same way: the Fellowship gronked them one at a time. Centaur and I came to the same conclusion Sharbie did: you need horses at least to make the wraiths a threat. Centaur also proposed the wraiths having at least a Fate point as well - that wouldn't have made a difference in my games, but I think would be a good adjustment as well.
In the Fog on the Barrow-Downs scenario, neither Centaur nor I walked backwards so we would meet Tom Bombadil sooner - this seems like a better idea than rushing ahead like I did (or huddling up in the center like Centaur did). Gorgoroth did it and while it brought the Fellowship closer to a barrow, he got help from Tom pretty quickly. Also, I forgot to put on the Ring in this scenario, but Centaur didn't - and it paid off big time. We did forget to make Ringbearer control checks, but if you have Young Bilbo (who doesn't need to make those checks), you would definitely dominate. But this leads me to the second conclusion: Young Bilbo is definitely the best Ringbearer you can get. Bilbo not only gets access to Dwarves who meet the requirements you want for "good heroes" in these missions (2-3A at F4-5) and while they could go down to magic, taking someone like Bofur ensures that you probably have someone besides Bilbo who is active on the board even if the magic is flying (which it won't for very long).
Weathertop was fun and would have been a lot more challenging with the normal combatants (S2 Hobbits would have to rely on charging the wraiths to death unless they get lucky), but without Might or lots of Will, the Ringwraiths aren't that dangerous. Theoretically, there's a tactical game you can play in this mission, but by rushing the wraiths you take the casting out of the equation (at least on the first turn). They'd be a lot better with 1 Might and 1 Fate each, but it's fine for Fantasy Fellowships - we had fun.
Conclusion
Hopefully you enjoyed this sequence of missions. As the missions get more involved, we won't group everything in the same path in the same post, but these three just made sense to group together because they are played so quickly. If you have any thoughts on the scenarios or how they were played (or changes you wish were made), let us know in the comments below! Until next time, happy hobbying!
No comments:
Post a Comment