Good morning gamers,
We've looked at a variety of armies in this series so far - we've looked at traditional armies like Angmar and Ugluk's Scouts, as well as an all-hero army (the Breaking of the Fellowship), and an army that we needed to be fleshed out a bit in order to make it work (Rivendell - though you could do it with Fantasy Fellowship models if you're okay making Rivendell the allied contingent). Today, we're looking at an army that is, by no means, a competitive choice - and there are hard counters to it for sure. But there are also many armies that will be quaking in their boots when they fight it - it's the Serpent Horde, run the only way you can with Quest of the Ringbearer as your basis. Let's get stuck in!
The List
Quest of the Ringbearer has lots of models in it and for exactly one mission, you need to invest in the Serpent Horde - here's what you need:
- You need two War Mumaks of Harad (currently the entry barrier for me);
- You need one box of Haradrim Warriors (I have half of these guys right now).
And that's it - still ~$250, but "that's it." Fantasy Fellowship missions don't get us any other models, so there's exactly one way to run this force - double Mumaks:
700 points, 24 models, 10 bows hitting on a 4+, 2 D6+ models (the Mumaks), 2 war beasts with 22 passengers, 4 Might
This list has already been mentioned on the blog in our Bare Necessities series, though I only presented it as an idea (I didn't cover it in the main article). Today, we flesh out the discussion on this list and see how it approaches each of the scenarios. If you want to learn about Mumak tactics from the professionals, read Dan Entwisle's article on Warhammer Community.
- War Mumak of Harad with Rappelling Lines [ARMY LEADER]
- 5 Haradrim Warriors
- 5 Haradrim Warriors with bows and poisoned arrows
- War Mumak of Harad with Rappelling Lines
- 5 Haradrim Warriors
- 5 Haradrim Warriors with bows and poisoned arrows
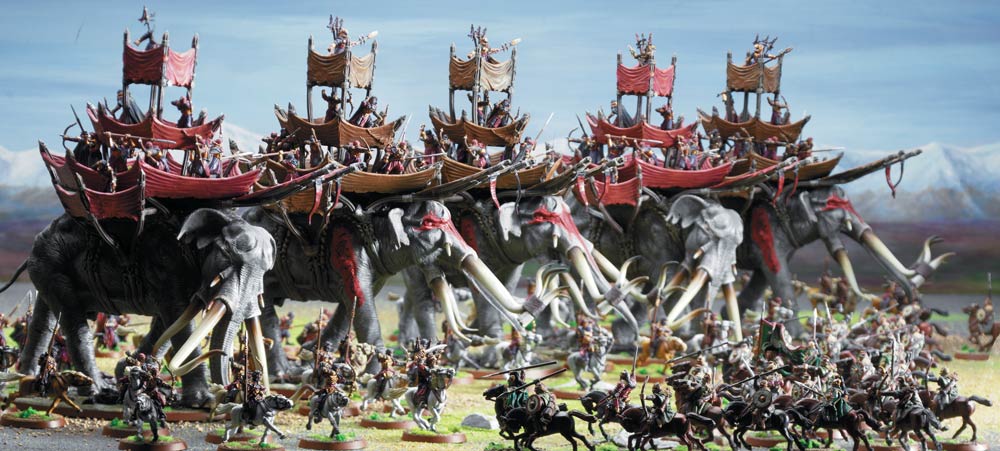 |
| Photo Credit: Warhammer Community |
700 points, 24 models, 10 bows hitting on a 4+, 2 D6+ models (the Mumaks), 2 war beasts with 22 passengers, 4 Might
Army Theory
We could have placed all of our archers in one Mumak and put all of the melee models in the other (which could save us 10 points for Rappelling Lines on one of them - that would be another bowman and 3 spears, probably), but I instead chose to give both Mumaks Rappelling Lines, which is important for two reasons. First and foremost, Mumaks don't want big heroes to charge into them, so being able to peel them off and force them to fight something else is a good way to make them burn through resources. You can also have three Haradrim charge someone like the King of the Dead so he can't call a Heroic Combat and kill the Mumak (which he can do with a single wound). Since all models in the Howdah automatically pass Courage tests, you don't have to worry about the Terror or Harbinger of Evil, so you can just charge him. Pulling him off can give you a chance to kill a little more before he gets there - and maybe even get a charge off on the following turn.
The second reason we want the Rappelling Lines has to do with when we need to get a few models out of the Howdah to pick stuff up (or if our army leader needs to get a few kills). We don't REALLY want to do this, but it's an option if we need it. Our archers are going to be busy shooting, but we have 5 options on each Mumak to disembark and try to hold ground in the Mumak's wake. Where possible, you want these guys to stay in the Howdah so that they can benefit from the D9 in-the-ways.
Our goal, of course, is to only present the Mumaks to the enemy and rely on Heroic Moves (and potentially Heroic Marches) to ward our enemy away from our vulnerable units. We've got Mumaks that will hopefully get off some good charges and we'll hopefully run over enough guys to break the enemy. If that happens, we hold out until our opponent flees the board and we win. Simple enough, right? Well, let's see how it works in practice . . .
Game Play Strategy
Maelstrom & Object Missions (Pools 1 & 3)
Maelstrom scenarios can be really good for warbeasts, not only because you can run things over on the first turn if you can arrive at an oblique enough angle to clip something, but also because you can get some extra damage in with your bowmen (with little fear of retaliation). Most Maelstrom missions need you to get somewhere and most object-based missions requires someone to be holding the objective - both of which we can do just fine.
No matter which maelstrom scenario we play, if we have to enter the board first, we don't care where we show up - just walk onto the board 8" and "prepare" for the assault (unless of course there are siege weapons on the board - then show up where they don't have lines of sight if they have no minimum range and walk on within their minimum range if they have one. Sure, you're a siege target, so you're not THAT worried about it, but why take the chance. Make your way to the center as quickly as possible (I assume your opponent won't drift too close to you on the first turn).
If you arrive second, measure out a 6.5" (length of the base) + 1" distance from the farthest person in a warband's battle line and mark that point on the map as your arrival point. Then, move onto the board the requisite 6.5" and advance 1" to hit with the model - you're able to trample because you're fully on the board and if you clip anyone else in your remaining movement (0.5"), you can kill them off too. In the subsequent Shoot phase, shoot at models that are vulnerable - in-the-ways ought to be a non-issue for you because of your elevation, though you'll want to make sure you set up the models in the Howdah to be in a "broadside" setup where they can all look out at one side and focus their fire in the same direction. You are expected to get 2.5 hits each turn from each Howdah, which should translate into a kill/turn (either per Mumak against D3-4 foes or across the battlefield against D5-6 foes).
On the next turn, our opponent may try to charge us and tie us down - but that ultimately means that one of their heroes is staying out of the center to stay and fight us OR isn't drifting very far. We can't Heroic Combat with these Mumaks, but we've still got bowmen up top to harass whoever tries to run away. I would call a Heroic Move with these guys to trample people while they're there, even if your opponent has already called a Heroic Move - seems worth it to me (even though I generally think this is a waste of Might).
In Hold Ground, we need to have more models within 6" of the center of the board - and since 6" will reach the top of the Mumak and since the bases of the Mumaks are 5.5"x6.5", if we have both Mumaks parked next to/on the center objective (which we're told in the Designer Commentaries are open terrain), our opponent will be hard pressed at the end of any round to have anyone in range (especially since Mumaks don't back away when they lose a fight). Obviously, we don't want to "just sit there" but we can walk on anyone who tries to stand in our way (and "patrol" around the objective, crisscrossing it if required to keep our opponent from having anyone in range. I wouldn't drift too far way, though - if we get charged/held in place away from the objective, we could be in huge trouble.
Similarly, in Command the Battlefield, we want to be walking around, but now our goal is to have our 26 models managing 4 quadrants of the board. This is probably the most challenging of the maelstrom missions, because our opponent is likely to "run to ground" and find parts of the board we can't physically access with our Mumaks. Good thing for us, we can have our Haradrim spread between two different sides of the Howdah and therefore cover two quadrants if the Mumak straddles the line. The Mumak (and likely the commander who is in the center of the howdah) won't count towards the control count, but the Haradrim in either side of the Howdah (front/back or left/right) will count. Use your bows to get a few kills in, break the enemy if you can manage it, and force your opponent to have lots of models alive on the board after you've played for a few hours to win.
In Heirlooms of Ages Past, you don't need to flip over objectives - and in many ways, it helps you if you don't. If you WANT to, you can always have someone rappel off the Howdah to dig stuff up, but it would be far better for you to focus on running over enemy models without trying to pick up the Heirloom. If no one knows where the Heirloom is, there aren't a lot of points on the board - and breaking your army will require shooting into the Howdahs or felling Mumaks. Some armies can do that, but most conventional armies will say, "Oh no . . ." Use that to your advantage, puppy-guard an objective marker or two, and if your opponent turns up four empty markers, then your markers become the new targets to fight over and he has to come to you (or risk a draw/minor loss if you manage to break him/kill his leader). It's a risky business, but solid in the end.
Should your opponent dig up the Heirloom, start lumbering towards him and run the guy over. Since you can't hand the Heirloom off (and could get rooted in place with it), you only need to get close to the Heirloom to be dangerous. If you can kill the guy with the Heirloom and kill everyone around him, you just need to park a Mumak over the Heirloom to gain some victory points. When it's clear, you can always have someone rappel off to pick it up after the Mumak moves.
The other object-based missions are . . . weird and risky. In Seize the Prize, you again don't want to dig up the Prize - focus on smashing into the enemy and breaking him instead. If the Prize gets dug up, great - run over the guy and rappel down when it's clear. Even if you don't pick it up, that's fine - you just need to break the enemy and you'll win the game. If the Prize is abandoned, rappel down and dig it up (or pick it up if your opponent did the hard, unreliable part for you) and get it up the field as best you can.
In Destroy the Supplies, you can certainly march towards the enemy stashes if you want to (rappelling models off to get in contact with it if you move second - pretty safe move unless there's a gunline looking at you), but your primary goal is to march towards wherever your opponent's troops are amassed. Without breaking the enemy, the game can go on far longer than you want it to and you risk losing all of your supplies (since defending them is going to be REALLY hard without Mumak-sized choke points). While focusing on the objective is the key to winning any game, in this one, you probably want to focus on killing things that are coming for your stashes BEFORE you focus on getting to your opponent's stashes (just to avoid him hitting all three of yours).
Retrieval could be really risky, but since the "flag" you need to defend is open terrain, you can park a Mumak on it and "just not go far." Just like in Hold Ground, you can deny your opponent access to your flag by keeping a Mumak pacing back and forth on it - trampling anyone who gets close OR being able to cut back to hit the foe should they sneak behind you to pick it up. Your other Mumak goes barreling forward towards your opponent's flag, rappelling someone off to pick it up when you've driven the opposing forces away from their flag. If you are able to shield the Haradrim who jumps down to grab the flag (you COULD send your non-army-leader Chieftain to do it), you could make an easy game of it.
Control Missions (Pools 2 & 5)
In Domination, you need to drive your opponent off the objectives while breaking his army (and preferably quartering it). You don't want to start right on the centerline - by starting just out of charge range, you can play the "how close do you want to get to me" game, denying him the chance of tying you down on the first turn if he gets Priority/calls a Heroic Move and giving him plenty of time to think about "how far do I back up" if he doesn't want to be in your charge range. Your archers, meanwhile, can assist in the decision, sniping models that try to get between/around the Mumaks. Late in the game, you want to rappel Haradrim Warriors (non-bowmen) to objectives that you pass, but you don't want to do this too early - there's no point in leaving vulnerable units on the ground for your opponent to attack. Watch how close your opponent is to breaking and make the gamble when your opponent is about to break (or has just broken if you trampled over a bunch of people). Setting up your archers in a "broadside" setup would be good here, looking inward at as many objectives as possible, but be willing to shuffle your Howdah configuration if required.
In Breakthrough and Command and Control, you know where those objectives are going to be, so you can have your Mumaks walk in a conga line of sorts from objective to objective, shooting at models that attempt to play keep-away from your path of devastation. The center objective in Command and Control should be the primary target of your archery, as your opponent could pop over to tag it early and then hold units there to race in after the Mumaks pass to other objectives. As your opponent nears breaking, rappel out of the Howdahs and race for cleared objectives - you only need to touch it while unengaged to flip it to your side, so do this at the last possible minute!
Reconnoitre might be your easiest mission, since your opponent will probably do whatever he can to avoid the Mumaks. If both Mumaks get on the board on the same turn, you want to have them walk on close enough to each other that the drivers are within 6" of each other (that's REALLY close for Mumaks - with 5.5" widths on their bases and the commanders being in the center of the base, you need to have a gap of no more than 1.5" between them). In this way, you can call a Heroic March with a commander each turn to drive those Mumaks forward 11" each turn - you'll get off the board after 3 Marches and 2 normal moves if unhindered. When you're near the middle of the board (or wherever you have room to hold up the enemy), dump ALL your troops out of the Howdahs - and it's okay if a few break their necks! You start with 24 models, so a quarter of your army is 4 models - those would be your two Mumaks and their commanders. The rest of your models then need to hold up the enemy and die just after your Mumaks get off the board (5 turns). Skirmish with your opponent (backing up half-speed with your archers to give them as much time as possible), then charging into your opponent's units with your melee troops as best you can. Ideally, you can hold up the enemy before he can get any units off the board - and by having so many vulnerable targets on the ground, you can encourage your opponent to slam into your troops and kill them. If you need to die faster, consider Stabbing with your Haradrim so that when their F3 and 1 Attack fails them, the have another chance of dying (you die on a 5+).
Seize the Camp is theoretically easy - advance forward with your Mumaks (assuming you can get both in your camp) and control the middle early. You could consider dumping a few Haradrim with bows near your camp, but because the game ends when one side is quartered, you could just have one Mumak (maybe your army leader's Mumak?) playing offense and your other Mumak turn around part-way through the game to play defense (probably pursuing whoever your opponent sends to your camp). If you have the decision in which corner to defend, you want to take the Mumak bases into account - for first deployment and for where you're assaulting. If you're left with a bad position by your opponent, focus on getting your Mumaks out onto the board, doing whatever it takes to do that.
Divide and Conquer will be a really easy set-up - one Mumak starting from each corner. From there, you advance to the middle and run over whatever shows up . . . pretty simple. Use your shooting to harass models that are sweeping in behind you, and be sure to use those Rappelling lines to pull heroes out of combat with the Mumak and make them spend resources calling Combats against the guys they're fighting (or put more guys into them than they can kill in a turn). If your footprint is big enough to deny your opponent the opportunity of being in range of an objective, so much the better.
Killing Missions (Pools 4 & 6)
To The Death is a simple mission - and if Reconnoitre isn't your easiest mission, it very well could be this one. Your army should be walking towards the enemy, trying to shoot any banners running around and running over stuff with your Mumaks. Your opponent will likely tuck a banner-bearer away in a piece of terrain you can't get to (or see very well), so if there's a banner stuck in the middle of nowhere, consider dropping some guys out of your Howdah to hunt the banner down. Focus on not breaking (keep as many models as you can in the Howdah and watch out for models that are able to wound the Mumak well).
Clash by Moonlight is another great scenario for you - your bows do slightly more damage and you won't be shot at until you get to within 12" of the enemy (which is pretty much charge range). Your 12" measure, however, won't be the same as your opponent's 12" measure, since you measure from the base of the models in the Howdah down to the base of the enemy models - so don't try to play keep-away from the enemy. Like To The Death, this scenario rewards you for breaking the enemy and not being broken, so if you can keep your models safe in the Howdah and can get a good trample or two in, you have a good chance of winning the game (especially if you can bring down 2+ heroes). However, because shooting the Mumaks is easier in this scenario too, you need to get engaged as quickly as possible so you don't go stampeding away from the enemy and open yourself up to even more shooting. Once a Mumak goes down, breaking you is certainly doable (as is killing a hero, who could be your army leader).
Lords of Battle is a pretty good scenario for you too, as you can probably trample more models than you can physically suffer wounds. Like in the Domination game, you want to stand far enough back that you can't be charged on the first turn, but be willing to March towards your opponent to get close if he tries to stay away from you. Getting in a good trample or two (as well as some shooting attacks) will be key to winning - and be sure to keep track of wounds dealt to mounts with your tramples, as they count towards your total.
In Contest of Champions, you have two options: first and foremost, you can try to run over the enemy army leader before he can kill your Mumak (or shoot anyone out of the Howdah if he has a ranged/magic option). This can work, but very much depends on the kind of hero you're fighting. Your second option is to have your Army Leader dismount from the Mumak with Rappelling lines in order to get a quick kill or three - probably after your opponent's army leader is dead. This is riskier since it exposes your army leader to taking damage, but also gives him the opportunity to "actually get some kills". Regardless of your approach, your army leader will need to start within 3" of the center of the board, so there's no way you can guarantee that he won't be charged on the first turn. Your OTHER Mumak, however, can deploy outside of charge range and be ready to ram into the enemies that charged one side of your army leader (just make sure you don't run into the other Mumak).
Assassination is another scenario where getting full victory points will be difficult - actually killing a model with your non-army-leader Haradrim Commanders will be pretty difficult (though the Rappelling lines does make it possible). Personally, I think it's better to settle for the 5 VPs and keep your Haradrim Commander (who is your opponent's target by default) safely up in the Howdah. Your goal, of course, is to walk through as many of your opponent's units with your Mumaks, getting wounds on your target and the enemy army leader with your bows and Mumaks as quickly as possible. Do your best to keep your Mumaks away from each other so they can't be made to run into each other.
Fog of War is the last scenario - and you'll be working hard to keep your Haradrim Commander (not your army leader) alive and unwounded. Pick a hero that you can run over with a Mumak - ideally someone who needs to be involved in killing the Mumak to be worth their points (or who needs to be near their friends to provide auric buffs). Focus on breaking the enemy with your trample damage and walk into base contact with a piece of terrain near the center of the board (or drop some guys off into a piece of terrain with your rappelling lines).
In our next post, we turn to an army that I've been playing with a little and has been making its rounds around the international tournament scene: the Black Riders LL. This is an obvious choice for a Quest of the Ringbearer collector, but how do you take an army with nine models to the tabletop and think about approaching the various possible scenarios? And is this army even a fair force to face? Find out next time - until then, happy hobbying!
No comments:
Post a Comment