Good morning gamers,
We are always trying to find new and interesting formations here at TMAT - some of which have their basis in historical military formations. Today we'll look at a few formations that can be helpful in various contexts - fighting cavalry, breaking a shieldwall, and holding ground.
Formation #1: The "Long Fangs" Anti-Cavalry Formation
Have you ever found yourself staring across the field at an army of Rohan cavalry preparing to run into your front ranks and absolutely decimate your troops? Have you ever wondered how having a few cavalry models of your own can keep this doomsday scenario from working against you? Well, Rythbryt came up with the following formation to be used in a mixed arms force of infantry and cavalry. How do you prepare to meet the cavalry? By NOT having battle lines. Instead, we want a few very long teeth.
Let's assume we have the following two 500-point lists fighting each other:
- Rohan
- Theoden, King of Rohan on armored horse with shield and heavy armor
- 5 Riders of Rohan
- Theodred, Heir of Rohan on horse with throwing spears and shield
- 1 Rider of Rohan with throwing spears
- 3 Riders of Rohan
- Gamling, Captain of Rohan on horse with the Royal Standard of Rohan
- 4 Riders of Rohan
- Mordor
- The Witch-King of Angmar on horse with the Crown of Morgul, 3M/15W/2F
- 5 Morannon Orcs with shields
- 4 Mordor Orcs with shields and spears
- 1 Mordor Orc with shield, spear, and banner
- 3 Orc Trackers
- Ringwraith on horse with 2M/8W/1F
- 2 Morannon Orcs with shields
- 2 Mordor Orcs with shields and spears
- Ringwraith on horse with 2M/8W/1F
- 2 Morannon Orcs with shields
- 2 Mordor Orcs with shields and spears
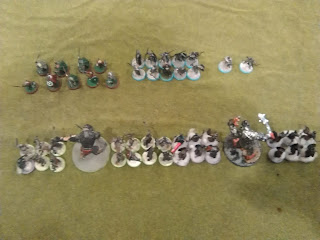
The Mordor list has 24 models, while the Rohan list has 16 models. With a lot of D5-6 models, the Mordor army should hold up to most of the Rohan bows. The Rohan player knows, however, that he'll need to get the charge off against the Mordor models in order to close the model deficit.
 |
| Forth Eorlingas! |
The Orcs are in your everyday, run-of-the-mill shieldwall, with a few Ringwraiths behind them to neutralize enemy heroes. The Riders of Rohan are pounding towards the ranks of Morannon Orcs - and if they get the charge against the Orcs, they're going to clear out a LOT of guys (higher Fight, lots of banner support, knock-down with wounding on 5s thanks to the S4 charge bonus).
 |
| The opening charge - note all of the cavalry in reserves for the next round . . . ouch time! |
Since the Orcs have a "neat" (and short) battle line, the Rohan force could have just charged the heroes into one flank, leaving the rest of the army waiting in reserve for the next round (and only facing a portion of the enemy's force). In a totally-expected move, Theoden and Theodred both call Heroic Combats:
 |
| We came, we slew, we flew into more guys (though in this example, Theoden actually had to spend 1 Might to win the fight). |
The combats are successful (in no small part due to Gamling's banner giving beneficial rerolls) and a Ringwraith finds himself charged by Theodred (who passed his Courage test easily) and two Orcs find themselves assaulted by Theoden.
 |
| Two of the Morannon Orcs are prone - I just didn't have the tokens on me . . . |
Aaaaand after one round, the entire right flank of the Mordor battle line has been destroyed (4 more Orcs and 1 horse are killed, 8 total Orcs lost on that side). The other side managed to only suffer one loss, but the Mordor player is REALLY down-handed (and while he might get to move first next turn, there are horsemen he can't reach and who will be getting charge bonuses). The game is basically over.
Surely, there must be a better way to take a charge from cavalry. There is, in fact - and here's what it looks like:
 |
| The tapering of the lines provides anti-archery coverage for your cavalry - only shooting models that are looking directly down the corridor can shoot at your horses! |
Instead of making a horizontal line of models, we're going to make four "fangs": the front-line troops will be ready to take the charge, each backed up by two spearmen and one "not-spear" guy. Between each tooth is a 40-50mm gap, able to fit a cavalry model (or two infantry models if you do a 50mm gap). This means your formation is really long, but doesn't allow the enemy riders to charge into that many models.
What happens next is based on who gets priority. In general, the Riders don't want to move first, lest they get wrapped around by the Orcs. Let's assume that the Orcs have priority - and they more-or-less remain in this formation (advancing towards the riders to close the distance). After they're done moving, the Rohan army decides it's time to charge!
 |
| The Second Charge (and notice how there are still Rohan models in reserve) . . . |
As the Riders charge into the Mordor ranks, they can tag each tooth with one rider - maybe two. So long as it's one rider against each of your front-rank guys, you should be "okay", since each front-line guy has a spearman behind him. Should you lose fights, don't make way (this will trap your model, but he's getting knocked Prone anyway). If your knocked-Prone models are killed, you will still have a spearman backed by a spearman, which will give you the ability to meet the next charge as well (which could be during a Heroic Combat).
If you're able to move after the Rohan riders charge (either because the Riders charge on a turn that they have priority OR because they call a Heroic Move to charge during the second round of combat), you unleash the true power of this formation: the ability to charge their Riders with horsemen of your own (denying them their charge bonuses).
 |
| NAZGUUUUULLLLL!!!! <SCREEEEEEEECH!!!!!!!> |
By charging into the cavalry models, we go from being at an even dice pool (or a disadvantage) to having the dice advantage AND no one gets cavalry bonuses. This makes calling Heroic Combats with those heroes much harder (since they'll have to cut through our own cavalry AND the model they originally charged).
The charge becomes even better if our infantry are free to wrap! We have the equivalent of an extra file in our battle line that is free to move around the flanks if we want - and in doing so, we prepare for the next round!
Now let's assume that the cavalry want to avoid us - how do we get them to charge the formation? Well, this particular formation includes both archers AND magic casters, which means we can use Compel to bring enemy cavalry models closer to use (and March our men forward) if we want to kill them slowly.
It's important to note that we still took casualties here - but we lost far fewer models. We originally lost this many:
 |
| 9 Orcs + 1 horse, 4 models away from breaking . . . |
And we ended up killing a few and losing a few with the Long Teeth formation:
 |
| 5 Orcs lost, 8 models away from breaking . . . |
Formation #2: The Svinfylking (or Boar Snout) Formation
You've probably never head the term Svinfylking before (I hadn't heard it until recently), but you've probably heard of a "wedge" formation. If so, you know all about the Svinfylking - it's where you have a tapered attack formation that starts at a point and slowly extends outwards (exposing whoever is at the tip to lots of charges but engaging as much of your opponent's army as possible with your best troops - and tucking your weaker units away to mitigate total losses). As you punch through the front ranks, you can then continue to press through your opponent's ranks. If you want the detailed write-up of this historical military formation, you can read a great write-up about it here (with links to ancient manuscripts that describe it). You can also see a demonstration of this formation on Modern History TV's YouTube channel here. To illustrate this, let's look at the following two 500-point armies:
- The Men of the West LL
- Aragorn, King Elessar
- 4 Warriors of Minas Tirith with shields
- 5 Warriors of Minas Tirith with shields, spears, and bows
- 2 Warriors of Minas Tirith with bows
- Eomer, Marshal of the Riddermark with shield
- 8 Warriors of Rohan with shields and throwing spears
- The Black Gate Opens LL
- Uber-Mordor Troll Chieftain
- 7 Morannon Orcs with shields
- 5 Morannon Orcs with shields and spears
- 1 Morannon Orc with shield, spear, and banner
- 1 Orc Warrior with shield and spear
- Mordor Troll Chieftain
- 6 Orc Warriors with shields
- 6 Orc Warriors with shields and spears
 |
| A special thanks to my son, Gorgoroth, for letting me borrow his Troll Chieftain on the right for this photo. |
Let's start with why we'd want to do this in MESBG. Normally, you see two formations charging towards each other in a line. As the lines draw near each other, they engage directly as shown below:
 |
| The numbers are about the same here, so we have formations pushing against each other "hoping" to break through the other line first. |
This is not very fulfilling. Sometimes, you can get more out of heroes by putting them near the flanks and trying to Heroic Combat through people, but we run the risk of not being able to keep our center strong because our heroes are on the wings. Wouldn't it be nice if we could have our heroes do the hard bit of crunching the enemy lines while keeping our warriors safe? Sure - make a wedge.
 |
| For Frodo! #YOLO |
With Aragorn at its tip, our formation puts its strongest units in the front and tapers to the weakest models (in this case, we've left our throwing spear troops on the wings since they can move full and still harass enemy models). When we charge, we can charge with a line if we want to, but we can also just use Aragorn. If we move first, our opponent can't double-up on anyone without charging a model further back in the wedge because of control zones, so the front models will be pretty safe from being ganged up on.
 |
| "If anyone is going to get a Heroic Combat off against warriors, it's me!" ~Aragorn |
The initial charge can rely on a heroic combat. If you want, you can charge with the first three models if you can reach with them, but the goal is to make sure your best models are fighting and your weaker models are less engaged.
 |
| On the next turn, we charge and start crushing stuff! |
After the first round, you've dealt enough damage to make retaliation harder. While our formation can be counter-charged, Aragorn remains the only exposed model, with each of our supporting models not able to be engaged by more than one foe until you reach the back of the formation (which is far away). Even if models do get that far back, we have throwing spear models that can charge their flanks and pull models off our warriors, making those fights much better.
Now there are problems with this formation - if you're not careful, your opponent can punch through your rear troops and trap the models near the front of the formation. As a result, you need to be careful when using this formation - so be careful. :)
Formation #3: The "Pac-Man" or Millennium Falcon Formation
Have you ever found yourself saying, "It's okay that I'm running infantry - I'll just March!" Then, you show up to fight your opponent in Seize the Prize and you're like, "You know what, it's fine - I'll just March!" So you deploy your forces as follows (once again, we'll illustrate with the Men of the West LL):
 |
| For Frodo! I mean, we're not ACTUALLY using the FV buff rule, just saying it because it's fun . . . |
Aragorn calls a March and you race to the center with him. Then you start moving your other models and find that one of two things happen. First, depending on your points limit, not everyone can fit in that March bubble, so people get left behind. The second option (which we have in play here) is that your battleline gets messed up by the terrain because it was really long and can't maneuver well.
This is, of course, because models have to start within 6" of the Marching hero and end within 6" of the Marching hero in order to get the extra movement from the March. Any models that are within 6" of the Marching hero and can't finish within 6" of the Marching hero can't move at all - which is not good. If you don't want someone to follow the Marching hero but you DO want them to move, be sure to move them before the Marching hero moves (easy solution).
Since the radius of the March is going to be a circle and our hero who is calling March is at the front of the formation, we only have half of the possible area to boost our movement. Making a battle line further restricts how many models we can include in our March. So what's the solution? You can either make a "Millennium Falcon" formation OR you can make a "Pac-Man" formation.
The Millennium Falcon should need no introduction, but in case there are people who don't know Star Wars, it's a spaceship from Star Wars that looks like this:
 |
| Well, it doesn't look EXACTLY like this, but the general shape is the same - two things at the front, gap in between, rounded back. You get the idea? |
We won't be flying today - that wouldn't be very Lord-of-the-Rings-y unless Eagles or Fell Beasts are involved - but we will be making a formation with a path for a Marching hero (who is intentionally set deep in our ranks) to run up and then everyone ELSE runs past. Since most heroes with March are not superb fighters (most are generic Captains), having them near the middle of your formation and your power heroes in the front makes it easier for the power heroes to get locked in faster AND keep your supporting hero in a back-up role. We also make the most of the circular radius inherent in a Heroic March:
 |
| Here I go again! #TakeMeToATourney |
Now this formation isn't flexible - you have to advance straight forward with your March because you only have that path available to you. This is fine if you know the scenario is something like Seize the Prize and the objective marker will be right in front of you (it can also work in Reconnoitre if the terrain is good), but in most cases, we want our formation to be a bit more flexible. The solution to this is a variant of the Millenium Falcon formation - the Pac-Man formation.
Hopefully, Pac-Man needs no introduction as well, but just in case, Pac-Man is a character from a VERY old arcade game that ate little beads and fruits while trying to not to get caught by ghosts. There was a Mrs. Pac-Man variant as well, so if you prefer her, imagine her in this post. The shape of Pac-Man is simple: three-quarters of a circular pie is filled in, with the rest being an open mouth. We can do the same thing to maximize our area of March coverage (like we did with the Millennium Falcon formation) but with a larger aperture for moving our March hero:
 |
| The number of models we have makes this look more like a ">" sign, but if you had lots of Army of Thror Dwarves around your Captain of Erebor/Grim Hammer Captain, it would look more Pac-Man-ish . . . |
We can now move roughly 45 degrees to the left or right off the center line and everyone can move with us - note that the March hero sticks out like a tongue a little bit so that no one is impeding his movement potential.
 |
| #MoreAragorn - cameras, catch my good side next time! |
While these two formations help infantry out a lot, a few adjustments are needed when trying to March cavalry models. The philosophy is still the same - you want to set the Marching hero deep in the formation and leave room for the cavalry to maneuver, but because the bases are larger, you need to be more conscientious of where models are placed. Since cavalry tend to want to be more flexible in their movements, you probably want your Pac-Man aperture to be even larger than you normally would have it for infantry:
 |
| Ride - ride to Gondor! |
Well, hopefully this was intriguing and gave you a few ideas to use in the future! I'm looking forward to bringing the Men of the West to the tabletop soon, so watch this space and see if these formations are used in upcoming battle reports! Until next time, happy hobbying!
Wow, what a great article!
ReplyDeleteBut I have a question: if you turn the millennium Falcon 180°C, you can march and charge in the next turn with the boar snout right? And would that be a good tactic?
You certainly can! The Falcon isn't a formation you want to fight in (Easterlings might manage to not trap themselves), but you could very easily change to a Board Snout formation to prepare for the oncoming charge. The only tricky thing is the models protecting the edge of your wedge might need to move before the Marching hero because they might not be within 6" of him when they finish moving.
DeleteGreat article, I really like your formation articles. I always learn something new!
ReplyDeleteThanks mate - they're fun to make!
DeleteFunny to see how much you discover through your testing ^^ Gonna use that to throw those damn peasants down their horses !
ReplyDelete