Good morning gamers,
Well, we've been plowing through magical spells for a while now, but we come today to the last spell in the arsenal of MANY evil spell-casters (causing us to wrap up a LOT of models today). While Ringwraiths (and other evil casters) have neutralizing spells in the form of Transfix/Compel, a precision damage spell in Black Dart, and the ability to reduce enemy resources/stats via Sap Will and Drain Courage (the Witch-King also has access to Your Staff is Broken), Ringwaiths have a very iconic spell in the game that can scatter enemy models: Instill Fear.
While Instill Fear is a good scattering spell, we'll be talking about a more precise scatter spell as well: Call Winds (which is only available to Galadhrim and High Elf Stormcallers).
 |
| Nazgul: "I'm casting Instill Fear - SCREEEEEEEEECH (or is that Transfix now? oh well, whatever!)!" |
What Do These Spells Do?
Instill Fear is an area-of-effect scatter spell that affects all models within 3" of the caster (not because the spell says it's 3", it's just always 3" for all the models that have it). All enemy models within 3" of the caster have to pass a Courage test or make a full move directly away from the caster (or until they run into something/someone) and are afterwards unable to move (basically, they run in fear). If channelled, the models that test for Courage have to roll three dice and use the lowest two dice (which, if you haven't seen the math for it, is pretty brutal for anything that is below Courage 5 - and even C5 models are only 60% likely of passing). Add to this that most models with Instill Fear have some kind of Harbinger of Evil/Ancient Evil special rule attached to them, models really have to be Courage 6 to have a better-than-not chance of passing this channelled spell . . . ouch.
The models test in the order the caster wants, so it's pretty common to test with the models furthest from the caster first, then working your way inward. You can cast this spell a few milimeters from a model (aka within an enemy model's control zone), but after the scattering, you will need to complete the charge against whatever model you entered the control zone of first.
Call Winds is a precise scatter spell, targeting a single model and pushing that model back D6" (2D6" if channelled). The model stops if it hits an obstacle (but not models) and is Knocked Prone. Unlike previous versions of the game, models aren't forced to stay on the ground for the rest of the turn (which is sad). Like Sorcerous Blast, the Strength of your target doesn't dictate whether the model can be knocked Prone - anyone is fair game. This spell is different from Sorcerous Blast in two ways, though: first, this spell doesn't knock any other models Prone if they're in the path of the scattered model. Second, no damage is done to the target (or anyone else the model would pass through - even when channelled). While not a damage spell, it certainly changes the way an enemy model can behave for the round (and usually the next round as well).
Who's Got These Spells?
Let's review who has the spells we'll be talking about today:
- High Elf Storm Callers (Rivendell) have access to Call Winds, which can be cast easily on a 3+;
- Galadhrim Storm Callers (Lothlorien) also have access to Call Winds and cast it on a 3+;
- All Ringwraiths (Mordor, selections in Barad-Dur, Angmar, Corsairs of Umbar, Serpent Horde, Easterlings) have access to Instill Fear and most of them cast it on a 5+ (the Witch-King of Angmar and the Dark Marshal cast it on a 4+);
- Angmar Orc Shamans (Angmar) cast Instill Fear on a 5+;
- The Mouth of Sauron (Mordor) casts Instill Fear on a 5+ as well;
- Smaug (The Desolator of the North) casts Instill Fear on a 5+ (despite being really scary?!?!?!?!);
- The Necromancer of Dol Guldur (Dark Powers of Dol Guldur) casts Instill Fear on a 4+;
- Galadriel, Lady of Light (White Council) casts Instill Fear on a 4+; and
- The Dark Lord Sauron (Barad-Dur) casts Instill Fear on a 3+ (which is AMAZING).
How Do You Use These Spells Most Effectively?
These spells are pretty straight forward, but using them can be tricky - so here are some guidelines:
- Don't channel these spells (EXCEPT as a Hail Mary move);
- Cast with a 70% chance of success; and
- Target a model with Call Winds (or a group of models with Instill Fear) that will make a difference.
1) Channeling: Balancing Game-Altering Power With Incredible Risk
The channelled versions of these spells are great - a 2D6" throw-back for Call Winds will roughly send a model flying 7" and force the model to spend half of its movement standing up the next time it's able to move (which could be this turn, but might be next turn if your opponent's character has already moved). While you might whiff your roll and only throw the model back 2-4", you're still forcing your opponent to get where they were BEFORE you cast - and that's huge (you're making your opponent spend 1-2 turns getting back to where he was). At a maximum, you could send your opponent back 10-12" away from his starting position, which means it will take 2-3 turns to get back to where he was - and THAT has huge benefits for sure.
A channelled Instill Fear makes models that have "good" Courage NOT reliably pass their Courage tests - and the result of failing this test is a move away from the caster (with no ability to move further that turn). As has been noted previously, since most of the models that have Instill Fear also apply a -1 penalty to your Courage if you're within 6-18" of them (awww, poor Mouth of Sauron and Angmar Orc Shaman - not that Mordor or Angmar are hurting for Courage penalty heroes), enemy models will need to have a base Courage 6 (which becomes C5) to have a better-than-not chance of passing their Courage test.
While the channelled versions of these spells are great, the models that have these spells are limited in the Might they have - and most of them would prefer to use them for other things! Stormcallers and Angmar Orc Shamans only have 1 Might each and most Ringwraiths only have 2 Might (generic Ringwraiths should ALWAYS have 2 Might, no matter what list you're using them in), so choosing to channel this spell means most of the casters have 0-1 Might left (to boost the casting attempt, to boost a different casting attempt, to boost a dueling/wounding roll, or to call Heroic Moves - to say nothing of Heroic Combats/Channellings/Marches where applicable). As great at these spells are when channelled, I think you risk wasting your Might by using it here.
That said, if you need it, you need it - Instill Fear allows a single caster model to clear an objective on the last turn of the game OR scatter part of a battle line on the first turn of full-on combat. Alternatively, you can use Call Winds to throw a single model off an objective OR send an important model (maybe a mounted model?) away from where they want to be. So, while channelling is risky, you can risk channelling as a Hail Mary maneuver (but manage your expectations).
2) The 70% Success Guideline
You're tired of hearing this by now, but let's say it again for completeness: if you're targeting an enemy model, having less than a 70% chance of success means you'll fail more often and waste Will points. With these spells, as I recommended in the previous point, I think you want to save Might to cast your spells, saving you some Will. Let's look at the differences between spending enough Will to get a 70% chance of success vs. saving a Might point to boost a spell:
- Either Stormcaller - Call Winds (3+): 2 Will (or 1 Will with 1 Might to boost);
- Galadriel, Lady of Light - Instill Fear (4+): free Will point + 1 Will (almost to 70% with free Will point and 1 Might to boost);
- The Witch-King of Angmar - Instill Fear (4+): 2 Will (or 1 Will with the reroll from the Crown of Morgul);
- The Dark Marshal - Instill Fear (4+): 2 Will (almost to 70% with 1 Will and 1 Might to boost);
- Angmar Orc Shaman, Mouth of Sauron, and Other Ringwraiths - Instill Fear (5+): 3 Will (or 2 Will with 1 Might to boost);
- Smaug - Instill Fear (5+): free Will point + 2 Will (or free Will point + 1 Will with 1 Might to boost - let's assume that since you're moving to within 3" of some enemy models in order to cast this spell that you're probably not Breathing Fire this turn, eh?);
- The Necromancer of Dol Guldur - Instill Fear (4+): 2 Will (or 1 Will with free die from your army bonus); and
- The Dark Lord Sauron - Instill Fear (3+): free Will point + 1 Will (or free Will point with 1 Might to boost).
As you can see, most of the models in this list will save 1 Will if they're willing to spend a Might point in the case of a just-barely-failure roll. For some of these characters, Will is a very limited resource (Angmar Orc Shamans and Stormcallers in particular), so saving Will is good for them. For others (like Sauron or Galadriel, Lady of Light), you probably have other things you want to use your Might for, so perhaps you can lose a little more Will to save your Might. Note that in previous posts (like Auric spells) we talked about spending more Will so you were less likely to need to spend Might. This post is exactly the opposite: here we assume your Might is the more expendable resource because we're going to be Will-constrained (and our Might, while "always useful", is most useful helping us cast spells instead of being used for other things).
3) Finding the High-Priority Target(s)
What makes for a "high priority target" differs for each spell. Call Winds is best employed against models that are going to cause problems if they get to you (either in combat or because of auric abilities). While targeting models that don't have Will makes it more likely that your spell actually works (warrior monsters, for example), it's okay to target models with a decent amount of Will to force them to spend resources to resist the spell. Mounted models (especially mounted heroes) make for great targets, as the Knocked Prone will deprive them of their mounts (in most cases - wargs can be complicated) and makes the hero less dangerous (and slower to return to the fight).
 |
| A Ringwraith attempting to Instill Fear against this formation - a formation that is too wide to be covered fully by the 3" radius of the spell (the two models on each end in the back rank and the model on each end of the front rank - three models on each side - are out of range). This is not a good way to cast Instill Fear . . . |
Instill Fear has a different kind of priority target: spread-out battle lines. Since you scatter models directly away from the caster, casting it against a straight two-rank-deep battle line will cause very few models to actually move away from you (most of the back-rank models, but not very many of the front-rank models).
This is what happens when you have a lot of back-rank models passing Courage tests and some models that are outside the 3" radius of the caster - three models failed their Courage tests (indicated by the models with the dice) BUT were prevented from going anywhere because the spearmen passed their Courage tests:
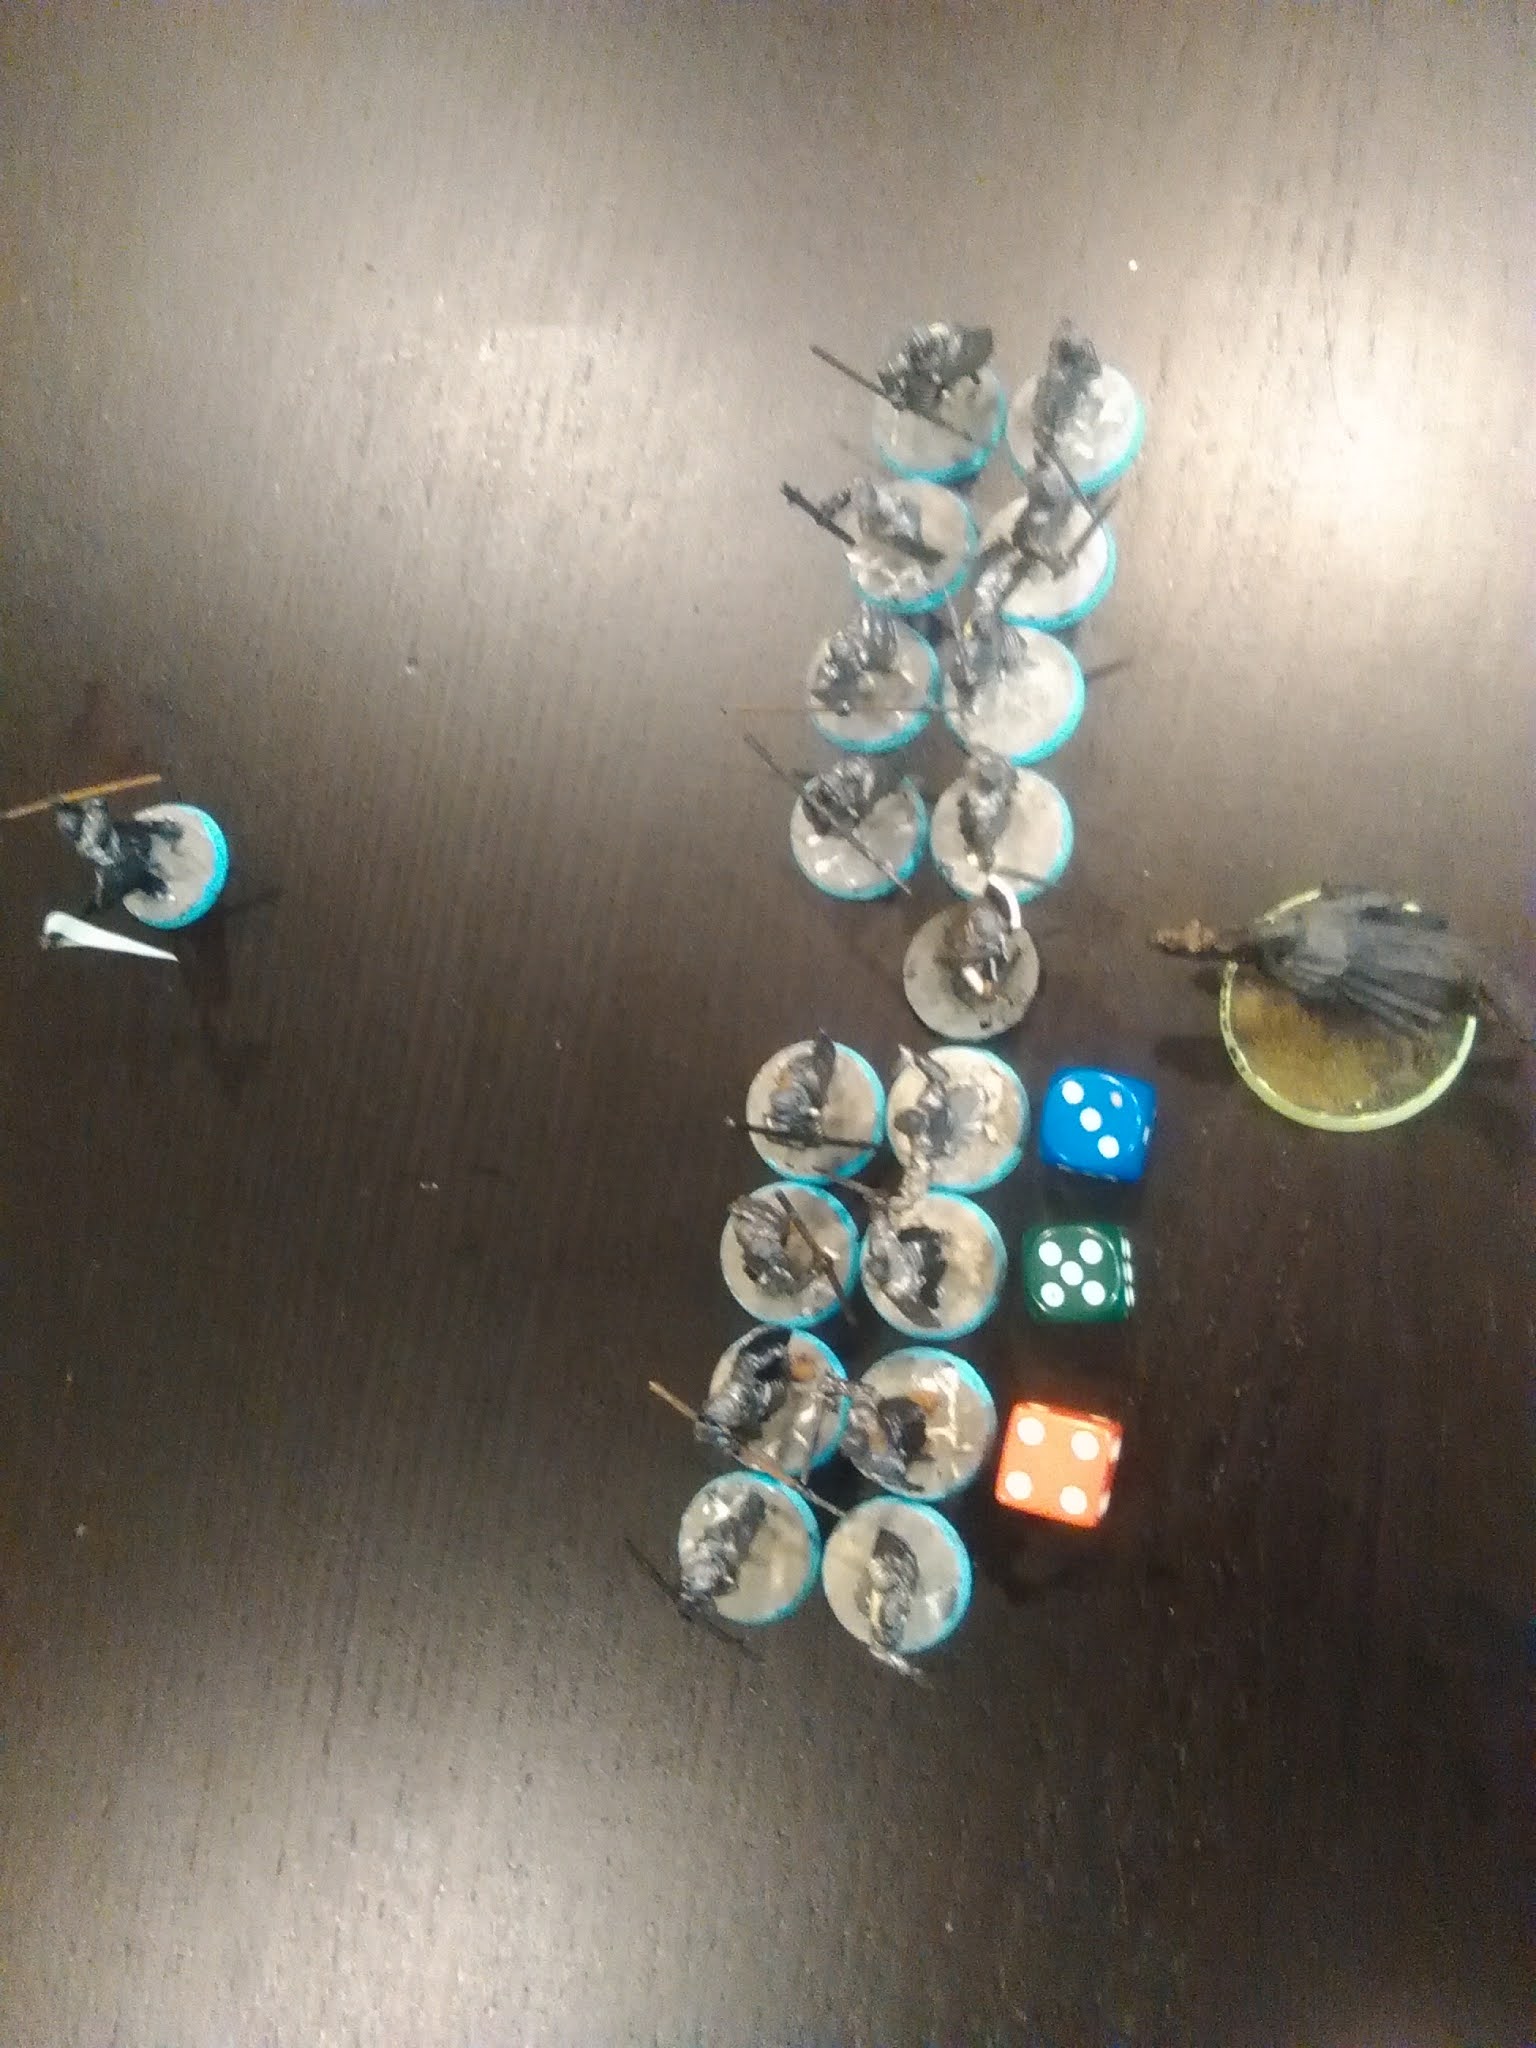 |
| Unchannelled casting attempt: not very good, eh? |
When channelled, the results are a bit better (I rolled an extra die for each of the previous trials and dropped the highest score), but once again, you see the benefits of passing Courage tests:
 |
| A bit better, but once again, good Courage test rolls AND the inability to cover all of the models causes this to be inefficient. Still, the formation has been split in half and is without a Captain and banner - perhaps now is a good time for a charge? |
 |
| Second formation: staggered back rank for maximum visibility with archery - perfect for Instill Fear! |
As a result, ranks of archers that are in a stagger pattern (with the second rank looking between two friendly models) make much better targets - and single-rank formations (or a small cluster of troops) are still better targets. The fewer units there are, the less likely they are to prevent other models from scattering away from the model casting Instill Fear.
Here's what the normal cast looked like:
 |
| Admittedly, we had more models fail their Courage tests in the back rank - but there is an interesting catch with this spell and this formation: a single spearman who runs allows two models in front of him to flee from the caster (because of how their bases line up with the caster and the spearman behind). In trade, despite the slightly different starting angles, the models flee together away from the caster (as opposed to the hap-hazard retreat we saw above). |
Now that's more like it! The channelled version is even more impressive:
 |
| One guy left huh? And I've go the higher Fight Value and charge bonuses? I think I'll take that . . . |
One final (probably obvious) point: this spell doesn't work against models that automatically pass Courage tests - whether that be tied to a special rule like Bodyguard/Sworn Protect or tied to a magical power/special rule (such as Aura of Command or the Balrog's Goblin Mastery rule). Thankfully, all of the models with Instill Fear have another spell in their arsenal that might help with this (like Sap Will to take down Aura of Command or Fury) or, just make sure you head-hunt the enemy hero who's providing the auto-passing of Courage tests (to take down Sworn Protector/Bodyguard). If you drew the Balrog, good luck . . .
When Do You Use It?
There's a variety of models that have these spells - different casting values, different Will stores (including free Will/rerolls), and different purposes they play in their armies. Let's take a look at some illustrative cases for how you can use Call Winds and Instill Fear.
Use Case Study: Storm Callers and Call Winds
Stormcallers have two spells - Call Winds and "another one" (High Elf Stormcallers have Strengthen Will - which we've already reviewed - and Galadhrim Stormcallers have Enchanted Blades - which we'll be looking at next week). Honestly, when I look at Stormcallers, I see a single spell: Call Winds. Cast on a 3+, this is a more reliable spell than your alternative option (no matter which version of the Stormcaller you have) and does pin-point neutralizing of enemy threat models. Since any natural 6 gives you your Will back, there's an off-chance that a Stormcaller will be able to cast Call Winds more than three times in a game, but even if you only get it off three times, you should make your points back pretty easily.
Based on the kind of list you're using, your priority targets will change - if you're running a High Elf Stormcaller with Gil-Galad and Glorfindel, you probably don't care about throwing back Cave Trolls, but throwing models like Shades, Barrow-Wights, or Fell Beast-riding-Wraiths is probably very helpful. If you're running a Galadhrim Stormcaller with Galadriel and Celeborn, you might care about trolls more (though flappy-flappy Ringwraiths are probably still high on your priority list).
This post closes out the spell suite for the High Elf Stormcaller, but you already know what I'm going to say: always cast Call Winds (on 1 Will, save your Might to boost) and don't cast Strengthen Will ever. If you want more Will on one of your characters (to resist magical powers OR to let someone like Elrond or Arwen cast more often), there are other/better options for you (Lindir, for example, grants Resistant to Magic to nearby Rivendell models at a competitive price to the Stormcaller, while Gandalf the Grey is a historical ally if taken from the Fellowship and casts Strengthen Will much more reliably on a free die - and does a lot more than the Stormcaller at a much higher price).
Galadriel has a 6" bubble for Courage reduction, which is enough to cover her Instill Fear radius (making it that much harder for enemy models to avoid the normal version of this spell and much MUCH harder to avoid the channelled version of this spell). If placed in the center of a battle line, Galadriel can keep nearby friendly models protected from archery and then scatter the enemy spear-supporting models before combat. As combat continues, this spell becomes even more devastating, as battle lines shift and warp - it's truly terrifying to face! Cast on a 4+, you should get it off nearly every time you cast it (if you use 1 Will and your free Will point) - absolutely killer!
Galadriel, Lady of Light is an excellent addition to any Forces of Good army at high points levels - this post closes out her spell suite, so here are some thoughts on how to employ her magical powers:
- On the first turn of the game, if your opponent has caster models near you (or might have caster models near you in a maelstrom match), you cast Fortify Spirit on Galadriel herself - this makes her less likely to lose all of her Will from a cheeky channelled Sap Will;
- Channel Fortify Spirit on yourself if your opponent has 2+ Ringwraiths, as you want to resist all spells that target you on a 5+ regardless of what your opponent rolled (which you should get on those 2 free dice 55% of the time - and 75% of the time, you should get a high value of a 5);
- If your opponent isn't near you, delay on casting Fortify Spirit on yourself on the first turn and instead cast Fortify Spirit on another key model (prioritizing mounted models first, since they may not be near you on the second or third turn) - you can channel this if you really want to, but I think it's optional;
- If your opponent has Spirit models that are a danger to you (Ringwraiths, Shades, and Barrow-Wights in particular), cast Banishment against them (channel to force them to spend more resources OR to have a good chance of killing them if they fail to resist); and
- If you don't have a good target for Banishment or Fortify Spirit, cast Instill Fear if your opponent has models near you just to spread models out.
Use Case Study: The Necromancer of Dol Guldur and Instill Fear
The Necromancer is a head-hunter, looking for models (usually heroes) that he can smash through with Drain Soul and a cheeky Transfix (or a channelled Shroud of Shadows on himself). But what happens if your opponent is hiding his heroes behind a wall of troops? Well, Instill Fear comes to the rescue, allowing you to scatter enemy models away from the action and leaving the hero vulnerable to a charge.
Even if your opponent has a hero in the front rank (let's say a generic Captain who is below F7 and can't call Heroic Strike), casting Instill Fear might not make the hero run (you don't want that to happen - have him test first) but it probably WILL make his spear-supporting model run away, exposing the hero to a bludgeoning from the Necromancer. Getting another model into the fight will be helpful just to get the amount of dice increased. This strategy works particularly well to scatter models that have rallied around a model that has been Paralyzed by Mirkwood Spiders, by the way . . .
This is our last post on the Necromancer, so here's my recommendations for using him:
- Always, always ALWAYS keep your army bonus;
- Look for priority targets to cast Chill Soul on 2 Will against (plus the free die from your army bonus);
- If there is a model with 3 Fate (especially if they're rerollable), channel Curse on 2 Will (plus the free die from the army bonus) instead;
- Cast Shroud of Shadows on 1 Will (plus the free die from your army bonus) on an important model to make safer for the current round (the Necromancer if he's threatened, otherwise a power piece) - channel on 2 Will if the target is charging into an important fight (could be the Necromancer of a power hero);
- Cast Drain Courage and Transfix on 1 Will (plus the free die from your army bonus) on a single die when you don't have good targets for Chill Soul, a channelled Curse, or Shroud of Shadows;
- Cast Your Staff is Broken on 1 Will (plus the free die from your army bonus) early on enemy wizards to force them to spend resources early on;
- Cast Sap Will on 2 Will against models with 4+ Will OR models that have Auric spells up (or Fury); and
- Don't waste your time with Compel or Instill Fear unless a scenario requires an enemy model to move somewhere (use 1 Will or 2 Will respectively).
Use Case Study: The Dark Lord Sauron and Smaug
The Dark Lord Sauron can use Instill Fear the same way as the Necromancer - focusing on isolating an enemy hero to bludgeon them to pieces. While I think this works just fine, it's also great for charging towards warriors that are to the left or right of a hero in order to scatter them away and come crashing in on the flanks of a hero. The scattered troops will limit your opponent's ability to get important models into the fight after the cast (in case you're moving first).
For Smaug, this is really important (albeit harder to cast that you'd like) because your base is so massive - and because you can't displace miniatures, you need to be able to do what you can to get them to move away from important models. If you can scatter warriors away from you (and your base is HUGE), you can free up the space you need to charge the heroes you want. Casting this on a 5+ is regrettable, but when you need it, you need it.
Honestly, while you CAN cast this spell with either model, you're only planning on using it if you need to clear unimportant models away from high-priority targets. Most of the time, you want to be casting other spells - Transfix, Compel, or Chill Soul (for Sauron) come to mind, but none of these spells can clear out chaff troops from clogging up your path to valuable units. So use this to clear them out only - don't waste your time on this spell if you don't have to!
This post wraps up both casters - Smaug should stick with his easiest spells because he'll want Will for breathing fire on the same turn he casts magic (or passing Courage tests, resisting spells, etc.). You can do loads with Drain Courage and Transfix, so use them. For Sauron, I have the following recommendations (if this reads similarly to the Necromancer's recommedations, there's a reason for that):
- Look for priority targets to cast Chill Soul on 1 Will against (plus your free Will point);
- Cast Compel on 1 Will (plus your free Will point) to bring models closer to you so you can charge them OR to send auric models away from you so your army can engage less-buffed troops.
- Cast Drain Courage and Transfix on your free Will point when you don't have good targets for Chill Soul or Compel;
- Cast Sap Will on 1 Will (plus your free Will point) against models with 4+ Will OR models that have Auric spells up (or Fury);
- Don't waste your time with Instill Fear unless a scenario requires an enemy model to move somewhere (use 1 Will plus your free Will point); and
- Don't channel anything - you need your Might for other things (such as Heroic Combats when your opponent is playing keep-away and promoting Ring saves).
Use Case Study: All the Ringwraiths and Instill Fear
The Witch-King and the Dark Marshal are the only Ringwraiths who cast Instill Fear "well" on a 4+ - and since they can both be mounted on Fell Beasts (I don't do this - I prefer horses), you can actually fly them OVER the enemy battle line and scatter the enemy line TOWARDS your troops! The front-line models will lack spear-supporting friends and your own ranks can charge towards them and pair up into the fights they like. Also, the size of your base matters - Fell Beasts can cause a LARGE section of your opponent's battle line to scatter (which can be huge).
All of the other Ringwraiths cast this spell on a 5+, which means you're draining yourself if you want to cast it reliably. By spending 3 Will to cast (or 2 Will with the potential to boost with a Might point), you can cast this spell once in a game without risking too much of your Will or Might IF you have more than 7 Will - so make sure you cast it when it counts. Otherwise, you've got an array of really good spells (Transfix and Drain Courage being my favorite, some people like Black Dart - but I don't) - use those spells.
This post closes out the spells available to all of our Ringwraiths, so let's take a quick look at how to prioritize spells:
- If you're running Khamul the Easterling, the Knight of Umbar, or the Betrayer, consider not casting spells other than Transfix and Instill Fear (depending on whether you are charging an important model or whether you need to scatter chaff troops off an objective) - your Will is more important elsewhere;
- If you're running any other Ringwraith model, consider whether your opponent has a hero who can be easily neutralized by casting Drain Courage (either once channelled or normally a few times) - if there are heroes that are vulnerable, use 1 Will to cast the spell (2 Will if you channel);
- Once you're nearing combat, if you have a clear path to a priority target, cast Compel with 2 Will to draw them out of formation (or Transfix if they're already vulnerable and you NEED the spell to go off a tad more reliably);
- If you are nearing combat and you don't have a clear path to a priority target, cast Instill Fear (if your opponent doesn't pass Courage tests reliably) to clear out chaff models that are in your way;
- Cast Sap Will very selectively (4+ Will, channel against models with the Will of Evil special rule);
- If you're using the Witch-King, cast Your Staff is Broken (never channel it) against a wizard to force them to spend Will/Might to resist your attack; and
- Only cast Black Dart if there is a priority target that needs a single wound to be neutralized (I generally avoid doing this).
"Use" Case Study: The Mouth of Sauron and Angmar Orc Shamans
So, I personally think Transfix and Drain Courage are great spells for Ringwraiths. Both of these spells happen to be on the Mouth of Sauron as well. Angmar Orc Shamans are the only model in the game with Wither and it's also a very useful spell (against the right people). So . . . don't cast Instill Fear with either of these models - rely on the other spells you have!
Both of these casters are also done - you already know what I'm going to recommend: cast their easy spells (0-2 Drain Courage casts and 1-2 Transfix casts from the Mouth of Sauron, 2-3 Wither casts from Angmar Orc Shamans) and avoid Instill Fear like the plague.
Call Winds and Instill Fear
Flinging troops into unwanted directions is a niche way of managing your opponent's models. While it won't always be effective, any of these spells that go off will change the tempo of the game dramatically! I played a great game against Rythbryt once where I had the Witch-King and the Dark Marshal (both with a 4+ Instill Fear) against Sauron and a Ringwraith (with a 3+ Instill Fear and a 5+ Instill Fear, respectively). It was rather bizarre when our battle lines flipped mid-battle thanks to the Instill Fear from models that had wrapped around each other's battle lines . . . the game was a hoot and we really enjoyed it (though our Orcs didn't care for it much, I think).
In our next post, we'll be looking at spells that augment the combat capabilities of your units - namely, Bladewrath, Enchanted Blades, and Enrage Beast. While most of these affect your Wounding rolls, the models we'll be viewing are mostly new units and can make really cool synergies for your army. This post also happens to be the second-to-last post in this series, so we'll be wrapping up magic and moving onto a different topic soon. Should be a great time - hope to see you there! Until then, happy hobbying!
Great article, I'd never even considered how different formations affected Instill Fear. I'd always just spammed it on Galadriel and accepted whatever havoc it caused as a bit of an unpredictable bonus, but you're totally right that it is more effective the more messed up a battleline is. I love casting it when outnumbered, it can totally change the maths on numbers in a fight.
ReplyDeleteThere are a few other little things that I've noticed that I think are also worthwhile considering. First is that if you're moving first, a model failing its courage test is good for you regardless of whether it can actually run anywhere, because it pins them in place. Against C2 armies, it can almost be a bit of a 3" Immobilise, letting you engage only the models that you want to (ideally with a numbers advantage) while the others stand around cowering. If the enemy is looking to move forward to engage you, then you can actually end up with a threefold splitting of their force: one third are running for the hills 6" away; another third are stuck standing still; and the last third actually got to move and charge you. So much fun!
A kind of implicit point that I think you sort of touched on is how much its value changes with matchup, and some of the implications of that. Most particularly, part of why I love Galadriel LoL so much is that unlike everyone else who can cast this spell, she often ends up facing Evil armies, who tend to have lower Courage values. Elves won't stress Instill Fear that much, but Gothmog's LL will be quite literally terrified. It makes her much better in Good/Evil tournaments, and I think also makes the Evil models that can cast it more likely to do so when they're not facing a Good army. Or the Balrog. It's a bit of an exception.
The final thing I've noticed with this spell is that it's much better on models who want to get in close like Galadriel or Sauron because they were already planning to be within 3" of lots of enemies. Other models can hit and run a little to cast it sometimes, but you often want to get within 1" of a model to maximise models covered, which can be a hassle unless you were already keen to charge the enemy battleline. Ringwraiths will want this sometimes, but they're often a bit stressed about Will, and only the WK is really strong enough to go charging a shieldwall head-on anyway. Smaug should love the spell, really, but as you've pointed out he doesn't really want to spend that much Will to cast it on a 5+. This is obviously just one more reason why Angmar Shamans should never cast this spell, in case any more were needed. They really do tick absolutely none of the boxes for models that want to cast this spell :(
Excellent points - I think the advantage you get with Ringwraiths is the ability to hop over the battle line, scatter models TOWARDS your lines so you can fight people piecemeal. Something I didn't realize until I did the illustrations for this post was that if your opponent does a "square block" of units (one spearman right behind a melee guy), they won't be in base contact when they run away from you. This allows you, if you scatter towards your guys, to engage both the spearman and his front-line guy separately and get them trapped that much more easily. The ringwraith is then able to charge whoever was left OR just fly away again, forcing your opponent to play on two fronts.
DeleteGaladriel LoL is very good at casting this spell, but I think it's the Ringwraiths and Sauron that can use it the best, mostly because if you're facing a Shaman, you can Sap Will against them (Gothmog's LL should always take a Shaman because, as was pointed out in your comment, their Courage is bad - even on their heroes). Between Sap Will and Black Dart to take down heroes like Theodred/Theoden (often the lynchpin for Rohan Royal Guard bodyguard rules), Durin (lynchpin for Khazad Guard bodyguard rules), or Boromir/Denethor/Elessar (lynchpin for Fountain Court Guard/Citadel Guard bodyguard), I think they have a better shot at making the most use out of Instill Fear. Now how much Will are they going to have after casting all those darts to kill off those heroes? Who knows (I'm generally not a fan of Black Dart, as I think everyone knows).
That's definitely very true, a flying Nazgul is amazing at pushing your opponent's line in every direction at once. And they've got great supporting spells to take on enemy counters in a way that Galadriel can't match. At the same time though, you've done a great job of pointing out the difficulty: you've got so many great uses for those Will points, especially if you're on a Fell Beast and thus probably keen to be in combat a lot. I suppose that probably means that the best caster of Instill Fear is a Ringwraith on Fell Beast, in an army with other Ringwraiths who can Black Dart/Sap Will away other counters
DeleteGreat write-up as always; the Instill Fear spell is also one of the reasons why I never leave home without a shaman (unless you're playing Angmar, in which case screw shamans because you don't get Fury anymore, :P ). Having the, "I auto-pass Courage tests" up does a lot for you, most notably shutting down Instill Fear.
ReplyDeleteTrue that - though the timing of it is important. Against a single Ringwraith, he can't cast Instill Fear and Sap Will on the same turn, but a Sap Will is going to turn most Fury Shamans into glorified spearmen. Though if he spends a turn targeting a Shaman, he's not targeting a killing hero, so that's probably a good thing.
DeleteGaladriel, Lady of Light is the only person with Instill Fear that you need to worry about if you're playing Good vs. Evil, so in those cases, having a Shaman is gold. :)
I definitely agree about the Shamans. They're way worse than last edition, and they're frequently not that amazing, but when you need them... Facing Galadriel, Army of the Dead, Angmar or literally any army with Cirdan or Radagast is just a nightmare without a Shaman or equivalent unless you're at least Courage 5 or have Bodyguard. I definitely think that people discount Shamans because they're worse than they used to be, ignoring that they're actually still pretty good. Except Angmar ones, which have no real purpose and kind of suck
Delete