With Centaur out of town for personal reasons, Tiberius and I got together last week to play a friendly game of MESBG. We ended up with a pseudo-thematic match-up that pitted the Fellowship of the Ring against the forces of Isengard (so, if Frodo had opted to make for the Gap of Rohan instead of entering Moria--talk about an alternate universe). We decided early on to try to make a Battle Report of it, which would be my first here on TMAT (very exciting). The game didn't disappoint.
The Participants: Fellowship vs. Isengard
Rythbryt's Fellowship of the Ring
890/900 points
890/900 points

Nine companions... and a pony...
10 Models (10 Heroes, 22* Might)
- Gandalf the Grey [ARMY LEADER]
- Legolas Greenleaf with armor and Elven cloak
- Gimli, Son of Gloin with Elven cloak
- Frodo Baggins with Sting, mithril coat, Elven cloak, and the Ring
- Meriadoc Brandybuck with Elven cloak
- Peregrin Took with Elven cloak
- Samwise Gamgee with Elven cloak
- Bill the Pony
- Boromir of Gondor with shield and Elven cloak
- Aragorn - Strider with Anduril, bow, armor, and Elven cloak
I'd originally brought a 700 point list that didn't include Gandalf (we usually play points matches at 700 points, just to limit the length of the game), but Tiberius was kind enough to bump it up to 900(ish, we were both slightly under) so I could have a wizard (which, given that Tiberius had Saruman on the other side, was a lifesaver for my Fellowship). The crew pretty much has the full kit, sans horses (elven cloaks, Anduril, a shield for Boromir, armor on Legolas and Aragorn, etc.), plus Bill the Pony as our resident rock star. The hobbits aren't very resilient on paper (neither is Boromir), but there are enough new synergies in the updated army list that I was hoping they'd prove tougher on the table than they look in the book. All models also gain Fearless when Frodo is alive, and the force never counts as Broken unless Frodo is slain, so keeping Frodo alive would be priority #1.
Tiberius's Find the Halflings!
888/900 points
888/900 points

So you have chosen... death...
53 models (5 Heroes, 11 Might)
- Saruman [ARMY LEADER]
- Ugluk
- Vrasku
- Mauhur
- Grima Wormtongue
- 12 Uruk-Hai Marauders with Uruk-Hai Bows
- 18 Uruk-Hai Warriors with shields
- 11 Uruk-Hai Warriors with pikes
- 1 Uruk-Hai Warrior with shield and banner
- 6 Dunlending Warriors with shields
Tiberius's Pre-Game Thoughts: For those who have followed the blog for a while, the Fellowship faced Isengard three times during Fellowship month in 2012 (Hold Ground, To The Death, Lords of Battle) and three times recorded on this blog prior to that in 2011 (Meeting Engagement, To The Death, Clash of Piquets). So needless to say, I've fought this kind of fight a lot. With three epic melee heroes (Aragorn, Gimli, and Boromir), one nasty archer hero (Legolas - though Aragorn does this too), one very powerful mage (Gandalf the Grey - not better than Saruman but still), one cheeky pony (Bill - mega-Might factory), and four annoying Hobbits (especially Sam and Frodo), I know this is going to be an up-hill fight.
Rythbryt's Pre-Game Thoughts: Reading Tiberius's pre-game thoughts is amusing in hindsight, since I had basically the same thought beforehand about his force: this was going to be an uphill fight. I've faced Uruks before quite a few times (Centaur's Uruks have cut my prized Iron Hills warriors to pieces more than once), and while the lack of Fight 6 would cause trouble for Tiberius's heroes, I was very worried about what his rank-and-file Uruks would do to my heroes if they were able to surround and trap them, especially since I did not have a banner. I'd also never played with the Fellowship before (and had only faced Saruman once before), so this figured to be baptism by fire (perhaps literally, if Saruman threw in a Flameburst or two). Having said that, I have played hero-heavy infantry lists a fair bit (Champions of Erebor at TMAT's Brawler Bash tournament, and then quite a bit with the Return of the King Legendary Legion that sports Aragorn, Gimli, and Legolas, so I felt I had at least some idea of how the Fellowship would play.
We did the 2D6 roll-off for scenario, and settled on Hold Ground, which we played on a 48" x 48" board. The majority of the Victory Points for the scenario center around an objective at the center of the board: at the end of the game (which randomly ends on a D6 roll of "1" or "2", after one force breaks), whichever force has more models within 6" of the objective gets 3VPs, which scales up to 5VPs if it has twice as many models within 6" as its opponent, or 7VPs if it has three times (or more) as many models within 6" as its opponent. There are also the standard 1VP/3VP for wounding/slaying the enemy leader, and another 1VP/3VP for breaking your opponent/breaking your opponent without breaking yourself.
The other key component of this scenario is deployment: non-Siege Engine forces roll to come on at the end of the Move Phase, using the Maelstrom of Battle rules (so a "1" doesn't come on, "2-3" the opponent gets to choose a point on a board edge, "4-5" you choose a point on a board edge, and "6" you can come on at any point you choose), and you can modify your Maelstrom roll with Might (if your warband's leader has any). There's also no alternating-warbands deployment: the player with priority rolls for all their warbands first (deploying them if they roll high enough), and then the second player rolls for and places all their warbands after that.
The Fellowship won the roll off for priority and so will roll to arrive first.
Rythbryt's Pre-Game Thoughts: Reading Tiberius's pre-game thoughts is amusing in hindsight, since I had basically the same thought beforehand about his force: this was going to be an uphill fight. I've faced Uruks before quite a few times (Centaur's Uruks have cut my prized Iron Hills warriors to pieces more than once), and while the lack of Fight 6 would cause trouble for Tiberius's heroes, I was very worried about what his rank-and-file Uruks would do to my heroes if they were able to surround and trap them, especially since I did not have a banner. I'd also never played with the Fellowship before (and had only faced Saruman once before), so this figured to be baptism by fire (perhaps literally, if Saruman threw in a Flameburst or two). Having said that, I have played hero-heavy infantry lists a fair bit (Champions of Erebor at TMAT's Brawler Bash tournament, and then quite a bit with the Return of the King Legendary Legion that sports Aragorn, Gimli, and Legolas, so I felt I had at least some idea of how the Fellowship would play.
The Scenario: Hold Ground
We did the 2D6 roll-off for scenario, and settled on Hold Ground, which we played on a 48" x 48" board. The majority of the Victory Points for the scenario center around an objective at the center of the board: at the end of the game (which randomly ends on a D6 roll of "1" or "2", after one force breaks), whichever force has more models within 6" of the objective gets 3VPs, which scales up to 5VPs if it has twice as many models within 6" as its opponent, or 7VPs if it has three times (or more) as many models within 6" as its opponent. There are also the standard 1VP/3VP for wounding/slaying the enemy leader, and another 1VP/3VP for breaking your opponent/breaking your opponent without breaking yourself.
The other key component of this scenario is deployment: non-Siege Engine forces roll to come on at the end of the Move Phase, using the Maelstrom of Battle rules (so a "1" doesn't come on, "2-3" the opponent gets to choose a point on a board edge, "4-5" you choose a point on a board edge, and "6" you can come on at any point you choose), and you can modify your Maelstrom roll with Might (if your warband's leader has any). There's also no alternating-warbands deployment: the player with priority rolls for all their warbands first (deploying them if they roll high enough), and then the second player rolls for and places all their warbands after that.
The Fellowship won the roll off for priority and so will roll to arrive first.
(More) Rythbryt's Pre-Game Thoughts: I was joking with Tiberius before we rolled for the scenario that I wanted a scenario with Maelstrom deployment and no centralized objective. Well, I got half of what I wanted. :-P I've played Hold Ground (aka "run to the middle" / "auto-lose") quite a bit, and have generally enjoyed it, but that was with Iron Hills Dwarves (who are very good at getting to the middle and then keeping it). I wasn't worried about getting to the middle with the Fellowship (call a free Heroic March with Aragorn and everyone's moving 7" or more each turn), but I was concerned about my ability to keep the middle if I got there first, against a horde of Uruks (with pikes) who could surround and then trap. While the fact that the Fellowship deploys as a single warband would help mitigate some of the unpredictability of Maelstrom deployment, once I "won" priority, I was worried that Tiberius would be able to counter-deploy his Uruks to trap me near the board edge while the bulk of his force went uncontested to the middle. And, of course, any time you have four Fight 3 hobbits against fifty Uruks, you're always worried about how they'll hold up once combat becomes unavoidable. Having played some hero-heavy elite armies before, I had a sense that Aragorn's free Might to call Heroic Actions (specifically moves) would be key to make sure I got to move first, so I could get my heroes where they needed to be and screen off the weaker members of the Fellowship (and hopefully the objective, if we got there first). Protecting Frodo remained priority #1, since my best bet at keeping the VPs close would be to break the Uruks without being broken myself--and keeping Frodo on the table was the easiest way to ensure at least half of that happened.
(More) Tiberius's Pre-Game Thoughts: The good news is that a good chunk of points in this scenario requires outnumbering your opponent in the center by a certain ratio. With five times the models of the Fellowship, I'm hoping to just have enough of us near the center to win. With the new army bonus that makes us not test until we hit 66%+ casualties and an auto-succeed with Saruman (assuming I can keep him unengaged), I'm just hoping the game doesn't go on too long...
Turn 1: Maelstrom
(Priority - Fellowship)
(Priority - Fellowship)
The Fellowship won Priority (R: yipes…) and proceeded to roll a 2, which Gandalf modified to a 1 (-1 Might) so the Fellowship could stay off the board. (R: I really didn't want to come on the board before I knew where Isengard was going to land... in hindsight, maybe I should have forced the action by going down first).
Saruman rolled a 4, and deployed in the center of the North board edge. He opted to include Grima in his warband, rather than attaching him to the fellowship. (R: this was a pleasant surprise for me, as I didn't really have a plan to deal with Grima, other than trying to March away from him and hit him with a Sorcerous Blast, Immobilize, or Compel. I also didn't realize this at the time, but it allowed me to target Grima with shooting attacks in addition to magical powers...)
Vrasku rolled a 3, and got put on the Eastern board edge, about 6" from the Southeast corner (R: I wanted his warband somewhere where the Fellowship could attack them or avoid them depending on where Mahur ended up going, so putting them near-but-not-with Ugluk and his mates seemed to keep those options open.)
Mahur rolled a 1, and elected not to modify it, so his warband stayed off the board as well. (T: We'll wait and see where the Fellowship arrives.) (R: bummer...)


Turn 1, End of Move Phase: Ugluk (5) deploys near the center of the East board edge.

Turn 1, End of Move Phase: Vrasku (3) is forced to come on 6" from the southeast corner of the board (on the east side).

Turn 1, End of Move Phase: A wizard is never late, nor is he early... he arrives precisely when he means to (and so does Mahur, apparently...)
Turn 2: To the Middle!
(Priority - Fellowship; Actual Priority - Isengard)
(Priority - Fellowship; Actual Priority - Isengard)
The Fellowship won priority again (R: We should really be saving these rolls...), but without any models on the board, Isengard got actual priority. After channelling Terrifying Aura on himself, Saruman's warband marched towards the middle of the board, as did Ugluk's and Vrasku's. (T: I realized after the game was over that channelling this spell was kind of pointless, because so long as Frodo is alive, everyone is Fearless...guess I need to kill Frodo...)

Turn 2, Move Phase: Vrasku advances from the board edge towards the center.

Turn 2, Move Phase: Saruman and Ugluk advance towards the center.

Turn 2, Move Phase: Saruman casts channelled Terrifying Aura (5, -1M).
At the end of the Move Phase, Gandalf rolled a 5 to enter the board on the east or west board edge. He chose the exact spot Vrasku had come on just before. All fellowship members performed full moves, except Bill (who has no interest in being in front) and Legolas, who has a nice open firing lane between he and Vrasku.

Turn 2, End of Move Phase: Gandalf rolls a 5 and the Fellowship enters play.
Mahur then comes on the Board with a 4, letting him choose any point on the North or South. He chooses a spot 6" from the southeast corner, and nine marauders move 4", lining up shots on Legolas, Bill, Frodo, and Gandalf. (T: In hind sight, it probably would have been better for me to have deployed further away to have a straighter shot at the stairs and get better benefit from the range of my bows, but whatever).

Turn 2, End of Move Phase: Mahur rolls a 3 (boosts to a 4, 1/2M) and comes on 6" away from the southeast corner. , on the southern board edge.
Gandalf casts Blinding Light, because Tiberius is nice (R: So many rules!) (T: I know. :) ). Meanwhile, Mahur and some of his choicest runners make a break for the stairs!

Turn 2, End of Move Phase: Mahur and his remaining marauders move 8" towards the center of the board.
During the ensuing shoot phase, Legolas (who didn't move) takes advantage of Good's priority to put three shots into the mass of assembled marauders, scoring two kills. He's now ahead on the kill-count with Gimli 2-0. Gimli's attempt to hurl a throwing axe at Vrasku goes wide-left. No other good models have shots. The marauders attempt to return fire at Legolas, and manage to score a hit through Blinding Light that wounds (Legolas saves it with Fate, 2/3F).

Turn 2 Shoot Phase: Legolas showing off his mad bow skills.
Turn 3: To war!
(Priority - Fellowship; Actual Priority - Isengard)
(Priority - Fellowship; Actual Priority - Isengard)
Hoping not to get caught by the Fellowship, Vrasku calls a Heroic Move (2/3M), prompting Aragorn to call his first (of what will be many) Heroic Move with Mighty Hero. In a theme that largely held true throughout the game, Vrasku won the roll-off, and promptly moved his heavily-armored siege Uruks to rejoin Saruman's and Ugluk's warbands, who were now converging rapidly on the objective in the middle.
With Vrasku's warband now out of the Fellowship's charge range, Aragorn spends his Heroic Move to charge the block of marauder archers on top of the hill, but the rest of the Fellowship are out of position to support him. Gandalf manages to get close enough to screen off Aragorn's left side, and casts Immobilize on Mauhur before he can flee (or counter-charge Aragorn) (cast on a 6, 3/5/3). Mauhur chooses not to resist. Frodo successfully puts on the Ring before he is charged, and the rest of the Fellowship forms up on the hill around Aragorn. Legolas has a clear firing lane to Mauhur.

Turn 3 Move Phase: Aragorn charges marauders (all by himself, apparently), as Gandalf casts Immobilize on Mauhur.

Turn 3 Move Phase: End of the Heroic Move-Off.
With both Heroic Moves finished, the marauders on the hill counter-charge Aragorn and Gandalf, while those near Mauhur line up some shots on Sam (scoring no wounds). With Aragorn now fighting four Uruk-Hai, Legolas passed up three shots at Mahur to take a 2+ shot at one of the four Uruks who attempted to trap Aragorn, but failed to kill him. Aragorn (who won his combat) succeeded in killing that Uruk, but no others. Gandalf loses his duel, but is not wounded.

Turn 3 Fight Phase: There's some Uruk blood for Gimli to spat (though he hasn't spilt any yet).
Far away, Saruman and Ugluk continue their orderly advance on the central objective, and are close to joining forces. (R: sorry, no picture.)
Turn 4: Buford's Cavalry
(Priority - Isengard; Actual Priority - Fellowship)
(Priority - Isengard; Actual Priority - Fellowship)
Turn 4 began inauspiciously, as Frodo (who had just put the Ring on last round) proceeded to fail his Ring check, which allows evil to move him (he fled from the rest of the Fellowship).
Knowing that they were still outnumbered on the hill, Aragorn called his second Heroic Move, in order to get the Fellowship into the Uruks before they could mobilize. Mauhur considered counter-calling, but knowing that he'd have a 50% chance of wasting his Might point, he chooses to save it for boosting his duel roll later.
Having secured the first moves, Aragorn charged two Uruks he failed to kill in the last combat, while Gandalf charged the third. Gimli then made a break for Mauhur (wounding him with a throwing axe - Gimli: 1/3M, Mauhur: 1/2H), followed closely by Sam. Gimli was then joined by Sam and Boromir.

Turn 4 Move Phase: Aragorn's Heroic Move ties up the straggling marauders, while Gimli pins down Mauhur.
With Priority restored, the marauders managed to peel Boromir and Gimli off Mahur, leaving Sam alone against the Uruk champion! (T: Ahah - I have saved Mauhur!)
As Frodo succumbs to the allure of the Ring and attempts to flee, Gandalf, Pippin, and Aragorn call Heroic Combats (Boromir: 5/6M, Aragorn: 2/3M) and succeed in killing 3 orcs in heroic combats. Gandalf charges into the Marauder who tagged Gimli, while Aragorn joins Sam in combat vs. Mauhur. (T: Oops...crud.) Pippin joins Boromir in his fight, making all three fights two-on-ones favoring the Fellowship.

Turn 4 Fight Phase: Several successful heroic combats (as Frodo mosies away).
Gandalf doesn't slay the Uruk in combat before Gimli does ("That one counts as mine!" 2-1 Legolas), Boromir and Pippin make short work of their Uruk, and Aragorn with Sam prove too much for Mahur. Legolas finishes his Uruk for good measure (3-1 Legolas). Now where has Mister Frodo got to?

Turn 4 Fight Phase: The Fellowship has control of the hill.
Turn 5: Reform the lines!
(Priority - Isengard)
Turn 5 saw Aragorn calling another Heroic March, pushing the Fellowship along the southern board edge, foregoing the stairs and heading towards the middle of the southern board edge (with Frodo rejoining them). Isengard concentrates its position in the center.
For obvious reasons, there were no combats, and everyone with a bow moved too far to fire (except Vrasku, who ended up without any eligible targets to shoot).

Turn 5, Move Phase: Mauhur's Marauders have rejoined Saruman, Vrasku, and Ugluk in the center (the white die near Saruman is the objective).
Turn 6: Portents of Things to Come...
(Priority - Isengard)
After Isengard reforms around the center objective, Aragorn spends his free Might point to call yet another Heroic March, pushing his companions further along the board edge. (T: He's scared of me...)

Turn 6, Move Phase: There are a lot of Uruks between the Fellowship and their objective...
Saruman, who has been measuring out 18" range the last couple of turns, finally casts his first spell of the game: Immobilize on Gandalf (5). Gandalf fails to resist it (4, 4/6W), but given that he's far away and can't be charged this turn, doesn't bother to spend Might to resist it.
With their fearless leader immobilized, the rest of the Fellowship prepares to take it slow...

Turn 6 Move Phase: Repositioning around Gandalf

… Except Legolas, who has managed to line-up a cheeky shot on Grima Wormtongue, with an in-the-way for a pikeman. Rather than opting for an auto-hit on Grima, Legolas fires three shots at the weasel. The first hits the pikeman, felling him. The second (now unobstructed) shot hits Grima, wounding (and killing) him. Gimli is now very perturbed. (R: This was a surprise (especially since I assumed Grima had more than one wound and at least one Fate). I know most players recommend that if you have to choose between taking Legolas and taking Gimli in a smaller list (like the ROTK Legendary Legion) to opt for Legolas. I try to take both when I can, but after shots like this, I can see why having Legolas is so valuable.) (T: The whole point of keeping him with Saruman was to keep him safe...so much for that...)

Turn 6 Shoot Phase: Legolas's three shots manage to take out the pikeman and Grima (5-1).
With no models in combat, and no Uruks with shots back at the Fellowship, we progressed to the next turn.
Turn 7: Arrows coming in hot
(Priority - Isengard)
After seeing the danger that Saruman can be to his fellows, Aragorn chooses to forego another forced march and chooses instead to call Heroic Resolve for free with Mighty Hero. Frodo decided to take off the Ring for now (passing his Courage test to do so). The rest of the Fellowship (except Legolas) moved around so they'd be in position to counter-charge the Uruks, should they try to attack. Gandalf chooses to cast Strengthen Will on himself and succeeds (5/6W).Saruman casts Compel on Gimli (4) and Gimli fails to resist it on his free Will point from the Resolve (3). He stumbles back a few inches, trying to remember what he was looking for.
Hoping to capitalize on their surprise marksmanship last turn, Aragorn (who didn't move this turn after calling Heroic Resolve), took aim at Saruman with his bow, but hit (and killed) a pikeman instead. Legolas also shoots at Saruman, managing to take down an Uruk with shield (2/3M, 6-1 Legolas), but again, no arrows find their way to Saruman. Still no combats to resolve.

Turn 7 Shoot phase: Legolas and Aragorn doing some light damage (but unable to hit their primary target, Saruman).
Turn 8: Kill the Wizard!
(Priority - tied, Fellowship)
This turn was so important that we don't have a single picture to show for it. (R: Sorry!)
Aragorn goes back to his previous MO and calls a Heroic March to get the entire Fellowship (again, sans Legolas and Bill) within counter-charge range of the Uruks. As the Fellowship advances down the slope, Gandalf casts Protection of the Valar on Boromir (4, 4/6W), trying to keep the low-Will hero from being dragged into combat with Uruks this turn. In this part, he succeeded...
Gandalf then proceeded to succumb to Saruman's second spell: a nasty Compel (4, 5/6 Will) and Gandalf completely whiffed his Resist roll (1, 2/6W) on double-dice (R: two 1s--yipes!). Because Aragorn had called a Heroic March, Gandalf ended up advancing a full 4.5" towards the Uruks, who then proceeded to surround and trap Gandalf with four siege Uruks - thankfully with no pikes. (R: I foolishly failed to remember that Gandalf had cast Terrifying Aura on himself, so we didn't take any Courage tests for those Uruks--big mistake on my part, given what happened next).
Fortunately the Uruks managed to score only three wounds on eight to-wound dice, and Gandalf has three rerollable Fate points (all of which he passed), so Gandalf remained unscathed (but out of Fate)… at least for now. Boromir also took an arrow from an Uruk Marauder during the Shoot phase (2/3H). (T: PAYBACK!!!!)
Turn 9: To Gandalf!
(Priority - tied, Isengard; Actual Priority - Isengard)
The Priority roll went against the Fellowship, which put Gandalf in a serious predicament. Seeing that the Uruks could trap Gandalf into yet-another-bad-fight, Aragorn called a Heroic Move. Saruman counter-called and won the roll-off, allowing the Uruks to re-engage Gandalf. The Uruks tested for Courage this time, and two critically-positioned Uruks failed their rolls (you'll see them standing ~1.5" away from him in the picture below. A good bunch of the Uruks opted to stay entrenched around the center objective, so only three Uruks (and a couple pike supports) managed to make their way around their terrified comrades into Gandalf.Finally, Saruman attempted to cast Immobilize on Aragorn (4, 4/6W), hoping to keep the famed hero from killing tons of Uruks, but to no avail as Aragorn stubbornly resisted the spell (4, 2/3W).
With Aragorn still un-tagged, the Fellowship managed to charge into the enemies surrounding Gandalf, gradually peeling them off into separate combats. Frodo, seeing lots of angry Uruks with pointy swords and pikes, put on the Ring, but most of the hobbits couldn't quite reach combat (except for Merry, who managed a tag-team with Boromir). Neither can Legolas, who seems content to shoot Uruks from afar after helping himself to a Second-Breakfast from Bill (2/3M; Reasons for Gimli to be upset: 7).

Turn 9 Move Phase: With Gandalf ailing, the rest of the Fellowship charges forth to rescue him!
In the ensuing Shoot Phase, two more Uruks go down to Legolas's bowfire (1/3M; kill-count 8-1 Legolas, who is really feeling it now). Vrasku, for his part, actually does something, hitting Gandalf - with 2 Might to boost - on his first attempt to shoot Bill the Pony (Vrasku: 1/3M; Gandalf 2/3H). Vrasku's shot scores Isengard 1VP for wounding the enemy leader. His second shot hits (but doesn't wound) the Uruk behind Gandalf.

Turn 9 Shoot Phase: Shooting war...
In the Fight Phase, three Heroic Combats are called by Aragorn (2/3M), Boromir (3/6M), and Gandalf (2/3M). The Fellowship slays all three Uruks in those fights (all of whom had been fighting Gandalf). Gandalf, Aragorn, and Gimli aren't finished yet, and charge more enemies.

Turn 9 Fight Phase: It's Saruman!!!
Gimli wins his follow-up fight, opening up the middle of the Uruk's formation (7-3 Legolas), but Aragorn and Gandalf can't win their follow-up combats to press the advantage (Aragorn is forced to save a wound with Fate - 2/3F). Tiberius has positioned a lot of Uruks (and Saruman) in reserve to hold that center objective (T: Yes, that is the general idea...).

Turn 9 Fight Phase: The center objective is in sight... for now...
Turn 10: Uruks closing in...
(Priority - Isengard; Actual Priority - Isengard)
As with any turn where things are getting tight, we had a Heroic Move-off between Ugluk (2/3M) and Aragorn. Ugluk wins the roll-off and the Uruks charge.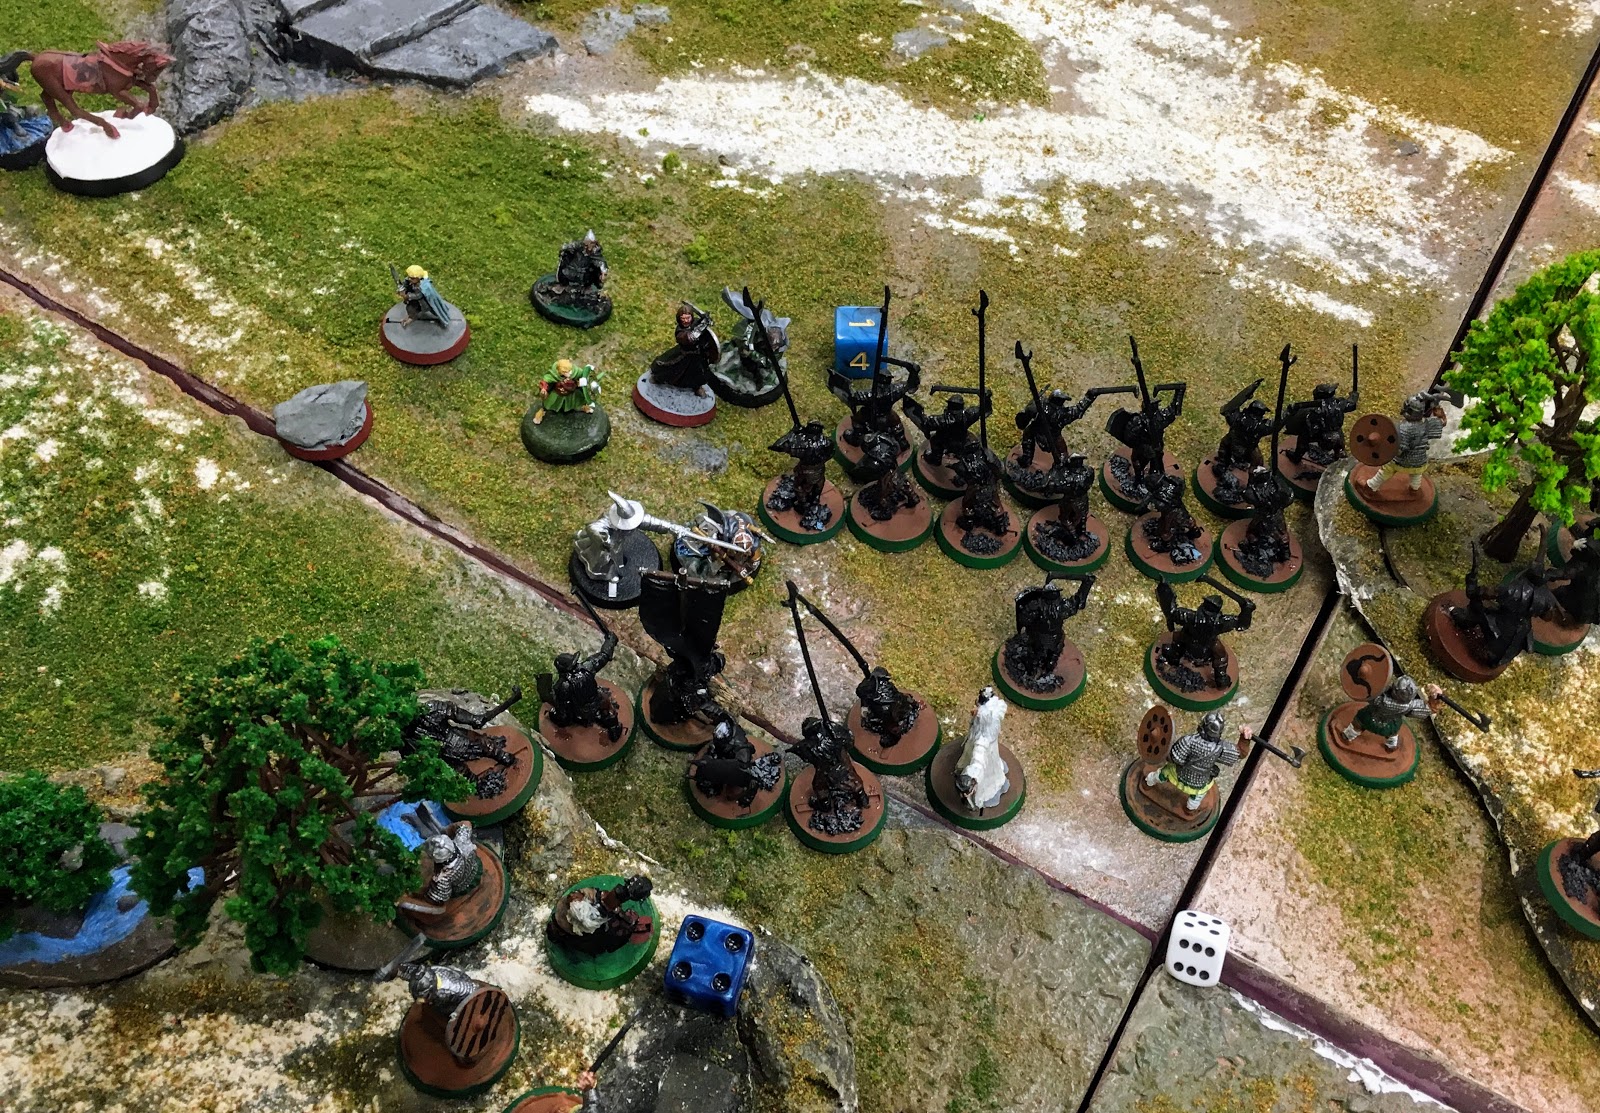
Turn 10 Move Phase: Ugluk wins the Move-Off against Aragorn.
After pinning Gimli and Gandalf with Uruks, Saruman casts Compel on Boromir (6, 3/6W). Boromir manages to resist on a 6, retaining his single Will point (1/1W). Saruman is understandably miffed (T: He vexes me - I'm terribly vexed).The Uruks proceed to pin everyone but Merry and Sam (who are just out of charge range behind Pippen, Boromir, and Aragorn) and Frodo (who is getting an absurd -4+ on charge tests, thanks to the Ring). Nothing of interest happens in the Shoot phase.

Turn 10 Move Phase: Boromir vexing Saruman...
With Isengard's Heroic Move complete, the Fellowship gets to move Frodo, Sam, and Merry. Frodo and Merry manage to get into Gandalf's combat, while Sam manages to sneak into the combat with Aragorn and Boromir. When the Fight Phase begins, both Merry (using one of Boromir's Might Points) and Sam (for free, trying to get to Frodo) call Heroic Combats.

Turn 10 Move Phase: Heroic Combats incoming.
Merry's Heroic Combat is successful, launching Merry, Gandalf, and Frodo into Uruk warriors (although Frodo has suddenly found himself in combat with a single Uruk banner-bearer supported by Pike, which is not great). Sam's Heroic Combat goes off as well, although Sam finds himself out of combat (since he has to move as close to Frodo as possible, if he can't join Frodo's combat). Aragorn charges two pikemen to give Pippen some relief, and Boromir manages to sneak into Ugluk (who didn't Strike this turn).

Turn 10 Fight Phase: The Fellowship, trying to press its advantage.
The Fellowship survives without losing any hobbits, and Aragorn (killing 2 pikemen), Boromir (wounds but doesn't slay Ugluk), and Gimli (kills an Uruk, 7-4 Legolas) are starting to put dents into the enemy's wall, but they're starting to run low on Might and there are still a lot of Uruks between them and the center. Elsewhere, Frodo wins his fight (spending all his Might (2/2M)), but fails to kill the banner. Gandalf is also running low on Will to counter Saruman.

Turn 10 Fight Phase: The outcome very much in the balance...
On the plus side, the Fellowship has broken the Isengard force, though with Saruman on the field and only a handful of Dunlendings that need to test, it's unlikely that the numbers will dramatically dwindle for a while. We rolled to see if the scenario ended and it did not...
Turn 11: Fool of a Took!
(Priority - tied, Fellowship; Actual Priority - Fellowship)
It was on this turn that Tiberius realized he hadn't used the Palantir yet...there was much groaning over this as the Fellowship picked their fights. Bill the Pony, who had previously stayed away from the fighting, trots over towards the Hobbits to "assist" them, but not before Legolas can get a third breakfast from the packs (2/3M; Reasons for Gimli to be upset: 8). Gandalf fails to cast Strengthen Will on himself.
Saruman calls a Stand Fast (automatic thanks to Hero of Legend) to keep the Dunlendings in the game, then casts Immobilize (6, 2/6W) on Boromir, who is engaged with Ugluk. Boromir succeeds in resisting it, but has to spend his last Might Point to do it (6, 0/1W, 1/6M). With 1 Might point left, Boromir prepares to face down Ugluk (who has 2 Might left).
Without Bill, Blinding Light, or cover from a tree, Legolas is under fire from Mahur's last three marauders. In a masterful display of archery, Legolas slays them all before they can shoot (1/3M, kill-count: 10-3). Gimli is the only member of the Fellowship who seems dismayed by this.

Turn 11 Shoot Phase (Good Priority): Superior Marksmanship...
Both Ugluk (1/3M) and Boromir (0/6M) call Heroic Strikes, while Sam calls a Heroic Combat. Sam kills a shield-carrying Uruk that he's fighting. Boromir gets to Fight 10 with his Heroic Strike and Ugluk rolled a very, VERY impressive...1...getting him up to Fight 6. Boromir won the fight, but failed to wound his target. Frodo, wearing the Ring, loses his fight to the banner-bearer and suffers a Wound. Gimli manages to win his fight, then drop three foes (10-7, Legolas). But it's not enough to save Pippen, who goes down to several Uruk pikes! On the plus side, Isengard was now down to ~70% of its starting force and would start taking courage tests with everyone...

Turn 11 Fight Phase: The Fellowship is Broken... (sorta)
We rolled to see if the scenario ended...and it did not...
Turn 12: PALAAAAAANTIIIIIIRRRR!!!
(Priority - Isengard; Actual Priority - Isengard)
Saruman passes his Stand Fast to keep the Uruks on the field and they charge. Bill is assaulted by three Uruks (one obscured by the trees), but not quite trapped. With Pippen gone, and Legolas still not fully descended from the hill, Gimli holds the Fellowship's left flank against pikemen (he cares not for pikemen). Boromir charges Ugluk, but with no Will, he's immobilized by Sauron.

Turn 12 Move Phase: Getting close to the end now.
Gandalf attempts to Immoiblize Ugluk, but fails (Ugluk: 0/1W, 0/1M). Undetered, Gandalf charges Ugluk after Merry fearlessly charges two Dunendings.

Turn 12 Fight Phase: Pressure on Ugluk.
Boromir (Immobilized) and Aragorn then proceed to botch their duel rolls, but Gandalf rolls a 5 which he boosts to a 6 to claim the duel (0/3M). Aragorn then proceeds to botch his to-wound rolls, but Gandalf comes through (again) to finish the job, killing the Uruk captain.

Turn 12 Fight Phase: Ugluk's final stand.
Elsewhere during the Fight Phase, Bill takes two wounds from his Uruk attackers, but passes his Fate to stay alive (just barely - 0/1F, 1/2H). Gimli wins his combat and slays another pikeman (kill-count: 10-8 Legolas), but Frodo can't overcome the Fight value of the Uruks, costing Frodo all of his Fate points (0/3F). Merry manages a draw against the Fight 3 Dunlendings (who used Piercing Strike) and wins the roll-off, but only rolls a 3 to wound the Dunlending who dropped down to Defense 3 (and Boromir is out of Might).
At the end of the round we rolled again and - a move that made Rythbryt very happy - the game continued... (R: Almost there...)
Turn 13: The Last Stand
(Priority - Isengard; Actual Priority - Fellowship)
Aragorn leads the charge once again, calling a free Heroic Move with Mighty Hero. Gandalf cast Protection of the Valar on someone (probably Boromir), protecting them from Saruman's spells (5).
With most of the members of the Fellowship within scoring range, the Uruks counter-attack. In an attempt to get models away from the objective, Saruman passes his Stand Fast and attempted to Sorcerous Blast Bill, which is likely to kill Bill and also knock down an Uruk (and Merry, who is in combat with it). The spell is cast on a 5 (1/6W), but Bill (with his single Will point) resists on a 5, keeping Bill within 6" of the objective! Saruman regrets not boosting it to a 6...

Turn 13 Move Phase: An unexpected important moment: apparently Bill is not moved by the Voice of Saruman.
Elsewhere, Gimli continues to fend off pikemen, while Legolas and Merry have tied up the Uruks who went after Bill last turn. Sam and Frodo are stuck in 1 v. 1 fights against Uruks in the center, and Aragorn, Boromir, and Gandalf charge Dunlendings.
The Fight phase saw Gimli kill 2 pikemen (kill-count: 10-10 TIE!) and Boromir killed 2 Dunlendings. Sam and Frodo both took some damage, but neither were killed (taking a Wound each since they have 2 Wounds a piece). I think Aragorn lost his fight, but didn't suffer any damage. As we rolled for whether the scenario would continue, we rolled a 2 and the game ended.

Turn 13 Fight Phase: Final positions around the objective.
Aftermath
Final count: 4-3 victory to Isengard, thanks to having more models on the objective (Saruman and 7 Uruks to 6 Fellowship) and wounding Gandalf. The Fellowship scored 3 VPs for breaking Isengard without breaking themselves.
Assessment by Tiberius: That game was exciting and very satisfying - not just because we managed to pull it out as a win. :) Besides not channelling Terrifying Aura (and remember to test for Terror when charging Gandalf), the only thing I would have done differently was not taken Vrasku and instead taken Thrydan - if you need to carve through lots of Fate points, someone with Mighty Blow is definitely your guy. While I like Vrasku in theory, I have a hard time playing with him - so perhaps there's some bias there as well. That said, I was pretty happy with Isengard's performance against the Fellowship - especially since this was the first time I've played with them against the Fellowship under the new rules.
Assessment by Rythbryt: I've played the Return of the King Legendary Legion several times, so I had a pretty good idea of what Aragorn, Legolas, and Gimli could do (especially if you could keep them moving through Heroic Combats and use other members of the group to screen them so they could do their job), but previously they'd always been supported by 14-16 warriors of the dead, not four hobbits and a wizard. The resilience of the hobbits really surprised me (RIP Pippen), especially Sam (who always found himself in the middle of the action, but never really felt like he was in any real danger) and Merry (who somehow escaped unscathed, even as he held the right flank with Gandalf towards the end). Had the game gone on one additional turn, I think I would have pulled off the victory, but given that the game could have ended two or three turns earlier (had the dice rolled differently), in which case I would have lost 3-9 or 3-6, I was very glad to pull within striking distance at 3-4.
In hindsight, the Fellowship has so many rules that I missed quite a few of them as we were going along (Gandalf causing Terror, the Horn of Gondor, Gimli's throwing axe, Bill's banner effect for the Hobbits, casting spells with Gandalf when he moved), so I would definitely benefit from more practice. I also wonder how the game would have played if I had put the Fellowship on the table Turn 1 (instead of Mighting down) and gone with some quick Marches with Aragorn to claim the center quickly. I was worried about being able to screen off the center objective without being surrounded, but letting Tiberius claim the middle uncontested meant he was ready for my advance, and it took a long time for me to get to the middle (Gimli and Legolas never quite made it there).
In hindsight, the Fellowship has so many rules that I missed quite a few of them as we were going along (Gandalf causing Terror, the Horn of Gondor, Gimli's throwing axe, Bill's banner effect for the Hobbits, casting spells with Gandalf when he moved), so I would definitely benefit from more practice. I also wonder how the game would have played if I had put the Fellowship on the table Turn 1 (instead of Mighting down) and gone with some quick Marches with Aragorn to claim the center quickly. I was worried about being able to screen off the center objective without being surrounded, but letting Tiberius claim the middle uncontested meant he was ready for my advance, and it took a long time for me to get to the middle (Gimli and Legolas never quite made it there).
Stellar unit for Tiberius: In the interest of not being boring, I'm going to not pick Saruman. Honestly, he did the most for my team, forcing Gandalf to play defensively with his spells to protect vulnerable heroes like Boromir instead of Immobilizing my models or attempting a Sorcerous Blast or two. His 18" range on Immobilize/Command (coupled with his 6" move) means that an enemy hero who is trying to sit back and shoot can be neutralized without you shifting your battle line too much. With most of his spells being able to be cast on a 2+, 3+, or 4+, you can reliably cast them all on your free die (since you get to reroll a casting die), leaving your other Will points to throw at must-go-off spells or resisting spells from your opponent. While I knew in my head that this was good, it wasn't until today that I realized just how good it is...
But my stellar unit for today is actually the Banner-carrying Uruk: while not reflected very well in the write-up, the banner reroll was critical to getting high rolls in Ugluk's fights (causing rerolls), winning fights against Frodo (and nearly killing him), and forcing Aragorn/Frodo/Gimli to burn Might for boosting (we ate BOTH of Frodo's Might points in a single turn!). At 35 points, he's a real cost to the army, but I think I'd take him in smaller games in the future, even though it costs me a good bit of my army.
But my stellar unit for today is actually the Banner-carrying Uruk: while not reflected very well in the write-up, the banner reroll was critical to getting high rolls in Ugluk's fights (causing rerolls), winning fights against Frodo (and nearly killing him), and forcing Aragorn/Frodo/Gimli to burn Might for boosting (we ate BOTH of Frodo's Might points in a single turn!). At 35 points, he's a real cost to the army, but I think I'd take him in smaller games in the future, even though it costs me a good bit of my army.
Stellar unit for Rythbryt: Can I go with all of them? No, seriously--each of them had at least one key moment (Bill not getting blasted, Boromir killing two Dunlendings on the objective at the very end, Gimli holding that right flank for days, Merry beating back two Dunlendings all by himself), and the margin of victory was so close, that if any of those things don't happen, the score could have been drastically different). If I had to choose, I think three were just a cut above. Legolas really did a number on the Uruks early, and his surprise takedown of Grima early-on was an underrated reason why I got so many heroes near the center at all: given that my heroes were all out of Might by the end, having to spend double-Might for those crucial Heroic Moves and Heroic Combats would have drastically reduced my ability to push to the middle. On sheer epic moments, I think he runs away with it. I was very pleasantly surprised by Boromir, as well: he spent all his Might, but without it, he, Merry and Pippen lose several key combats that we had to win in a game that came down to the wire. But in the end, I think it has to be Aragorn: despite his failure to beat two Dunlendings on the objective (which would have swung the game to from a 3-4 to a 4-1), those free Heroic Moves throughout the game (there were something like 10 of them?) proved essential to making sure I could at least try to keep the Fellowship moving before Uruks could completely envelope them. But I could be biased. ;-)
Conclusion
Thanks for reading! For more information on the factions we played with, you can check out TMAT's review of the Fellowship and Isengard, and be sure to leave any feedback for us in the comments!
No comments:
Post a Comment