The knock on Shieldwall is that while it's fairly easy to keep it up against enemy archers (more difficult against certain siege weapons), it's not easy to keep up in-combat unless you keep your infantry in a very disciplined (but inflexible) formation. Since flexibility of movement is a key concept in the Middle Earth SBG (we have to protect our flanks, pressure our opponent's flanks, and get to/contest important objectives--sometimes all at once!), I spent an evening last month trying to figure out if there were any more flexible formations that could sustain Shieldwall. Here's some of what I discovered.
(Apologies in advance: this post contains a lot of pictures, so hopefully your load time won't be too long. Also, no maths!)
Understanding Shieldwall: Rules Deep-Dive
The basic rule for Shieldwall is found on p. 106 of the Rules Manual:
Shieldwall (Active) - Some races train their warriors to form an impenetrable wall of overlapping shields, protecting their friends and preventing foes from breaching their lines.
If this model is armed with a shield, whilst in base contact with two or more non-Prone models with this special rule that are armed with a shield, this model gains a bonus of +1 to its Defense. This bonus is only available whilst on foot.
The key positional trigger for Shieldwall is its requirement that we be "in base contact with two or more non-Prone models with this special rule that are also armed with a shield." If our goal is to get +1 defense against enemy ranged attacks, this is as being sure we move our Shieldwall units in base-contact with each other during the Move Phase. As few as four Shieldwall warriors can do this, in the following formation:


In this "4"-formation, each Iron Hills dwarf is in base contact with two other Iron Hills dwarves. So long as none of them die or are knocked prone (watch out for catapults and trebuchets), all of them will get the +1 defense bonus, which means elf bows will only wound them on a 6/4+, regular bows need a 6/5+, crossbows only wound on 6s (still), and even the mighty Gondor Bolt Thrower (D6 Strength 7 shots) will only wound them on 5s. For regular troops, that's fantastic protection against ranged attacks of all stripes.
Unfortunately, simply lining up next to each other may not be enough to keep Shieldwall up in the pell-mell of combat, because of the "Back Away" rule (Rules p. 44):
Loser Backs Away: With the Duel's winner determined, the loser must Back Away in a direction chosen by the controlling player. To Back Away, the loser must move 1" in a straight line away from the winner (though this does not have to be directly away). When a loser Backs Away, it can move through enemy Control Zones, but cannot move into base contact with an enemy model.
Backing away isn't optional: the loser must Back Away. And while the direction of that back away is chosen by the controlling player, it has to be in a straight line (no wrap-arounds), the model itself must move at least 1", and the model backing away has to end up further away from the model it was fighting than it was when it started (though it doesn't have to end 1" away from the winner of the duel as long as it moved 1" from its starting position).
Because strikes are resolved only after a model backs away, the positioning trigger for Shieldwall requires that the model be in base-contact with two or more non-prone Shieldwall models after backing away: being in Shieldwall position during the duel isn't enough (unless the model ends up trapped, and can't back away).
Equally important for Shieldwall is the Make Way rule (Rules p. 46). This rule takes up a lot of text in the book, so I won't reproduce it in full here, but here are the most relevant bits:
- If a model loses the duel, one friendly model may make a special Make Way move of up to 1" to clear a path for their ally to Back Away.
- A model that is Making Way may move 1" through difficult terrain/ water features or if prone, but cannot be used s a substitute for crossing obstacles, taking Jump/ Leap/ Climb tests, or if doing so would cause falling damage.
- You may Make Way into an enemy model's control zone, so long as the model Making Way doesn't come into base contact with any enemy models.
- Models that are engaged in combat cannot Make Way.
- Only one model may make way for another model (barring a special rule like the Easterling's Phalanx).
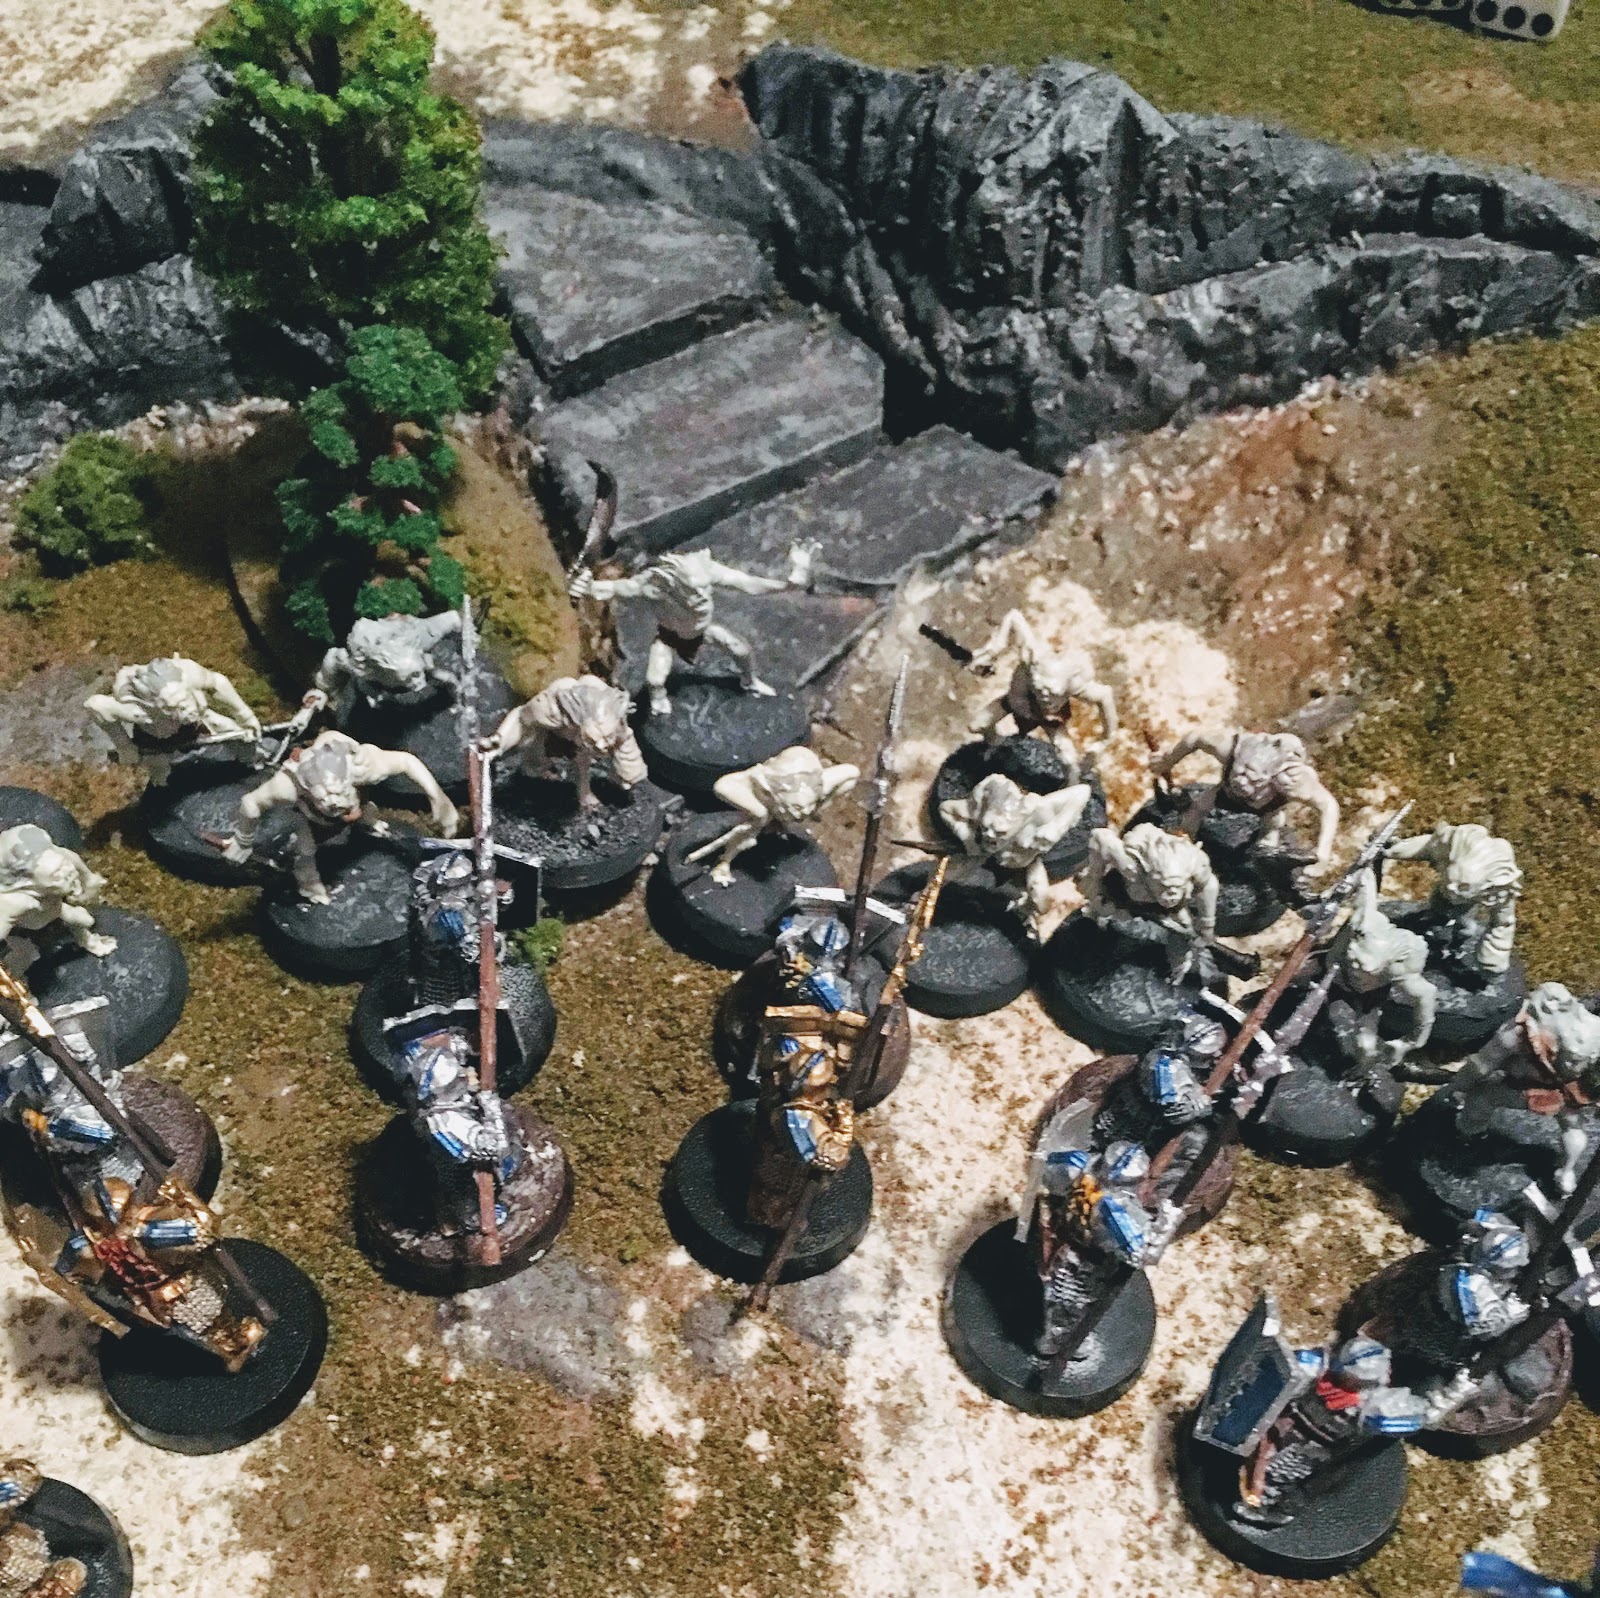
The "Standard" Shieldwall Formation

Two ranks of Iron Hills warriors, deployed against two ranks of Goblintown warriors.
Let's start with the obvious formation: two ranks of Shieldwall infantry, one lined directly behind the other. The front rank needs shields (obviously), and the second rank also needs shields (otherwise no Shieldwall ability). We also probably want the second rank to have spears, because otherwise it's not doing much in combat (other than helping to proc the front rank's defense buff. As Jay Clare noted in his tactics discussion of Shieldwall over on Warhammer Community, while a staggered formation would also work to get the Shieldwall buff active, it can make certain dwarves susceptible to traps, especially if the enemy has priority. Deploying both ranks so they are aligned eliminates that problem:
The Iron Hills dwarf in the middle loses a duel against two Goblintown warriors...

His supporting model makes way...

… allowing him to back away, into base contact with two other Iron Hills dwarves with shields.
While this formation makes Shieldwall pretty easy to keep up (models simply retreat backwards into holes), its linear movement pattern (forwards-and-backwards only) makes for a pretty static battle line. Our opponent is going to have a pretty good idea where the flanks are going to be at any given time, and once the enemy starts munching on those flanks (or gets into our back line), we go from having a very defensible front line to having a front line that is trapped by its own spear supports (traps are great! Being trapped is bad...). The static nature of the line also makes it more susceptible to Hurls from monsters, the dense-nature of the formation is an enticing target for enemy siege weapons, and while the formation works for a single round of combat, your dwarves can become staggered over time (as the dwarves that win combats stay put, or advance, while the ones that lose combat move backwards), which can open up holes. Finally, these formations tend to work best when there's open ground--but throw in the random ruin, rocky outcrop, or winding water feature, and forcing ourselves into these long, straight formations can put us out of position, or even become death traps.
Finally, there's the replacement issue: while Shieldwall is a major defense buff against S3 armies (if you get to D8) and S4 armies (if you get to D7), it's not a guarantee you won't be killed. In our above example, if the dwarf who backs away survives, then it's pretty easy to reset the formation on the next turn, provided we get priority. But if that dwarf is killed, suddenly there's a spear-supporting Iron Hills dwarf who can be charged by a Goblin warrior. Granted, a spear-supporting Iron Hills warrior can bear being charged better than most, but if he's charged, he'll have no friendly Shieldwall warrior in base contact with him at the start of the Fight Phase (unless both dwarves to his left and right also lost their combats in the previous round). It's possible we could get another Shieldwall model into base-contact with him, if we get to move first and/or get to choose the order of fights (and we happen to lose both fights on either side of him), but those are a lot of potentialities that have to swing our way.
Some of these problems we can solve by anchoring our formation near a defensive terrain feature: in the photo above, the Iron Hills have set-up between a rocky outcrop on one side, and a tree on the other, to make their flanks less accessible. If we've brought a cavalry contingent of Goat Riders (or Dain Ironfoot), we could position them near the trees to further dissuade our opponent from trying to sweep our left flank. It doesn't fix our replacement problem, but at least it reduces the likelihood we'll be trapped (which will only increase our replacement problems).

A defensive formation between a rock ledge and some trees, to keep the enemy away from our flanks...


The Crescent Formation

A basic crescent formation of Iron Hills lined up against Goblintown warriors.
This is primarily a defensive formation: the idea is that the flanks are pulled back, so that the opponent has to expend more movement to reach them (ideally buying us more time to react to his moves).
While this looks good on paper, this formation poses some problems for Shieldwall. The biggest problem is what an arched formation like this does to models on round bases. For starters, if we want each of our front rank models to be supported by a Shieldwall model (as we had in our standard formation above), it's not physically possible to have the front rank-models in base-to-base contact with other front rank models and have a spear support model in base contact with all of the front rank models and have a formation where the flanks are pulled back: the back-rank models can't physically fit base-to-base in that formation unless they're in a straight line. This means that the formation only works if at least some of the front rank models have space between them and their neighboring front rank models:


The spear support makes way...

… so his mate can make way.
… but it does mean the front rank won't get their Shieldwall bonus against ranged weapons during the Shoot Phase (or throwing weapons in the move phase). Depending on who we're playing against, this could be a major disadvantage.
Another problem with this formation is that while an arch usually provides us with enough avenues (and room) for each individual pair of models to back away, if several of them have to back away in succession we can run out of room pretty fast:

The two (gold) Iron Hills dwarves in the middle have lost a duel, shortly after their comrades to the left (silver) did so (and backed away). The Spear Support (in the gold) has enough room to squeeze through the hole and slides next to another spear support, giving his front-rank comrade (also in gold) enough room to slide into his vacated space. But as we transition to the next fight...

… you can see just how little space is left for the two dwarves to their right (also silver). If they lose their fight, the spear-supporting model won't have enough room to Make Way for his comrade.

Depending on how generous you were with the other models who backed away, it may be possible for the front-rank dwarf to avoid a trap by "backing away" to the left, into the space vacated by his neighboring front-rank model. Just remember that he can't back away into base contact with any enemy model (even though he can enter his control zone). If this isn't possible, that front-rank dwarf will be trapped.
If we have priority, we can mitigate this somewhat by choosing fights in an order that will allow us to avoid these traps, and/or by shading our supporting models' Make Ways to the left or right, towards models who have already fought (and won) their duels:

Here, the two silver Iron Hills dwarves to the left have lost their duel and backed away. The two Iron Hills dwarves in gold fought next and won, so they don't have to back away. The two silver dwarves to the right have now fought and lost. In the photo above, those two dwarves back away directly away, so they are fine; but the dwarves to their immediate right may be trapped if they lose their duel, because of the curved nature of the line.

Here, instead of having both dwarves on the right back directly away, the spear-supporting dwarf backs away slightly to our left, behind the dwarves who have already won their duel (and thus won't have to back away any further this round). The front-rank dwarf on the right slides into the space vacated by the spear-supporting model (as he did before), but now there's plenty of space for the models to their immediate right to make way and back away, without causing a trap.
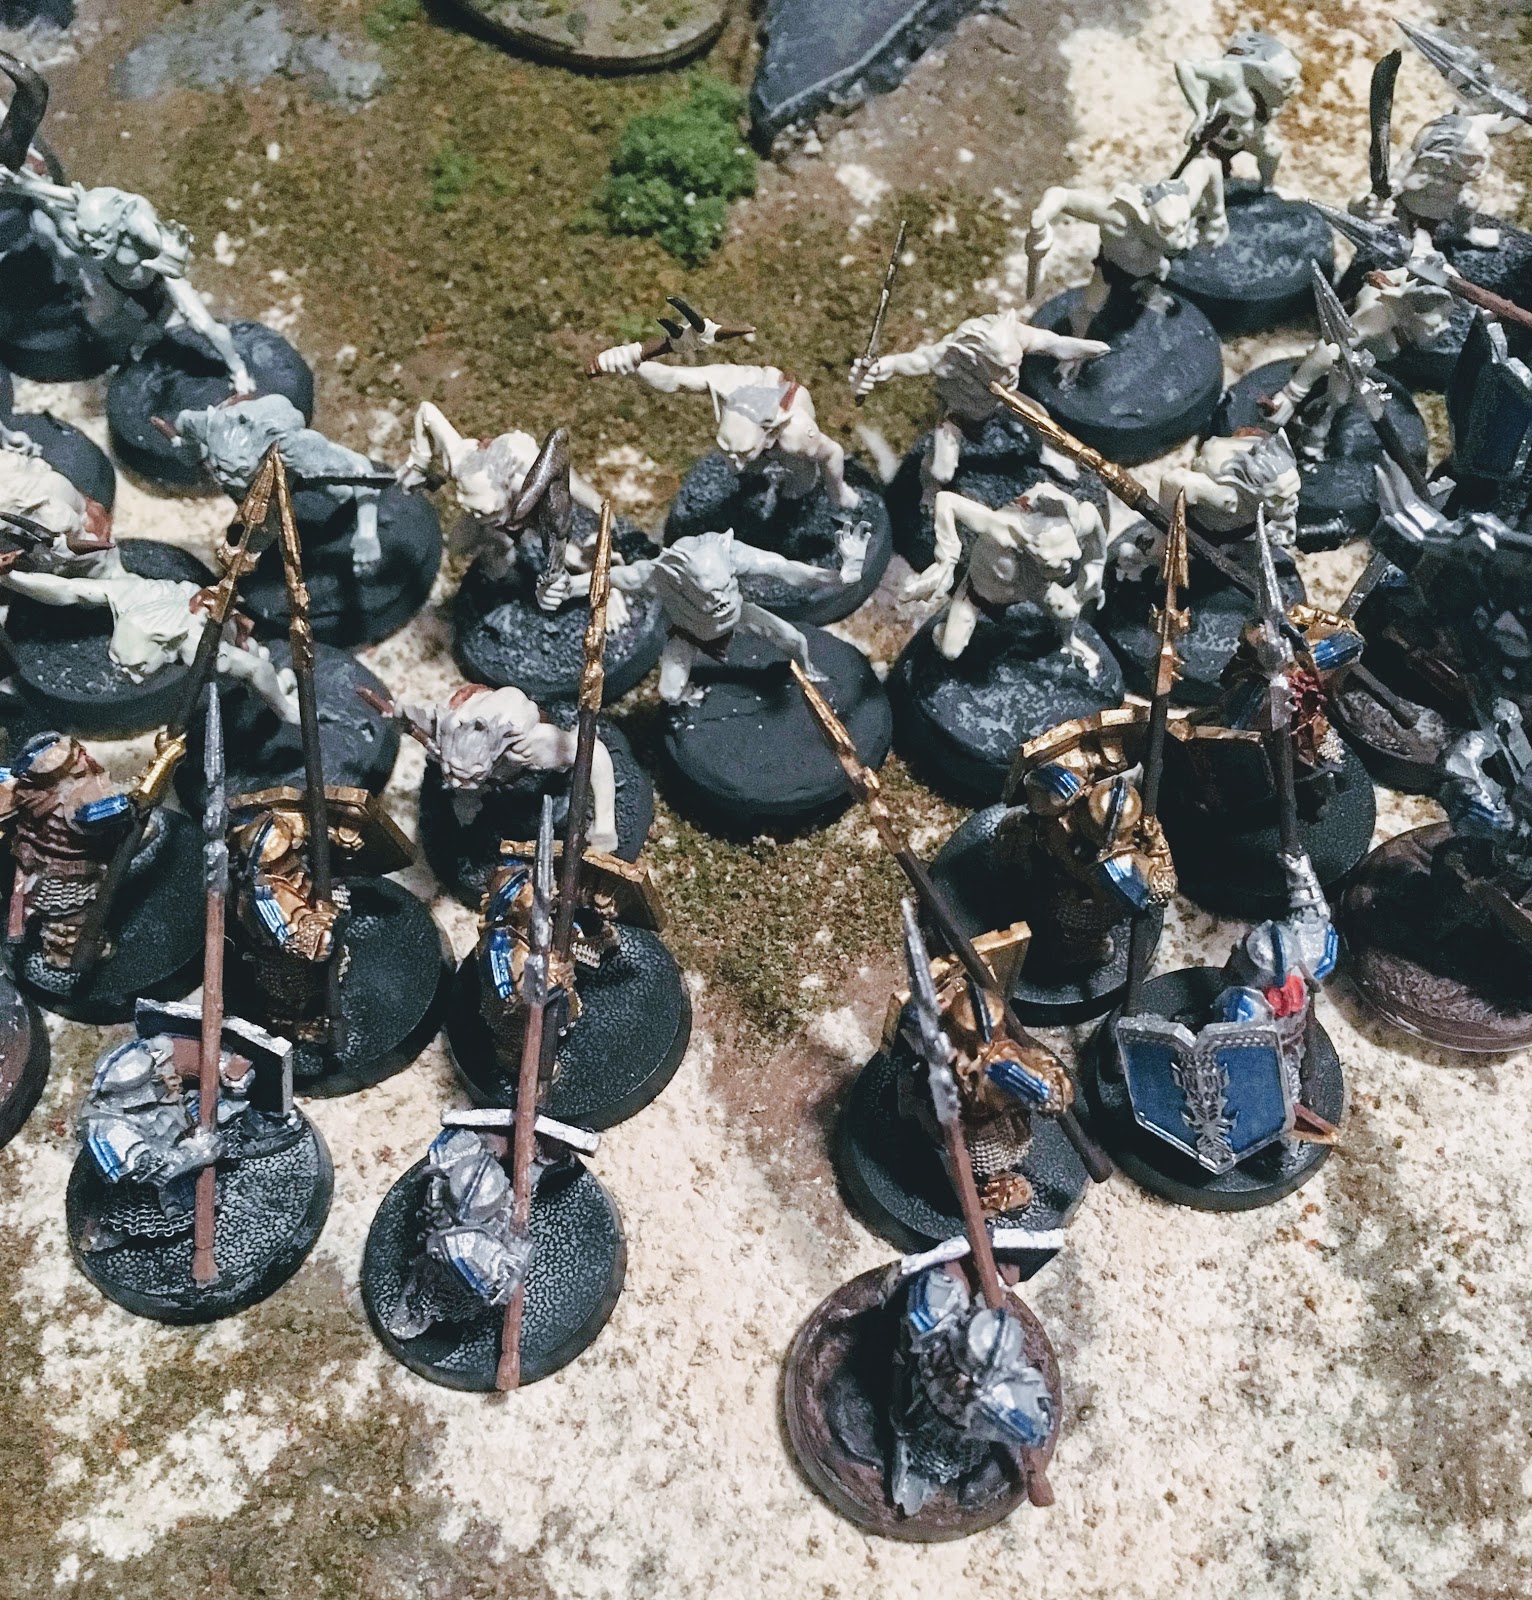
The Defensive Halo Formation
So far, we've been assuming roughly equal numbers of combatants on both sides; but given that Iron Hills dwarves are elite soldiers (and so are Warriors of Minas Tirith, once you bulk them out with spears and shields, and potentially bows as well), we should probably count on being outnumbered most of the time we bring Shieldwall troops to the table-top. Because the flanks of a Shieldwall formation are its most vulnerable, keeping the flanks secure is one of our top priorities. If the enemy outnumbers us severely, even a crescent formation (with the flanks swept back) may not give us enough space to keep the enemy in front of us, and there may not be enough defensive terrain (or defensive terrain where we need it, if we're playing an objective-based scenario) for us to keep the enemy in front of us that way.
So how do we protect the flanks against overwhelming numbers? My getting rid of them entirely:

Here's twenty-four Iron Hills dwarves drawn up in a defensive halo formation.
A couple notes on this formation: first, you'll notice that it replicates the issue we had with the crescent formation, namely that our front rank is not in base-to-base contact with other front-rank models (and thus won't have Shieldwall up at the start of the Shoot or Fight Phases, or even during our opponent's Move Phase if we end up with priority). In other words, this is not the formation you want to start in against elf bows (or against Crossbows, if you're running Warriors of Minas Tirith).
Second, we still have the compression issues with Making Way/Backing Away, only now they're amplified because the curve of the back rank is more pronounced. In the photo below, you'll notice that the model at the extreme right of the supporting rank may not even be able to back away because of how his mates to each side are angled... and even if he did, neither of his mates will be able to back away.

This is only a problem if we lose fights, of course... but if the enemy has enough forces to force us into the desperation of the defensive halo formation, they're probably going to be throwing buckets of dice at us... which means we'll lose a lot of fights.

A more realistic halo formation... facing buckets and buckets of enemy dice.

Our dwarves in the middle of this defensive halo formation (silver supporting gold) have just fought a duel and lost. They back away...

... but in doing so, they've inadvertently closed off a retreat lane for the front-rank dwarf to their right, supported by a spearman with banner (who now has nowhere to go). The dwarves to their left, as well as the dwarves to the right of the banner, may also not be able to back away, either. Needless to say, all of this is very bad.
Third, setting-up a defensive halo formation when you can only move one model at a time (especially when any model you moved already can't be moved any further) is an absolute logistical nightmare. That's why the halo formation pictured above is more oblong than circular--even with several turns to practice, I still had tremendous difficulty getting it to close properly. This is a formation you should practice with beforehand: trying to line up your models in concentric circles for the first time on-the-fly is dangerous.
Fourth (yes, there are problems with this formation), the greater the curve of our inner line, the more compressed our inner line, and the more space there will be between our front rank models. If our models are lined up in straight lines, one rank in front of the other, and tightly packed together, it's not physically possible for more than one model to get into base-to-base contact with one of our models (which means we're going to be fighting 1 v. 1 or 2 v. 2, unless the opponent has pikes), unless they can get to a flank. In a defensive halo formation, we give up those flanks, but the spacing requirements of the back line means that our warriors on the front line can find themselves in base-to-base contact with two (or more) enemy models, who can each be supported by another model:

Our Iron Hills dwarf in the center finds himself (and his supporting dwarf) in combat with two Goblintown warriors, who are supported by two more Goblintown warriors.
In situations like this, being inadvertently trapped by our own models will turn deadly in a hurry, as the inner circle is constantly compressed further inward:

The evil player has opted to resolve the duel to the right of our Iron Hills dwarves. The neighboring dwarves lose, and are forced to back away.

The front-rank dwarf in the neighboring fight manages to find a spot to his right to back into...

… but even so, our dwarves locked in combat with four Goblintown warriors have nowhere to back away, which means our front-rank dwarf will take eight to-wound dice if he loses his combat--and doesn't even have Shieldwall up to protect himself!
So how can we avoid this issue from happening? The simplest solution I've found is to go with a formation that... actually looks nothing like a shield wall...
The Loose Halo Formation

Believe it or not, this is actually a Shieldwall formation (most of the time).
Here, only two Iron Hills dwarves are in base contact: the front guy and the rear guy (who is spear-supporting him). The dwarves in the back rank are separated by between a quarter- and a third-inch, with the front rank guys separated by about a half- to three-quarter inches (no more than that, for reasons we'll discuss shortly). This is still a halo formation (there is no flank to expose), but no one has Shieldwall up right now, either.
This formation still has the same disadvantage as all our curved formations thus far: the front rank is clearly not in base contact with two models with Shieldwall (it's only in base contact with a single model, in fact), so if it ends its movement in this position, it won't get +1 defense against shooting attacks, or even throwing weapons if our opponent has yet to move. In addition, all that spacing in the front means that it is now very easy for our opponent to throw two front-rank guys into our front dwarf, which means 4-on-2 combats will be a lot more common:
This isn't ideal in a perfect world, but remember: the halo formation is designed as a way to defend ourselves against overwhelming numbers of enemy models. If the enemy has three times as many models as us (as Goblintown does in this example), the question is not whether the enemy is going to be fighting us in 4-on-2 combats (he's going to, barring some unfortunate Maelstrom deployment rolls, at least until we start whittling his numbers down), but whether he'll succeed in trapping us in 4-on-2 combats (or worse, trapping us in 2-on-1 combat against the front rank, and a 2-on-1 combat against the spearman on the other side). If we have to fight 4-on-2, we want the enemy's 4 in front of us, with a clear path for us to back away and a way to keep Shieldwall up for as long as possible.
The loose halo formation gives us all of those options. There is no flank, so our opponent won't be able to crush the flank or sweep behind it, to pin our front line against our back one. And by giving our back rank a quarter- to third-inch between them, we open up a wider avenue for our models to Make Way and Back Away if they were to lose fights. Unlike the tight halo formation, where even a single lost combat threatened to trap our own units...

… the back rank in a loose halo formation has plenty of room to Make Way, without cutting off its fellow supporting units in the back rank:

Now that his supporting model has Made Way, our Iron Hills dwarf in the front has room to Back Away. If he were to drop straight back, he wouldn't get the Shieldwall buff, because he'd be in base contact with just one Shieldwall model (the model who was spear-supporting him). Fortunately, the rule for Backing Away specifically says that a model doesn't have to Back Away directly away, which means that our front-rank warrior can back away either to his left or to his right:


Either way, he'll want to back up until he's in base-contact with both the model that was spear-supporting him, and the model that is spear-supporting the model next to him, but he has the flexibility to move to either side. This side-to-side versatility gives our Shieldwall formation another dimension of movement (we're not just moving backwards all the time), which allows it to be both dynamic and reactionary: if we see a flank getting whittled down or exposed, we can shift a model into it a gap. If we want to load more of our models on one side we can do that: to reinforce a spot where our line is folding, or to take advantage of a spot where we've succeeded in killing multiple enemy models, that we may be able to break through next turn.

An added bonus from all the space we've left ourselves in this formation is that we can do this side-to-side shifting with the model that Makes Way, too. Here, an Iron Hills dwarf has Made Way for his front-rank comrade by shifting to the back-right. This opens up an avenue for his mate to Back Away, without compromising the retreat lanes of the dwarves to his left and right:


Alternatively, the spear-supporting model could Make Way by moving to the back-left. The dwarf in the front rank still has plenty of room to Back Away...


… but the end-formation is wider, and leaves less of a gap for enemy models to try to enter, should the dwarves to the left also lose their upcoming combat.
Hopefully the pictures are conveying how this formation simplifies the process of keeping Shieldwall up in combat: the forward-backwards-side-to-side movements themselves are not hard to master, and I've found a loose halo formation significantly easier to set-up (you have a lot more leeway if you're setting up a loose formation where models are supposed to have gaps between them, than you do when you're trying to fit those models tightly together with no gaps). And in general, the formation is pretty forgiving. But there is an important exception: the formation cannot be so loose as to leave a 1" gap (or more) between your front-rank models.

This is fine...

… this is not.
The reason is that if you leave a gap of 1" or greater, a swarm will be able to charge your front-rank warriors (eliminating their control zones), and then charge into one (or both) spearmen who are supporting your front rank. Those spearmen are now engaged in combat, and can't Make Way until their fight is resolved (and they either win and force the opponent back, or lose and Back Away themselves). If your opponent has priority, they can save the fights with the spearmen for later, which would trap your front-rank guys (again, out of Shieldwall formation, because they're only in base-contact with the spearmen who is now trapping them).

The two spearmen in the middle have been engaged by a Goblintown warrior. In the evil player has priority and chooses to resolve the fight above them first, a single Iron Hills dwarf will be engaged with two more Goblintown warriors (whom he will have to fight alone), and if he loses, he won't be able to Back Away because the model that was supposed to be spear-supporting him is engaged in another fight. That poor Iron Hills dwarf in the front will then have to survive not two but four to-wound dice, without Shieldwall. At least that dwarf is in a better position than his front-rank mate below him--he's engaged with four Goblintown warriors, who will roll eight to-wound dice against him if they win--and again, he won't have Shieldwall up to protect himself.
We have to be mindful of this as well as we're Making Way. Here, the two Iron Hills dwarves in the middle have lost a combat to four Goblintown warriors:


The dwarf in gold backs away to his left...

… and the front-rank dwarf in silver backs into base-contact with him and a neighboring dwarf, completing the Shieldwall (which is good). Unfortunately, there's now a sizeable gap between that dwarf and the spear-supporting dwarf next to him. If that dwarf doesn't shift its position between now and the opponent's next move...

… the opponent can engage the nearby front-rank dwarves, and then rush some goblins into the gap, engaging the dwarves in the back (which pulls them out of supporting combats and can create traps for nearby dwarves (which is bad).
So the key to both setting-up and maintaining this formation is to mind those gaps, to always keep them less than an inch wide. If we can succeed in doing that, the loose halo formation gives us an easy way to keep up our Shieldwall, in a formation that can flex to the left or right as-needed.
The Inverted Crescent Formation
So this is a crescent formation (curved), but instead of curving so that our flanks are pulled away from the enemy, this time it's our flanks that are extended towards the enemy while our center is pulled away:


(And from the front!)
Now you might be asking yourself: why on earth would we want a formation like this? Isn't the goal to protect our flank, so our shield wall can't be overwhelmed and our models trapped by each other?
Well, yes, that's certainly important to maintaining any shield wall. And against a horde army, this is probably not the best formation. But not every enemy army is a horde army, and depending on the terrain and their approach angle, not every horde army is going to be able to sweep around our flanks if we can bottleneck them with terrain. In this example, our Goblintown warriors are being funneled through some rocky outcrops, down some stone slabs. The dwarves, knowing that the goblins will overwhelm them if allowed to proceed through the outcrops unhindered, have set-up an inverted crescent formation that covers the two exits from those outcrops.
The goblins attempt to attack them by running headfirst right into the center of the crescent (yes, this is unwise, and goblins should never attempt this against Iron Hills dwarves--just assume the goblins do this for now). Take a look at the way both armies are formed up:

Notice that by inverting the crescent, the dwarves have a very strong formation. For one thing, the front rank of dwarves all have Shieldwall up from the beginning, because they're in base-to-base contact with three other dwarves with Shieldwall (the model spear-supporting them, and the other front-rank dwarves to their immediate left and right). Goblin warriors don't have throwing weapons, but if they did (or if they were wood elves or Iron Guard instead of goblins), these dwarves would be well-prepared to shrug them off.
Notice as well that while the front rank is tightly backed side-by-side, the dwarves in the back rank have a quarter- to third-inch gap between them, which allows them to do the same side-to-side Make Ways we saw in the loose halo formation.

After our spear-supporting model (in silver) Makes Way...
… our front-rank dwarf (in gold) can either Back Away to the right...

… or to the left, as the situation demands.

Either way, there's still plenty of room for neighboring dwarves to Make Way...

… and to back away, without entrapping each other.
Because the curve of the formation is flexed towards the enemy (if that makes sense), there's almost no way this formation can trap itself by backing away (assuming we have our backs to an open space, and not a cliff face, a chasm, deep water, etc.). Here's how the formation would look if every single dwarf lost a combat and backed away:

Notice that even though they've lost all the combats, every single dwarf in the front rank is still getting the Shieldwall buff, because they're in base contact with both their assigned spear-support and at least one front-rank model to their left or right. This means that should the opponent get to move first next time, we'll have Shieldwall up against incoming ranged fire, throwing weapons, etc. And while we have one pretty sizeable gap in the right-middle (which may be large enough for a goblin to sneak through), the formation is pretty tight throughout, to keep our front-rank in the front, and our back rank free to support them where needed.
Now let's rewind and look at how the enemy formation looks in the middle of an inverted crescent formation. For starters, look at how tightly packed they are: as it happens, there's not even enough space for every single front-rank Goblin to be supported by one of its mates. And there's certainly not enough room for multiple goblins to charge a single Iron Hills dwarf in the front rank; on the contrary, the goblin in the very middle of the front rank has found himself engaged with two Iron Hills dwarves (and their two spear supports), which is not a winning position for a low-fight Goblin:

But wait! It gets worse! When that Goblin loses that fight (which he will lose 84% of the time, against four Iron Hills dwarves supported by banners), he and his mate must Back Away (because otherwise he's taking eight dice to-wound on a 4+). Even if the model supporting him Makes Way by moving directly away...

… the models to their right may not have enough room to Back Away. And if they do, the models to their right certainly won't:

Again, this formation won't work against every opponent (not every opponent will choose to go into the crescent, and some scenarios won't incentivize them to do so), and protecting our flanks (and filling gaps) is still an important priority. But if we do manage to get our enemy to run into this formation, it gives us lots of room to keep up our Shieldwall, while putting our opponent in a very tight spot (literally and figuratively).
"4"-Formations
Thus far, we've only looked at formations that are largely static. Although we've managed to find some ways to slide side-to-side movement into them, the formations themselves are still fairly rigid, and not really ideal unless we have a lot of open space to set-up our battle line. Can we find anything more flexible?
While I was playing around with the inverted crescent formation, I kept finding that my Iron Hills dwarves would Make Way and Back Away into a formation of four, that would look something like this:

Intrigued, I started playing around with Iron Hills dwarves in sets of four (as opposed to battle lines of 24). This "4" formation has some benefits to it. For one, each Iron Hills dwarf in a "4" formation has Shieldwall up from the outset, and will keep it up as long as none of them are killed or knocked prone, which means it's a formation that can maneuver with protection against enemy archers (always a plus).

The formation is also incredibly compact, so if we're on a board where there's lots of terrain, ruins, trees, etc., this formation can duck and weave around those obstacles to get where we need them to go. And since it's just a company of four dwarves (instead of a long, connected battle line), it's much easier to avoid telegraphing where we're headed to our opponent. Finally, because the dwarves are already arranged in ranks of two, if we were to be attacked by enemy models in a head-on collision, we'd be ready immediately to engage in traditional shield wall combat (with the Shieldwall buff still active):

If we were to lose the engagement, our dwarves would be able to maintain Shieldwall, either by backing directly away...

… or by backing out and to the side, like we did in our loose halo or inverted crescent formations:


We could then duplicate our lateral back-aways on the other side to expand the formation, if needed:


Now the problem with this unit in isolation is that, spread out like this to the sides, they will be very easy to surround, and if our second-rank models are engaged, the front-rank is probably going to be trapped:


Thankfully, there's a fairly easy solution to this: we take more than 4 Shieldwall models.
If we set up our models in a series of supporting "4" formations, we can seal the gaps (or at least most of them). That way, when the back rank drops back...


… the gaps are still too narrow for enemy units to charge them:

In the foregoing examples, I set-up the "4" formations as if they were squares, but there's no limit to the shapes we can make from these formations of four, so long as each model is in base-contact with two others. In the photo below, I've drawn up the dwarves in some diamonds that slant out towards the flanks, just to make it more difficult for our opponent to flank us:

If we were to lose fights, an alignment like this has the flexibility to expand to the left or right (kind of like an accordion), which means we can get those flanks even wider if we need to.

As long as we mind those gaps in the front, the formation will stay strong, even as it expands or contracts:

Here's another use of the "4" formations: we still have groups of 4 models lined up close to each other, only this time we've deployed the "4s" in what amounts to an inverted crescent formation around a sloping hill and the exits between two rocky crags:

There are a lot more goblins than dwarves, but because of the spacing between our "4" formations, the presence of some defensive terrain on our right flank (and the board edge on the left flank), and the inherent properties of the inverted crescent formation, they're having a hard time getting anything more than 2-on-2 fights against our dwarves. A ton of goblins are stuck in the back, unable to get into combat:

Over on the left flank, a couple goblins have managed to squeeze through the small gap between our dwarves and the board edge, and are threatening to buckle it:

If our models were locked into a single straight formation (or something like a crescent formation), we might not have the flexibility to reform the line without losing our Shieldwall. But because of the space we've left ourselves, this "4" formation can react in several ways to extend the flank while Backing Away/Making Way. The spear supporting model on the right (currently in base-contact with the dwarves in the middle and right side) can Make Way to the back-right (allowing the dwarf on the far right to slide into his current position; when the dwarf in the center fights, that same dwarf who Backed Away could then Make Way, sliding further down and to the left, extending the line, while the dwarf in the middle slides down to take his place. You could then rinse-and-repeat with the final dwarf on the left. The result is a dynamic flank that can expand or contract to the left or right, in order to keep the enemy at bay--all while maintaining Shieldwall.
Closing Thoughts
As I mentioned at the outset, all of this is very unscientific--just the results of playing around, moving models during a quiet evening at home. But hopefully these will spark your imagination.
If you've liked what you read and want to learn more about the heroes and warriors of the Iron Hills, check out our Iron Hills / Erebor Reclaimed Army Page for more from the TMAT team and other members of the Middle Earth SBG community (along with links to battle reports, podcasts, and more). And if you're inclined to try moving your own models around, let us know what you find in the comments!
Moria Goblin Prowlers, Corsairs of Umbar, and Dwarf Rangers (to say nothing of Warriors of Rohan and Rohan Royal Guards) feel disenfranchised from your discussion of throwing weapons. :)
ReplyDeleteA great write-up and great pics to show off the models! I'm leaning more towards OsVets for my front line Minas Tirith guys, but I've had to use my spearmen in shieldwall formations recently - gonna try that "4s" formation next time.
Prowlers, Corsairs, and Rangers are all good models in their own right, but I agree: the throwing weapons really add another dimension to them (and make them good value for their points). A S3 throwing weapon can still wound Defense 8, but it's 50% harder, so they'll definitely prefer fighting some of the looser formation variants.
DeleteGlad the pictures showed up. I'm sure there are other formations that can pull it off, so I'm looking forward to seeing what else others have come up with. The next challenge will be trying to figure out how to make Shieldwall work when you have other non-Shieldwall units (dwarves with crossbows, Palace Guard, Guards of the Fountain Court, Gondor Rangers, etc.) sprinkled into your battle line. :-P
This is really very well done, thanks a lot. The 4s make sense.
ReplyDeleteThere’s only one thing here you seem to have overlooked. You can simply choose not to make way, meaning that your front model takes more strikes, but with the extra defence that won’t make a massive effect anyway and especially against goblins (even with 4 attack because of spear supports) they are highly unlikely to kill the model anyway.
ReplyDeleteAnd also, even if you choose to make way, you only have to move an inch back so you should still be in base contact with the neighbouring models spear support as well as that models, meaning you still get the shieldwall bonus.
DeleteYou could always get in a chokepoint to avoid being flanked
DeleteWhile these are all good points, it's not all of the story . . . yes, you can choose to be trapped by not making way, but with 4 dice, they've got a roughly 50% chance of getting at least one natural 6, which means that in every four fights that you lose, a Dwarf should die. If you can make way while in shieldwall, the 2 base Attacks give them a 30% chance of getting a natural 6, so you should only lose someone in one out of 6 fights that you lose.
DeleteThe idea of making way so you touch someone behind and beside is exactly the idea behind these formations - you don't have to start in shieldwall if you're about to be in melee - you want to end in shieldwall. The 4s formation gives you the flexibility of being in shieldwall during combat or when you're moving up the field.
And yes, if there's good choke point positions, you can anchor your battle line with them . . . when the board and scenario allow this, it'll be great and you should definitely take advantage of it. :-)
I'll second what Tiberius said: while it's true you can decide not to make way, doubling the to-wound dice generally results in more deaths than the +1 defense buff mitigates. That's because your odds of rolling a 6 improve significantly if you double dice (it's about 50% if at least 4 dice are being rolled), and a "6" is generally enough to wound even a shield-wall model (Iron Hills Dwarves vs. S3 are the sole exception--but against S4 (or WoMTs vs. S3), a single 6 is all the opponent needs to wound).
DeleteHaving said that, there are other tactical reasons why you may not want to make way (the most obvious is if you're defending an objective, and making way would allow your opponent to move into scoring position), in which case the fact that you pick up shieldwall is a nice bonus. The point of this particular article, however, is that there's other ways to get Shieldwall up, beyond being purely stationary (or lining up in one long, static battle-line that is more prone to telegraphing).
Okay, well that’s me neatly trumped except for one thing, by refusing to make way, you keep shield wall bonus and goblins are S3 right? So that should be a 6/5or 6/4 to wound D8. Even with 4 attacks, reaching those are highly unlikely. Against an opponent with higher S however, I would concede my point. I would not trust D8 against an Uruk’s S4 with 4 attacks. Also you have the higher fight value so technically, as you have spear supports as well, you have a higher chance of winning the fight. As the goblin has maybe D3, you are probably going to kill them with 2 attacks. In the end, you will kill a lot more than you lose troops if you don’t make way, and thus hold the formation. You’re probably still right though.
DeleteStrength definitely makes a difference, and I agree that for S4, it's probably not worth it (so whether you'd do it against Goblin-Town or not may come down to whether the goblins have called a Piercing Strike, to go up to S4).
DeleteThe volume of dice also matters, I think. Doubling just one die isn't too bad, if you're just looking for 6s/4s. But doubling 4 dice into 8 (or maybe more, if you're fighting a hero or warriors with multiple attacks, like Reavers, Iron Guard, or Hunter Orcs) is a much riskier proposition.
Lastly, integrity of your battle-line also matters. Iron-Hills Dwarves are in a unique situation because their spearmen are always _also_ going to have shields, and be D7/D8. Depending on the scenario, whether there's VPs at stake for being in a particular spot, and what backing away will do to the integrity of your battle-line, you could situationally decide to take the extra dice from not making way. And while Shieldwall may not be the _motivation_ in that circumstance, it's definitely still a nice benefit to have when you make that choice.