
Hey Reader!
So in preparation for 2022 TMAT Grand Tournament, I decided to build a new gaming board. I've been storing up foam for about a year now, and as I was casually chatting with my wife about the tournament, the question of when the foam that was taking over the laundry room was going to disappear came up, and that's when I decided it was time to build a new board (in addition to trying out army lists to see what I'd take).
But this would not be just any board: it would have three elements that I've wanted to do for a while. First, it would have a few ruined walls, as walls are cool, fun to make, and I haven't made any out of foam yet, so I wanted to make some. Second, it would use variations in elevation for strategic play instead of obstructions, thereby making the board look open from an archery and movement perspective, but due to the undulating terrain there is a strategic advantage to being on a specific side of a hill to get In the Ways against archery, thereby still allowing archers to shoot and use their cool tricks, but also provide reasonable cover against ranged attacks. And finally, I wanted to use spices to create the board, instead of just using standard terrain elements like flocking, tufts, trees, etc.
And the result is a ruined Arnor town, complete with three barrow mounds. And here's how we made it.
Step 1: Sort the Foam
 |
| So many shapes, sizes, and materials! |
Feast your eyes - one Amazon Fire TV, two 3D printers, and a few other random boxes all containing foam later, and you've got a wide range of foam for our use. Also, huge thanks to Home Depot for the polystyrene sheets: naturally we won't be using the foam for the base of the board, as we want something long and relatively durable for that, and for that I always turn to those pink workhorses.
Most of the foam falls into one of two categories: packing foam which is dense and relatively easy to cut into clean lines if you have a sharp knife, as it will move with the cut as it has some give in it. We'll use these for some of the hills and slopes, as well as some of the structures. We also have the "popcorn" variety made of thousands of little dots, which is lighter and easier to carve, but is difficult to make straight lines or precise cuts with due to the nature of the foam. I plan to use that for some mountain and cave terrain, where non-straight lines are ideal.
And so with that, we start work on the board.
Step 2: Shaping Feature Pieces

I then set to work shaping a few pieces that will go on the board as "feature pieces": items that will define specific sections of the board. To start, we need the aforementioned wall, and I opted to do two types of wall pieces based on the foam we had on-hand.
The first are "standard stone walls" using the instructions from Zorpazorp, which is by far the best tutorial I've seen on making walls. But the second help to give this some flavor: we're setting the town into a mountain range that is "off screen," and to reflect this part of the wall is built out of a mountain outcropping, complete with hollowed out rooms and the wall being built out of the rock and packed earth.
Little known fact: a lot of castles were built this way, with the bottom of the wall being the actual hill, making it so that anyone who wants to batter it down is actually battering down a hill, not a wall. Very difficult to undermine, and requires a lot less work to get the same amount of height.
And the result is a set of walls that will reach most of the way across the board, but leave big enough gaps for two horsemen abreast at the smaller entrance, and a mumakil, Smaug, or any other large creature at the largest entrance where the gate used to be:

The only issue with this is the abrupt end to the mound wall: it shouldn't be sheer and flat like that, but that's how the foam came. So I grabbed another piece of foam and cut out a smaller piece to cap it off:

I shaped that up to look more like a rocky formation that is weathered and worn:

And then used toothpicks and glue to affix it to the end of our wall:

And boom: a more natural looking wall! To reaffirm that this is an ongoing mountain range, we now need part of a mountain, so I took our popcorn foam and drew out a template for its size:

And then I grabbed a similar piece that already had a cavern in it, and cut a rough door for a cave:
 |
| Since the Arnorians are gone, someone new has taken up residence here... |
Throw on a top (which I'd later break, so yeah...that is a thing...), and viola! A troll lair for the mountainside:

 |
| Save the piece that holds your 3D printing screen! It's very useful! |
Step 3: Spackling Board (1st of 2)
So we started spackling the board, and I opted to begin with the part that wouldn't have the walls and mountains on it because I thought it would be easier to do the other one, as all it requires is shaping hills and then throwing down the fortlet. Turns out I underestimated how much spackle we needed, so I had to make a quick trip to the hardware store to grab some more, and was joined by this fantastic little lady:

Once we got the spackle, the rest of the board was easy:

I sanded that down (and made a mess of my kitchen), and painted it brown for the dirt undercoat, and boom: we have the makings of this half of the board:

While the spackle was drying my daughter decided to drop one of her colored rings on the board, and it made an indentation:

I could have fixed this, but I decided, "Eh, why not - let's keep it," so I'm planning on making this a small lake so that the Elronds, Watchers in the Water, and Dead of Dunharrow people can't say I didn't put water on the board, :P
Step 4: Detailing the Board
With the dirt ready, now it was time to add the paths leading to the barrow hills. I decided to go for a "Celtic standing stones" look for the barrows, and that meant I'd need paths leading up to them but not actually going onto the hills themselves (as the hills are sacred), so I threw down some glue, threw down some sand, added some tufts, and let that dry:

As you might have noticed from the picture above, I also painted up and added coffee stirrers to the fort, making it look a bit more natural:

Then I added some flower bushes for aesthetics to honor the dead:

And now we're ready for the long dark of flocking.
Step 5: Flocking and Foresting
This part always takes me the longest, and I cannot seem to find time when I can do it all in one swell foop, so I'm having to do it in parts and I'm always terrified it's going to look like a patchwork quilt with brown seams, but in the end, after locking it down with watered down PVA glue, it turned out okay!

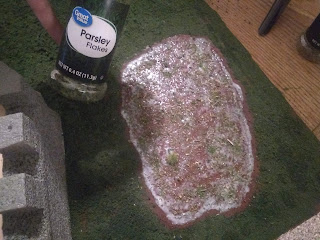
And if you're wondering about the huge patch of brown in the top-right, that's where we go next: the copse of trees for this part of the board (as both parts of the board will have woodland terrain, because elves and hobbits and some uruk scouts like that sort of stuff). I threw glue down on it and started adding Italian Seasoning (yay for spices!) to simulate fallen twigs and dead leaves:
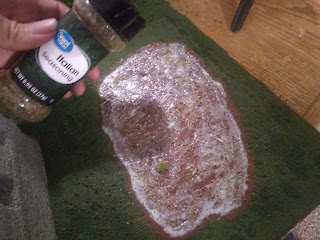
Add on some crushed parsley flakes, and you get some fallen green leaves to add some color:
Add in some trees, and we're set!

Step 6: Finishing Touches on Side A
With the board mostly set, I was down to finishing touches. I added an Agrax Earthshade wash to the coffee stirrers in the fort to make it look more weathered and worn:

I then added some cinnamon for dirt, Italian Seasoning for twigs and dead leaves, and parsley flakes for blown leaves, to give the road a bit more character:

Add a bit more character to the mountain, and we're set!

Oh, and one last thing: we have to finish the lake that my daughter made:

And just like that, we have half of the board set:
 |
| The white 3D printed standing stones will be painted, I promise! |
This will either be the area beyond the walls, or it could be an area within the walls, in case you don't want walls running down the middle of your board. It should work either way.
Step 7: Spackling Side B
With the first half done, now comes the trickier part: the fortress section. I started by spackling that down, which also helped to further lock the wall pieces into place (as some of them were a bit flimsy with their connection to the board for some reason):

With that done, I started painting the ground brown, and glued down some ruined stonework that I got from The Black Prince on one of his trips to Greece:

Step 8: The Mountain Wall
With the ground ready, I glued on the rest of the wood panels for the mountain wall, and that's when I realized that my super cool idea was going to require me to also make little tiny planks for the back of the wall...and the tops of the wall (as you can see them from above)...and that's when I realized that I was an idiot and should have just done stone, but oh well, :P So we did the outside part:

...And the inside part:

...And then capped off the side so it looks nice:

...And I'm never building a wooden castle wall again, :P At least not this way. Maybe I'll sharpen a bunch of pencils and paint them up as a palisade one of these days.
Step 9: Natural Attractions
Next we have the forest: I put down the Italian Seasoning, crushed parsley, and cinnamon again, and after adding the trees, the forest is done (I'll probably add some tufts to it before flocking, but I'm not sure just yet)!

With that completed, it was time to paint the cave and the mountain sections:

And with the mountain painted, I opted to put some decor in the cave, because our cave trolls are making this house a home (and apparently draw stick figures and write in English):

If my artistic abilities suck, it's because trolls suck at drawing and writing, :P
Step 10: Finishing the Grounds
I lined up Side A with Side B and noted where the road would have to go so that it would connect regardless of which way the board was facing, and then added the glue and the sand:

And then it was back to flocking:

I then added some cinnamon, Italian Seasoning, and parsley for flavor to make the road look more natural (and added some rocks where the old wall used to be to represent foundation stones):

I added in a 3D printed well (huge thank you to Loot Studios) to add more flavor to the woodland hill, and the board is taking shape!

Step 11: Final Touches
Just a few more touches to make things look better; I added an Agrax Earthshade wash to the mountain wall to make sure the wood looked old and worn:

I then put sawdust on the floor in the mountain rooms to simulate straw, making them look more realistic (as straw was used back in the day to help insulate your warmth when you lay down on it, so it was commonly placed on stone floors):

I added a wash to the stone walls as well to make them look a bit more weathered:

And I also added some 3D printed ladders to the wall sections so that we know where models can scale the walls easily:

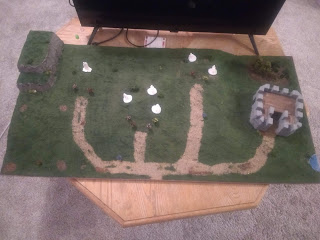
And that's when I called the project complete! Here's the final product:

Conclusion
The big thing that I want from this board, as noted above, is the use of elevation for tactics: instead of blocking line of sight with buildings and such (which is fun, and I have boards that do that), the board is pretty open, other than the wall pieces (which could be 3-4 inches from the board edge, so not blocking all that much), the mountain cave, and the outpost fort, but the presence of hills makes it so that you can obscure part of the model with the hill, thereby forcing a 4+ In the Way on the shot.
This adds a tactical element to play, in part because on average the barrow side of the board is higher elevation (so you may get better shots from that side) but it also has less cover, so return fire will be more painful. So things to think about as you determine your board edge and your progression across the map during the game, which is exactly what we want.
We'll see how it goes! I'm excited to have it done, as it's been sitting in the queue for quite a while - nothing like a tournament to get the fire going under you to finish something! And now to give my army a quick repaint, as I painted a number of the models over 10 years ago. Until next time, you'll know where to find me,
Watching the stars,
Centaur
"Sybil Trelawney may have Seen, I do not know...but she wastes her time, in the main, on the self-flattering nonsense human beings call fortune-telling. I, however, am here to explain the wisdom of centaurs, which is impersonal and impartial." ~ Firenze, Harry Potter and the Order of the Phoenix
No comments:
Post a Comment