Good morning gamers,
We're back with another update on my collection of models for the Quest of the Ringbearer missions. Last time we focused on Part I (up to Rivendell) and today we're revisiting Part I and covering Part II (through Moria).
Part I: The Shire to Rivendell
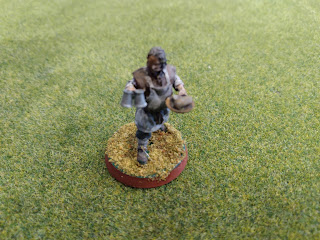
Since the last update, I got the last of the required figures for Part I, so here they are! First up, we have a model I've been dying to find for ages - Gildor Inglorion! He gets a bad wrap from most of the community, but is pretty good with Tom Bombadil (he's the kind of model who wants more than 1 Might point and can use the Will/Fate/Wound boost too) and gets you access to cheap, fast skirmishers.
 |
| 8" move with 2-4 Immobilizes a game . . . Pretty good deal. |
 |
| The red guy turned out really well . . . |
Next up, we have three characters from Bree - Barliman Butterbur, Harry Goatleaf, and Bill the Pony (who is used in Part II). Barliman was another experiment in wet blending to get some wear and texture to his hair and clothing (especially his apron). I love the details on this model and want to try him out sometime:
 |
| I think I can empathize with Butterbur more than any other character in the story . . . |
 |
| Turned the flash on to make sure the emphasis is visible . . . |
I also painted one of my favorite Aragorn sculpts - yet another excuse for some OSL practice, what with the torch and all (this time doing a layered highlight instead of a deep-color-to-bright look):
 |
| Layered lighting on the cloak and sword . . . |
 |
| . . . And his face remains in shadow . . . |
Bill is the rockstar of the Fellowship and is great fun to use. He was painted more simply (though his hair was a heavy wet blending process too):
 |
| Let's face it - you want me in your Fantasy Fellowship . . . |
Part II: Rivendell to Lothlorien
As the Fellowship heads to Moria, we get to a section that I own a lot of - I did start with the Mines of Moria starter set, after all. This section has about the same number of units, some of which will only show up in one scenario.
Purchase #9: A Wild Warg Chieftain
Thanks to Rythbyrt, I own one of these guys - and I love him so much! I submitted him as my March entry for the Drawn Combat blog and can't wait to field him in an Angmar army at some point.

I know these guys get a bad wrap for not having Strike or Brutal Power Attacks, but they're still great to field - mostly because they're fast! If you can trap your opponent's pieces, a S6 model with 3A doesn't have too much of a problem crunching through things.
Purchase #10: 18 Wild Wargs
I have six of the EIGHTEEN Wild Wargs required for this scenario, but am looking at getting the last of them next year. They are decent models in some lists, but not en masse (12 with a Wild Wargs Chieftain, perhaps, but not 18 unless you need them as dismounts).

Since I need a heap of Warg Riders for Fantasy Fellowships (18 for the Warg Attack scenario), the remaining wargs will be from Warg Rider sets.
Purchase #11: The Watcher in the Water
Rythbyrt got a great deal on two Watchers in the Water, so I got this one from him on discount - thanks mate! If you wanted to see my article on putting it together, check that out here.

This model is crazy - very powerful in Matched Play and really tough in the scenario from the Quest of the Ringbearer sourcebook. As I mentioned in my building article, I didn't like his tentacles sticking out so much in front of the base (makes it hard to get models into him), so instead I have him coming out of the water (which is much easier to play with).
Purchase #12: A Cave Troll with hammer and chain
"Chuckles" is one of my first models in this hobby and he's been through the ringer. :) If you haven't seen him in our TMAT Challenges, he gets a fair bit of thrashing (and has for the past 10 years).

Still, Cave Trolls are powerful models in the game - cheap enough that you can usually run 2-3 of them and if you can keep them from being shot to death and nixed by magic, you can deal quite the punch with them. Avoid Aragorn as much as you can - he'll get ya!
Purchase #13: 24 Moria Goblin Warriors
Once again, I started with these guys in the hobby - they're great little blokes and they provide LOTS of room for conversion (especially with the bowmen). I bought an additional box of 24 Goblins a few years into the hobby to "flesh out my army" and bought another 21 Goblins a few years ago, bringing my Moria horde to a rather impressive size.

Getting this many Goblins also meant I had models to convert into specialty Goblin models - like a Drum, Captains, Shamans, and Prowlers. This can save you lots of money on models that . . . well, just don't seem good enough to justify their $$$ cost.
Purchase #14: 2 Moria Goblin Captains
I converted these guys up - both from archer models. They're really great to have and are the fuel for my Depths of Moria Legendary Legion army.

When running these guys in the campaign, calling Heroic Moves and Marches is their main draw (just like in Matched Play, actually). Not great at fighting, but functional for the army.
Purchase #15: The Balrog
Let's face it - if you've read articles we've released recently on this blog, you KNOW I love this guy. He's amazing - he changes the way your opponent plays the game and can really mess up his day if he tried to run the F4/D6 spam with just enough heroes to field as many of those blokes as possible. On his own, he's lethal - pair him with some of the other shenanigans from Moria and he's downright terrifying.

He's a great model - and in the campaign, you only need to fight him once. Thank goodness. That scenario is probably the hardest scenario in the book, but whatever.
Purchase #16: Haldir
I've had Haldir for ages and recently got his armored version (before that, I just ran him "in his pajamas"). The new pack that gives you the bow-armed and sword-armed versions of Haldir is good, but in most points match games, you're probably running him with armor. Here are both Haldir models (and a showcase of how my painting style has changed over the last 10 years):

Purchase #17: 6 Wood Elf Warriors with Elf bows
I have loads of Wood Elves - love them to death. You only need six of them, so I've got a handful of my favorites here:

Conclusion
Here's how the standings look:
- Current Model count:
- Part I: 42/42 (100%)
- Part II: 43/55 (~78%) - just 12 Warg Riders left
- TOTAL: 85/97(~85%)
- Estimated cost remaining: ~$80
No comments:
Post a Comment