Good morning gamers,
Last year, we did a few posts on how to build an Excel-based calculator to determine your probability of winning duels (without boosting and with boosting) and the probability of wounding (either the average expected wounds you'll deal or the likelihood that you deal X wounds to an enemy). These posts, while very useful in providing a statistical view of combats in MESBG, are incomplete. You can tell the calculator that you assume someone has charged, or that someone is within range of a banner, or to some degree that someone has help winning the fight. But no matter how hard you try, there's more information that we might want - and it would be helpful if we could see examples of a combat. For this, we need a simulation - more specifically, a Monte Carlo simulation. And today, we build that.
Monte Carlo Simulations: Repeating A Scenario Many, Many Times
Monte Carlo simulations operate on the following theory: if you repeat a situation thousands of times, you can derive trends from them and get an idea for what to expect in a given (or changing-but-controlled) situation. This is particularly useful when we're rolling dice - you can mathematically figure out your likelihood of getting certain results statistically (as we've already done), but when you have dependent rolls (like dueling and wounding), it's sometimes helpful to see them in examples. And that's what we're doing today.
We're going to create a scenario (two sides fighting) and repeat the scenario 2000 times. Instead of assuming priority, we're going to roll for it - and that means we need to change the scenario inputs a bit. We already have things like Fight Value and number of dice to win the fight and wound on each side, but we need additional information too.
We're also going to allow one side to get up to five model types in the fight (Vertical) and the other side up to two model types in the fight (Horizontal). Because fights break up into one-on-one when multiple models engage from each side, most situations will involve one model on one side and one or more models on the other. The lone model could have a spear-supporting model (or 1-2 pike-supporting models), so I've let the Horizontal team have a second profile option. There may be situations where you'd need more than two profiles for the lower-model-count side (such as an Isengard-Easterling alliance with an Uruk-Hai Berserker supported by an Uruk-Hai Warrior with a pike and an Easterling Warrior with pike and shield), but for simplicity today, we're going to limit the scenario to 5 vs. 2.
We're also going to build out the dueling roll portion only - mostly because the process of accounting for basic dueling and wounding rolls is incredibly complicated and takes a LONG time to explain (I tried doing both dueling and wounding in one post and it was WAY too long). So, keep your shirts on - we'll be back next week to deal with the wounding portion. Keep in mind, though, that we can still learn interesting things from the dueling portion only (which we'll talk about at the end).
Finally, we need to acknowledge when making a simulation like this the first rule of spreadsheet tools:
Columns are free.
Columns in Excel continue to be added as you journey further to the right. We're going to generate a TON of columns in this spreadsheet - and by not constricting ourselves to a certain number of columns, we can keep our granularity as we go and it will keep our cells clean and our work simpler in the long run. So with that, let's dig in and start simulating some fights (well, the dueling portion anyway)!
Because of the way the simulation is going to work, we need to add some options to our inputs page. First and foremost, we're going to need to add options for tracking Might, Will, Fate, and Wounds on each profile. We've set up a drop-down menu for 1-6 Might points (for Boromir and Azog), 1-25 Will points (for the Necromancer), 1-24 Fate points (again, for the Necromancer), and 1-20 Wounds (for Smaug). You can see the options we've added here in red text (we've updated one naming convention in blue):
 |
| The "Base Attacks" field has been changed because we're not assuming who has the charge, knock-down, or anything . . . |
In this general section, we've also added rules for Fate Saves - specifically, five different options for the models: rerollable Fate saves (for those with Elven rings), a 3+ success on your Fate roll (for Thror), an extra 3+ Save (for the Goblin King), an extra 5+ Save (for Golfimbul, the Gift of Foresight, and Gundabad Berserkers with the Signal Tower), and an extra 6+ save (lots of different models, but especially Durin, Uruk-Hai Berserkers, and models within 6" of a model that has channelled Fury).
We'll also need to keep track of whether each model gets charge bonuses when charging and what kinds of bonuses are assigned (cavalry get an Extra Attack and Knock Down when charging enemy infantry that are S5 and below, but will only get the Extra Attack bonus if the enemy is S6+ - and some models like Shagrat can get the Knock Down bonus but no Extra Attack). As such, we're going to set up three options: "Extra Attack Only", "Knock Down Only," and "Extra Attack + Knock Down". Whether this bonus is applied will be determined by a) who has priority, and b) who wins the fight.
Finally, we're going to have a section where you can boost your wounding rolls. Previously, we didn't provide an option for this, but this will give us the ability to specify if we are willing to pay Might to boost your wounding rolls. Like boosting priority, we're telling it how many Might points we're willing to spend to boost the rolls - but it will assume that if you're willing to spend 1 Might to boost a wounding roll, you'd also be willing to spend 2 Might to boost 2 wounding rolls (1 Might each). We might want to consider in the future having a max-Might-spent option to throttle our Might use (though, to be honest, if I get three 4s and need 5s to wound a 2 Wound/1 Fate hero, I'd probably be down with spending them all). I don't know - just a thought.
Now before we go into actually building the simulation, let's get something out of the way: we're not going to implement all of this today. We've already got our work cut out for us, so what I've decided to do is just give us the options that we need for fleshing things out. Our simulation isn't currently factoring in things like casting magic in the Move Phase (or chucking a throwing weapon into someone) or boosting your Priority roll with Foresight points (or rerolling it with the Longbeard rule - or even auto-claiming it with the Palantir). When we actually get to the Fight phase, we haven't implemented rerolls from banners or special rules (just kept with increasing our dueling dice that we get to roll) or even calling heroic actions like Heroic Strike/Strength/Defense (or if we really want to get complicated, we could evaluate Heroic Challenge/Combat as well), but we've built in the things that we think we'll need in the future so we don't have to go back and edit a lot. So today, expect the "happy path" to be fleshed out in our simulation and in a later post, we'll delve into how to make things a bit more nuanced (and complicated). Let's begin!
Building The Simulation: The Priority Phase
For the purposes of this demonstration, we're going to look at how well Elrond and a few helpers tackle a Cave Drake:

We're going to create a new tab - I've called mine "MC_Sim", but pick whatever you want - and we're going to name our first four columns as follows:

We're then going to use the "Home >> Fill >> Series" option in COLUMN_A to populate the values 1-2000 (pick "Columns," "Linear", and "2000" as the "Stop Value") so that we have 2000 values populated for our 2000 trials. Each row will represent a different round of combat - initially for independent rounds of combat, later for sequential rounds of combat.
In cells B2 and C2, we're going to enter "=RANDBETWEEN(1,6)" which will stand for a D6 roll for each side (DUEL_V is the Vertical team, while DUEL_H is the Horizontal team). We'll be using this a lot in this simulation, so you can consider copying the formula somewhere to be able to fetch it quickly later.
Finally, we're going to enter "=IF(B2>C2,"DUEL_V",IF(C2>B2,"
To test, we can copy these formulas down for 20 rows just to visually compare the rolls and who wins what:

One last thing we're going to do before we move on from the Priority Phase: we're going to highlight COLUMN_B and COLUMN_C and select "Data >> Group" in order to group these two columns together. This allows us to click on the "-" sign to collapse those columns from our view (but still see who won the roll - makes reviewing things much easier if we can see the final result without having to open stuff):
 |
| Note that as you make changes, the cells recompute - so expect values to change as you go! |
I mentioned above that columns are free - but because we're going to have a lot going on, grouping/hiding columns is a useful way to preserve granularity for debugging our simulation while also not overwhelming us with data. It also means we don't have to artificially shrink columns. To aid in the columns being slim, though, we're going to alter the text direction to have the words up-and-down, centered and aligned-bottom (note that I've also colored the columns related to the priority rolls as blue - I've done this so that when we've got all of the grouped columns together, we can more easily identify what phase of the process we're in).
Okay, we have priority determined - let's get the dueling rolls going!
Building The Simulation: Getting Initial Dice Rolls
When you're playing MESBG, a lot of things happen very quickly for a dueling roll - and it will help us map out what we need to do if we spell out the steps that we take for granted when we play:
- We figure out what models are in the fight (which we've already done in the inputs page);
- We resolve heroic actions that involve stat improvements (Heroic Strike and Heroic Strength, both of which will be addressed in the future);
- We grab the dice that each model has, factoring in whether or not we're on the charge and getting extra dice (we have identified what charge bonuses each model gets, but we'll need to check who has priority to figure out whether or not our number of dice increases);
- We choose what special strikes we're doing, which can affect our Fight Value, but more often impacts our wounding roll should we win - and often our opponent's wounding roll if we lose (we aren't handling this right now, but we will in the future);
- We roll our dice and apply any negative modifiers that are in play (we have the penalties applied in the input page);
- We compare our dice to our opponent's dice (so we know if we're winning or losing);
- If we're losing, we perform any rerolls we have, usually from banners but occasionally from other special rules (we have this in our inputs page as well);
- If we're still losing, we determine if we're willing to boost our roll to win the fight;
- Once the Might has been spent to boost rolls, we determine who the winner is (comparing the highest roll and rolling a die if there's a tie).
Wow, that's a lot of steps. Let's see how we build this in our simulation. First and foremost, we need to determine from the inputs page what our highest Fight Value is for each side and whether or not there's an Elven-made weapon on either side (who has either value doesn't matter). This is simply done by finding the max of the Fight Value entries in the inputs page for each side and doing a COUNTIF(<elven-made-row>,"Yes"

We need one column for each participant in the Vertical team (we can read in their names from the inputs page) and can then use the following formula to determine the number of dice that need to be rolled, based on their default dueling dice - rerolls already included - and determining any charge bonuses they receive:
=IF(E$1=0,"",duel_calculator!
It should look something like this:

Once we have this copied/pasted for all five profiles, we can then create another set of columns that "rolls" the dice for them and reports the highest dice that's rolled:
=IF(K$1=0,"",MAX(IF(E2>=1,
With this we know how many dice have been rolled and what the highest roll for each model is:

Let's add 6 more columns to the right with our five profile names read in and a grouping column that's called "Duel_Penalties" (you should be up to column AA by now) and we're going to read in the dueling penalties each model has. To find the dueling penalties, we just need to pull the value from the inputs page, using the following formula:
=IF(Q$1=0,"",IF(duel_
It should look like this when you're done:

We can then apply the dueling penalties by . . . just adding the two values (I've collapsed the Duel_Dice section because we're getting a bit long-winded in the columns department). We're also going to find the MAX of these penalty-applied columns for ease of look-up later:

Okay, now for the tricky part . . . boosting rolls . . .
Building The Simulation: Boosting Dueling Dice
So far we've rolled some dice (including rerolls) and we've penalized ourselves - but now let's take a look at whether or not we need to boost any of our dice. We can use this formula to find the Might we are willing to spend to boost our dueling roll:
=IF(AB$1=0,"",IF(duel_
With our penalties and boosts applied, we can add six more columns to apply the penalties and see what our final highest roll for each model is:
=MAX(1,SUM(P2,V2))
And we can then add six more columns with no data for now to be used for boosting our rolls and one final column for the Vertical team that will take the max value of the boosted rolls and this will give us our "winning dice" to compare to the Horizontal team:
 |
| Once again, I've collapsed a few columns that we don't care about anymore . . . |
We don't currently know if we need to boost our rolls though - so let's build out the Horizontal team and then we'll come back and figure out the boosting logic (because it's dependent on knowing what our opponent got).
We need to mirror what we did for the Vertical team, but this time we need three columns for each step (instead of 6):
- Read in dice being rolled from the Inputs tab;
- Roll dice based on the number of dice specified in the previous columns;
- Read in the dueling penalties applied from the Inputs tab;
- Read in the Might allocated to boosting rolls from the Inputs tab;
- Apply dueling penalties (adding the penalty column to the max-roll column);
- Add three columns for boosting rolls; and
- Calculate the max roll for the side (column BI in my spreadsheet).
It should look like this when you're done:

With all this in mind, we can now turn to figuring out whether or not to boost rolls . . . hang in there, we're almost done. :-)
Whether to boost or not to boost is actually a fairly involved process - though in our heads, we can evaluate whether or not boosting will matter very quickly. Still, it's not uncommon for players to agonize for several seconds (hopefully not minutes) over whether or not to boost a roll - here are the usual considerations:
- Is my max roll (after penalties have been applied) lower than my opponent's? If so, we can consider boosting it; otherwise, we don't boost it.
- If my max roll is lower than my opponent's, is my max Fight Value not the same as my opponent's and will my boosted roll be greater than my opponent's max roll? If so, boosting it will force our opponent to boost as well (if he can); otherwise, we don't want to boost it.
- If my max roll is lower than my opponent's, is my max Fight Value the same as my opponent's and will my boosted roll be the same as my opponent's max roll? While this basically the same as the last question, we probably only want to boost our roll to a tie if we have an Elven-made weapon (otherwise we're boosting to get a 50/50 chance of winning or losing the fight); otherwise, we don't want to boost it.
Note that you COULD boost your FV if you're losing the roll when your Fight Values are tied, but I've chosen to not do that here. I'll point out where you can change it in the code if you want to (or make it configurable). Given these three considerations (am I losing, is my Fight Value higher or lower, or is my Fight Value the same), here's the logic you need in each cell:
=IF($AM2<$BI2,IF(OR(AND($E2<>$
If we copy this formula to the right for the five characters in the vertical team, we now have the amount of Might used to boost for their side. We can create a similar formula for the horizontal team:
=IF($BI2<$AM2,IF(OR(AND($G2<>$
If we copy this to the second Horizontal profile, we'll have cells that determine whether to boost rolls for both team. We can use this information to find out what the max roll is for each side (using the following two formulas for the Vertical and Horizontal teams respectively):
=MAX(SUM(AH2,AN2),SUM(AI2,AO2)
=MAX(SUM(BG2,BJ2),SUM(BH2,BK2)
It should look like this when you're done:
 |
| The values highlighted in red blobs are the final dueling rolls for each side (post boosting). |
I added one last thing to help with our metrics gathering at the end of this: in the column where we group together our boosting rolls (COLUMNS AS and BL), I put a formula that looks at your max roll post-boosting to your pre-boosting roll:
=AT2-AM2
=BM2-BI2
I should note that we are not doing (read, NEVER doing) iterative considerations of whether to boost rolls or not - we're deciding whether to boost our rolls based on the "pre-boosted" final result of our opponent. If our opponent's side doesn't have the high roll yet, we're not going to boost. If he subsequently boosts his roll, we won't pick that up. We could copy these cells over and over again to account for "escalating a dueling roll" (something you shouldn't do unless your opponent is almost dead), but that's beyond our scope for today (and frankly doesn't happen very often).
Okay - so who's the winner? We can compare these two final dueling values, factoring in the Fight Value of both sides and whether they have Elven-made weapons to report out which side wins (we assume the Vertical team is "more good" than the other, but frankly it doesn't matter):
=IF($AT2>$BM2,$AT$1,IF($BM2>$
The result should be something close to this:
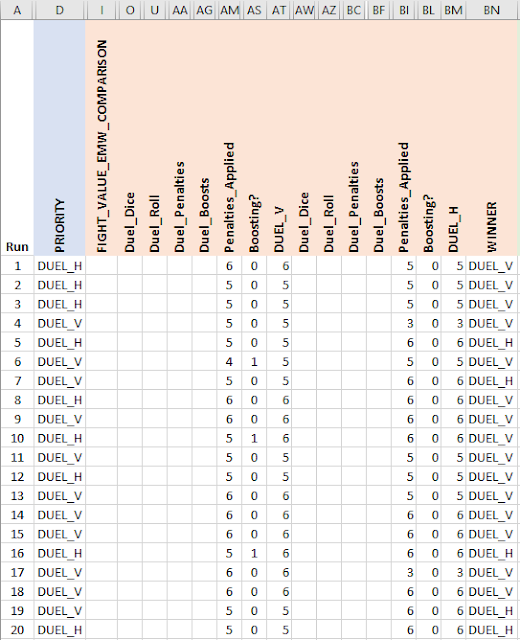 |
| For the record, Elrond's side is the "DUEL_V" . . . not that surprising, really . . . |
If you've followed my column generation, you should have ended on column BN . . . that's a grand total of 66 columns, all of which were free. :-) To complete our work, highlight the furthest-right cell that you made (in mine, it's BN2), highlight all the cells to the left of that cell (stopping at column B), and copy the cells down 2000 rows - and the dueling part of our simulation is done!
We're not going to get into the wounding rolls yet - we'll cover that next time, but let's see a few of the stats we can glean from just the dueling roll of the simulation. First and foremost, we can add to our inputs page the number of wins each side has:
=COUNTIF(MC_Sim!$BN:$BN,MC_
=COUNTIF(MC_Sim!$BN:$BN,MC_
We can also find the average highest dueling roll for each side:
=AVERAGE(MC_Sim!$AT:$AT) for Vertical
=AVERAGE(MC_Sim!$BM:$BM) for Horizontal
EXTRA CREDIT: you could expand on this by getting a count of each bin (6-high, 5-high, etc.) if you wanted to - this would just be COUNTIF(<column>,"<number>").
Finally, we can find the number of fights where we boosted a die roll - something that can be VERY helpful in correcting our own internal biases about going two-handed in fights:
=COUNTIF(MC_Sim!$AS:$AS,">0") for Vertical
=COUNTIF(MC_Sim!$BL:$BL,">0") for Horizontal
The outcomes of our run look like this:
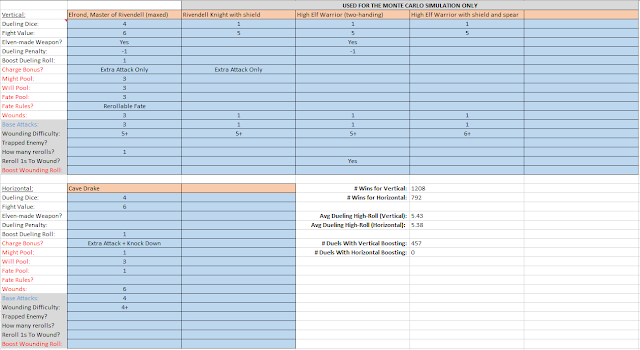
We currently have data for 2000 independent combats and it looks like Elrond and his team beat the Cave Drake three-out-of-four times (but also have to boost their rolls one-out-of-four times . . . while the Cave Drake never gets value from it - that's an interesting data point). Next time, we'll dig into the more critical element of the discussion: the wounding rolls. This will involve less duplication work (since only one side gets to wound . . . usually) but a TON of columns will be added (thankfully, they're still free). Hope to see you there - until then, happy hobbying!
This is exciting. Can it do something where it just battles say infantry types, then tell us the most points efficient?
ReplyDeleteIt probably can - the next post will cover the wounding part of the duel (and later we'll add other bells and whistles). But we'll also be doing posts that compare heroes and warriors and such. :-)
DeleteHi there,
ReplyDeleteI am following your guide to write this in R. I have a suggestion : instead of showing the formulas with the alphanumerical names of the cells such as `= AT2-AM2` I recommend using cell labels in formulas such as `Dual_V - Penalties_Applied.
Easier to read in the Excel, and easier to read for those not in the Excel.
Great job.
Thanks - I usually name my cells, but I didn't want to have to explain how I did that. "Copy/paste this" seemed like a better approach for this particular medium. :-)
DeleteHere you seem to be referring to an other Excel file.
ReplyDelete=IF(E$1=0,"",duel_calculator!L$3+IF(AND($D2=$AO$1,IFERROR(FIND("Extra",duel_calculator!L$8,1),0)>0),1,0))
Was that in an other post?
The "duel_calculator" reference is a tab name - I believe it's the dueling calculator inputs from the previous posts in the series. The inputs were joined so you could compute both the distinct probabilities and the monte carlo simulation.
Delete