Good morning gamers,
We're back with another epic movie moment - one of those scenes that you see and you're like, "Yeah, that's awesome - but there's no way I'd do that in MESBG." Today we're looking at one of my favorite five-seconds-of-film of all time (and one of those moments that really sold me on Lord of the Rings): the Last Alliance Elves using their two-handed weapons in a windmill sweep against a charging horde of Orcs. Let's get stuck in right away and figure out how to use this MESBG!
Movie Moment #2: "The Last Alliance Elves"
Okay, you're less than 10 minutes into the Fellowship of the Ring, and you see the Elves do two amazing things: first and foremost, Elrond is shouting in Elvish for his archers to slay all the Orcs in front of him (which they proceed to do) and then you see this . . .
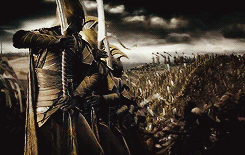 |
| You're going, "Aw YEAH!" - Am I right? |
I know I was feeling great when I first saw that moment - and I still pause in my painting to watch those few seconds of film every time I watch the movies. I love it so much - I mean, like, SO MUCH. Who doesn't like that windmill attack? NOBODY! But you don't want to do this in MESBG, do you? Why not? Because using a two-handed weapon applies a -1 penalty to your dueling roll (and THAT is a recipe for disaster). Or is it?
How would one take this very cool movie moment and translate it into MESBG? Well, let's lay down some ground rules: - We need to take at least a few High Elf Warriors with no additional wargear (since the guys in the shot have neither shield nor spear nor bow) - we'll call these guys "windmill models";
- We need to NOT support these models with spears (because the wind-milling guys weren't being supported); and
- We need to have our bowmen behind a line of shield-and-spear-carrying guys.
Okay, so we're all set, right? This is going to be the perfect way to run a Rivendell battleline, right? Well, I don't think our opponent will think so. How do we do it then? Well, we'll give it a go with the following list:
- Rivendell: 700pts
- Gil-Galad on horse with shield (thematically-inclined players should probably drop the horse and take an extra 10-point model)
- 8 King's Guard (our "windmill" models)
- 9 King's Guard with shields and spears
- 1 King's Guard with shield, spear, and banner
- Elrond, Master of Rivendell with heavy armor [ARMY LEADER]
- 10 High Elf Warriors with Elf bows
Amazingly enough, we got 30 models into a 700-point army. That's not bad, eh? As a matter of fact, we actually tick off all of the boxes from our Bare Necessities series except having 4+ fast troops (no March makes this almost-all-infantry army quite slow, but let's face it, we're trying to make our opponent come to us). Thematically, Gil-Galad should be our army leader, but thanks to Elrond having all of the bowmen, we're making Elrond our leader to benefit from our army bonus more (this also allows us to use Gil-Galad as a grenade, which is more fun).
 |
| I don't own Gil-Galad, so pretend that Arwen is Gil-Galad . . . |
Just like in the movie, we're going to put the bowmen behind the spearmen - we probably SHOULD just give the spears to the bowmen, but we can just have the bowmen eventually step 3" backwards and have the spearmen move behind the bowmen when we're about to be charged. The 10 shield/spear King's Guard (including the banner) will make the formation hard to shift - F6 in 10 fights with a supporting model for each fight and a reroll from the banner in some of them will make even F5 heroes work for any kills they get. Add into the equation the presence of Elrond in the near-center of the formation and you've got an anvil that will draw a LOT of attention from your opponent - and THAT is how we make the windmill formation work. How? We employ our windmill warriors on the flanks.
Look at the images from the movie again: yes, there is a long line of models "doing the windmill thing," but they're NOT in Elrond's formation at all:
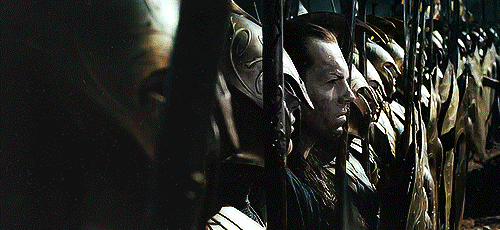 |
| Elrond's actual anvil formation . . . shield-and-spear Elves backed by bowmen! |
So what does this tell us about these "windmill" warriors? They're only part of the battle line! So we're going to have these guys guard the edges of our bow-armed anvil and drawing off whatever "extra" models our opponent has. Do you know what are near the windmill guys? Banners . . . and another rank of sword guys. Look again . . .
|
| Do you see the banners? |
One of our flanks (viewers left in the image above) is going to have as many windmill models within 3" of our banner as we can so each two-handing model gets effectively two dice to win the fight. The other flank (with no banner) will be supported by Gil-Galad, who our opponent will probably avoid like the plague. If our opponent is hesitant to send models to fight him, it also means they won't have many models to overwhelm the windmill models near him. With Heroic Combats at his disposal, Gil-Galad is pretty hard to tie down while you try to overwhelm models near him, so you can clear out models that try to overwhelm your position (or force your opponent to have models spaced out to keep Gil-Galad from getting into your big heroes). Any of these situations will make it harder for your windmill troops to be overwhelmed.
The key to making this work is an understanding of a few things: first and foremost, high-Fight models in range of a banner have a decent chance of winning a fight against a single die EVEN with a two-handed penalty. While percentages aren't technically probabilities, you have a 31% chance (0.306 probability) of getting a 5-high and you have a 56% chance (0.556 probability) of getting a 4-5 as your high roll. If facing an opponent who is only rolling 1 die, the Elf has a 58% chance (0.583 probability) of winning the fight and a 39% chance (0.390 probability) of winning against 2 enemy dice (which is not great, but seems higher than it should be considering we can't get a 6 as our final result). While each member of the windmill squad has a roughly 40% chance of winning the fight against most spear-supported models, your Elves in your main battle line have the opposite winning probability (61%) against 2 dice assaults when they don't two-hand - which means if you're REALLY scared, you can just not two-hand and so long as you have your banner nearby, you can have a 61% chance of winning as well. Not bad for just one model, eh?
Second, by spreading our battle line out with these models, we know that we're making our flanks more vulnerable, but we've also spread out our opponent (or exposed him to being counter-charged). Remember that we have an anvil that is 10 files long and 2 ranks deep with bows tearing through our opponents (plus Elrond) - and some of those models will be within range of a banner, so your warriors in the anvil will be rolling 2-3 dice to win the fight at F6 (Elrond could be rolling 4-6 dice, depending on whether he's spear-supported and/or within range of the banner). With any luck, you may also be fighting enemy models on the ground if Wrath of Bruinen goes off - and THAT would be a nasty surprise. The rest of your battle line can Feint with the front-line model (since the Fight Value of your back-rank model will keep the front-rank model's Fight Value from mattering), so if/when you win, you'll be rolling 2 dice and rerolling any 1s on one of them (which may not kill the enemy, but certainly makes it more likely to work). With 30 models in our army at 700 points, we should have pretty comparable numbers to most armies (maybe the numerical advantage) by the time our bows have finished doing their work - which, as it happens, comes right before the windmill scene in the movie.
Third, the objective of these windmill models is to buy time for your heroes to do their work - dragging models away from a tight formation makes it easier for mounted heroes (like Gil-Galad) to find vulnerable auric heroes near the main battle line. There are also plenty of models that can be struck with a Heroic Combat, whether they're supporting in fights on the flanks or supporting models in the center of the board. It's a pretty nasty thing when a big hero clears out 4 models in one turn - especially if it weakens the force fighting your main battle line. This could be done by models shielding, but can work just fine this way.
So . . . does anyone think they can honestly try to make this work on the tabletop? I'm certainly going to try (though I'll use Glorfindel instead of Gil-Galad - costs 15pts less himself and saves you 18 points on King's Guard upgrades, so you can add 2 more High Elves with spears and shields and 1 more High Elf with Elf bow to the army). Not as theme-based as it could be, but I like it. 🙂
Conclusion
Well, hopefully this was as fun of an exercise for you as it was for me - I'm excited to try it out with my newly-painted High Elves (still got some basing to do) and at some point I'll find a way to work it into a post. We'll be back later with more movie moments that you can replicate in your games - until then, happy hobbying!

No comments:
Post a Comment