Good morning gamers,
Dwarf archers (whether Warriors or
Rangers) have the advantage of having high Defense and are both resilient
against most enemy archery. To ensure these guys get good firing lanes, I run a
tight staggered formation with melee troops in the front (hero in the center,
usually) and your shooting troops in the second rank, garnering some protection
from enemy archery from the (usually) D7 troops in the front. While in base
contact, they can ignore in-the-way penalties for friendly models that are
between them and their targets, so make sure those two ranks are right up
against each other to get the most out of your archery!
 When the opponent’s forces begin to
close on you, widen the formation out a bit so the archers have more
visibility. With a wider battle line, you expose some of your warriors to
gang-up fights, but your archers have a better chance of being able to clearly
see an enemy spearman – and plucking him from the fight makes the odds much
closer (especially if you have a banner nearby and the front rank is
shielding). Getting kills when you’re shielding is rare, but not so rare when
you’re relying on archers to deal damage instead of spear-supporting.
When the opponent’s forces begin to
close on you, widen the formation out a bit so the archers have more
visibility. With a wider battle line, you expose some of your warriors to
gang-up fights, but your archers have a better chance of being able to clearly
see an enemy spearman – and plucking him from the fight makes the odds much
closer (especially if you have a banner nearby and the front rank is
shielding). Getting kills when you’re shielding is rare, but not so rare when
you’re relying on archers to deal damage instead of spear-supporting.
 The purpose of the English formation
is to use archers to drive your opponent towards your center line and allow
your archers to harass from the sides (and later trap models from behind).
Pulling this off requires thinking two turns ahead (recall that principle from
our first post in this series), making sure your archers move far enough ahead
of the main line to be within range but staying far enough from enemy models that
they can’t be charged when isolated from the main body of troops. The wings of
this formation are good for your bowmen and perhaps a smattering of throwing
axe Dwarves to keep them safe (or stall cavalry) - I've put my throwing axes in the center to force the enemy to keep coming into the kill-box.
The purpose of the English formation
is to use archers to drive your opponent towards your center line and allow
your archers to harass from the sides (and later trap models from behind).
Pulling this off requires thinking two turns ahead (recall that principle from
our first post in this series), making sure your archers move far enough ahead
of the main line to be within range but staying far enough from enemy models that
they can’t be charged when isolated from the main body of troops. The wings of
this formation are good for your bowmen and perhaps a smattering of throwing
axe Dwarves to keep them safe (or stall cavalry) - I've put my throwing axes in the center to force the enemy to keep coming into the kill-box.
 There is an alternate to the box: the formation above uses the
two-wings that we saw in the Shieldwall post, but with a different set up (one that first appears as a real head-scratcher): a
multi-step formation. In each of these steps, you have your archers facing
squarely towards the enemy, bows at the ready (throwing weapons, in this case,
making up the foremost step). Between each step is a slanted line of melee
troops (I recommend 5 models wide – more on why later). The slant is important
for keeping the firing lanes of the next steps unobscured and despite the
models having a fairly compact formation, you get a surprising amount of
visibility.
There is an alternate to the box: the formation above uses the
two-wings that we saw in the Shieldwall post, but with a different set up (one that first appears as a real head-scratcher): a
multi-step formation. In each of these steps, you have your archers facing
squarely towards the enemy, bows at the ready (throwing weapons, in this case,
making up the foremost step). Between each step is a slanted line of melee
troops (I recommend 5 models wide – more on why later). The slant is important
for keeping the firing lanes of the next steps unobscured and despite the
models having a fairly compact formation, you get a surprising amount of
visibility.
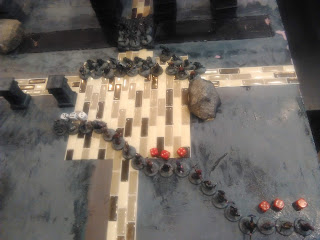
 As the enemy
closes in on you, the formation shifts, with the foremost step side-stepping to
allow the melee forces in the middle to prepare to receive the enemy (the two white dice show where the Ranger line began). The
primary objective is NOT to compromise a firing lane, so only move troops to
plug the holes created by the migrating archers. I recommend keeping one model
(I recommend your most-killy model) at the tip of the “stair” so that they can stay
in place (marking the end of your battle line - red die indicates the model that didn't move) and your other units move around
him. If you begin this movement 1-2 turns before the enemy can reach you, you
should have a 5-7 man battle line drawn up easily.
As the enemy
closes in on you, the formation shifts, with the foremost step side-stepping to
allow the melee forces in the middle to prepare to receive the enemy (the two white dice show where the Ranger line began). The
primary objective is NOT to compromise a firing lane, so only move troops to
plug the holes created by the migrating archers. I recommend keeping one model
(I recommend your most-killy model) at the tip of the “stair” so that they can stay
in place (marking the end of your battle line - red die indicates the model that didn't move) and your other units move around
him. If you begin this movement 1-2 turns before the enemy can reach you, you
should have a 5-7 man battle line drawn up easily.
 Alternatively,
your archers in the step can move backwards (diagonally to accommodate bunched
up melee models), allowing the melee warriors to slide in front of them
(keeping them in base contact to be ignored for in-the-way rolls). To do this, by the way, the first model to move diagonally needs to move a little more than 1" so that there's enough room for the model taking his spot to slide into position (the white die indicates where the edge of the Ranger's base was when he started - you'll see the Khazad Guard has moved into position slightly to the left of that die because of base maneuvering). While you could use the archers as harassers, this shields your archers in the second rank, allowing them to charge the flank (or protect your own). Either of these formation maneuvers is good - your preference as to which you prefer.
Alternatively,
your archers in the step can move backwards (diagonally to accommodate bunched
up melee models), allowing the melee warriors to slide in front of them
(keeping them in base contact to be ignored for in-the-way rolls). To do this, by the way, the first model to move diagonally needs to move a little more than 1" so that there's enough room for the model taking his spot to slide into position (the white die indicates where the edge of the Ranger's base was when he started - you'll see the Khazad Guard has moved into position slightly to the left of that die because of base maneuvering). While you could use the archers as harassers, this shields your archers in the second rank, allowing them to charge the flank (or protect your own). Either of these formation maneuvers is good - your preference as to which you prefer.
While the first step is maneuvering to receive the enemy, your other
steps of archers (and supporting melee models) continue to advance 2.5” each
turn. If you keep your steps 5” long, in 2 turns (you’re your first step is
ready to receive the enemy), your second step will have arrived, doubling your
battle line. As your stairs continue to advance, more and more troops are
brought into the battle (and the archers can continue to batter the opposing
force). While this doesn’t allow your full force to engage at once, the arrival
of new troops can be a crushing blow to a battle line that’s gotten stalled in
combat, as soldiers that were directed towards punching through the lines in
the front are dragged off to the flanks to keep the enemy formation from being
trapped (or archers from getting sniped by archery).
Today we get to do a deep-dive into my beloved bearded
fellows – the Dwarves of Moria! This post revisits a post I did back in August
2014 (and a post we did back in April 2011), where I talked about my Dwarves and the strategy for using them.
Today, we’ll be using them as a case study to recap what we’ve talked about in
the previous two posts in this series (one on shooting in SBG, one on using
throwing weapons).
Dwarves of Khazad-Dum/Moria: Why Skirmish?
A few of the armies we looked at in the previous post don’t have access to spears at all – Rohan has throwing spears but not normal spears. Among those armies
that don’t (really) have spears are the Dwarves of Khazad-Dum (Sharkey's Rogues is another one). Yes, if you get
1 Vault Warden team for each 1 archer you bring along, you’ll have a
“traditional shield-wall” complete with spears, but that’s not only very expensive
to actually acquire, but also very one-dimensional. And perhaps that’s not a
bad thing.
Where the Dwarves of Khazad-Dum thrive is in their
flexibility: while the Army of Erebor list is almost strictly melee in nature,
the Dwarves of Khazad-Dum have many shooting choices that allow them to
skirmish with their opponents very well. With ballista to force your opponent
to move towards your ranks, two kinds of bowmen to lay down medium-range fire,
and two options for throwing weapons (besides several hero choices), the
Dwarves of Khazad-Dum are a surprisingly good shooting army.
While most of the units I’ll be highlighting in this post
are Dwarf Warriors and Dwarf Rangers, I will say that the three more dominant
choices of units (Khazad Guards, Vault Wardens, and Iron Guard) are solid elite
warrior options. While Iron Guard will show up near the end of this post, I’m
not going to talk about Khazad Guards or Vault Wardens except to say that they
make great anvils for the rest of your armies. Dwarves are tough to kill – and
this is especially true of Khazad Guards and Vault Wardens, so including some
of these can help you bog down some of the enemy’s assault force while you
harass the flanks (or come crashing through a part of the battle line that’s
been softened by archery during the advance).
Shooting vs. Spears
When most of us were introduced to the game, we played with
at least one faction that could take spears (Centaur got started with Rohan and
Uruk-Hai Scouts, so a bit of an exception there). We all learned pretty quickly
that spears are great because they are a force multiplier, allowing more units
to get involved in combat without having to actually charge someone. As a
result, it’s common to see spears show up in armies that can get them (and
sometimes everyone gets kitted out with a spear, just so there’s flexibility in
the battle line when battle’s well underway and the lines get messy).
However, as I laid out in my earlier post in August 2014, the
disadvantage with spears is that they can’t be used as a force multiplier until
you’re in combat – for most armies, you have to slog across the field in order
to get to the enemy first (unless your spearmen have bows or throwing weapons).
For this reason, shooting can be a valuable substitute for spear-armed warriors,
since you have the potential to damage your opponents before they enter combat.
For the Dwarves of Khazad-Dum, getting to even odds is critical, since your
basic units are a bit above average price (9-10 points each), your elite units
are above average in cost (11-16 points each – more on this in a bit), and your
heroes tend to be a bit pricey (Durin is up there, King’s Champion is good
value for price but still expensive). While Dwarf numbers can be comparable to
other armies at the start of the game, your best bet is to have a numerical
superiority at when the fighting starts (and for that, we need to shoot stuff).
Skirmishing Tactics: Stagger Formation
The heart and soul of Dwarf skirmishing comes from Dwarf
Rangers. While Dwarf Warriors with Dwarf bows are nearly comparable to Dwarf
Rangers with Dwarf Longbows (aka, normal bows – why not just call it
that?!?!?!?!), they don’t hit as often, and now that there’s a scoot-and-shoot
penalty when you fire on the run, Dwarf Rangers are just more reliable as
covering fire troops than Dwarf Warriors are. That said, against odd-Defense
troops, Dwarf Warriors make up for the 1-pip-worse to Hit by getting 1-pip-better to Wound, so I tend to run roughly equal numbers of Warriors and Rangers (just because
most armies tend to run a mix of even-Defense and odd-Defense troops). Also, bring Dwarf Rangers with throwing axes (maybe two-handed weapons too if you want extra damage) - they're great for supplementing your archery.
 |
| Better hope they don't have a siege engine or a dragon or something... |

One final note on the stagger formation: I tend to put
throwing axe Rangers on the ends – as I mentioned in the throwing weapon post,
being able to kill someone with your ranged weapon in the Move phase is
tempo-altering for everyone (and a helpful tempo alteration for you), so when
your opponent gets close, you can use these guys to swing wide on the flanks
before the fight begins (still within range of enemy spears) and then charge
them in on the second turn (or on the first turn of combat if you move second).
Really powerful. . . .
Skirmishing Tactics: English Formation
While the stagger formations are a nice
compact way of organizing your troops, an “English” formation is also very
useful with these guys. If you haven’t ready Rythbryt and my posts on Shieldwall,
you should do that – I talk about the historical
backdrop of the English formation there.


Conclusion: Skirmishing with Khazad-Dum/Moria
So, those are some thoughts from one Dwarf commander to
another. I’ve been thinking about getting some Iron Guard for a long time (more
throwing weapons on 2 Attack models is great), though I will counsel all Dwarf
commanders that, though their printed cost would make you think that they’re 15
points each, they’re actually 16 points each. Why? Because if you keep your
army bonus (which you should), you already get all the positive bonuses from
Feint and unlike ALL other Dwarf models in this list, Iron Guard begin the game
with a sword. You don’t want that – you want an axe! So, pay an extra point/model
(bringing them to a nice and tidy 16 points each) and get that axe!
Would some of these formations be better with a Khazad-Dum
focus (with Durin and Vault Wardens)? Probably. Durin is very powerful but also
very expensive – and taking him AND a King’s Champion (you want him for his
banners more than anything else - though the Champion is very, VERY good in his own right) will run you a hefty 300 points (probably
rolling up to 380 after you add a Dwarf King). For 350 points, you can get
Balin, a King’s Champion, and Gimli (and 3 Warriors/Rangers or almost 2 "real" Iron
Guard with the 30 points left over). While I think Khazad-Dum is a very strong
list, I think a skirmish-oriented army of Dwarves will favor a Moria list, since the
savings you get on heroes and sink that into skirmish troops (and you could get a few more troops if you leave Gimli at
home and take that Dwarf King).
Leaving Vault Wardens at home reduces your resilience, but
buys you valuable points for picking up better skirmish troops than you might
otherwise get. Taking Iron Guard are good for both skirmishing and carving
through things, but at nearly twice the number of points as a Dwarf Ranger,
they come at the high cost of numbers. Your choice as to how many you include.
That about wraps it up for talking about my beloved bearded
fellows – if you have thoughts, we’d love to hear them in comments! This post
was quite nearly the end of my discussion on Shooting in MESBG, but we’ll be
doing another army tactica involving skirmish troops (a fitting list to cover
on the heels of the Kingdom of Moria): Moria! Until next time, happy hobbying!
Nice
ReplyDelete