Hey Reader!
I'm working on terrain for Brawler Bash 2019, so I decided to venture out from my usual posts to do a terrain tutorial. I'm not particularly good at terrain (I have my moments), but since I am working on this, I figured I'd show you a bit of what's going on in preparation for the tournament.
Brawler Bash 2019 requires several pieces of terrain: hills for the King of the Hill match in Round 3, as well as lairs for fell wargs and cave trolls in the Living Wild match in Round 2. This means that the next few weeks you'll find me making terrain, requisitioning terrain from the gaming group, and painting up the last model I need for my force (which I'll post on the 17th when registration closes).
I'm starting with the hills for King of the Hill, as I want those to be standard across all maps. Thankfully, building hills is easy. You will need:
So here's what I'm doing to build the hills for the tournament.
Step 1: Pre-Measure
As a former apprentice carpenter who now does carpentry and home repair jobs on the side, I carry the same mindset over to building terrain: measure, measure, measure. Use notes on it if you have to if there's something you need to remind yourself of. The most frustrating thing is cutting a piece and then finding it doesn't work and you have to start over again, so measure thoroughly and mark off what you need.
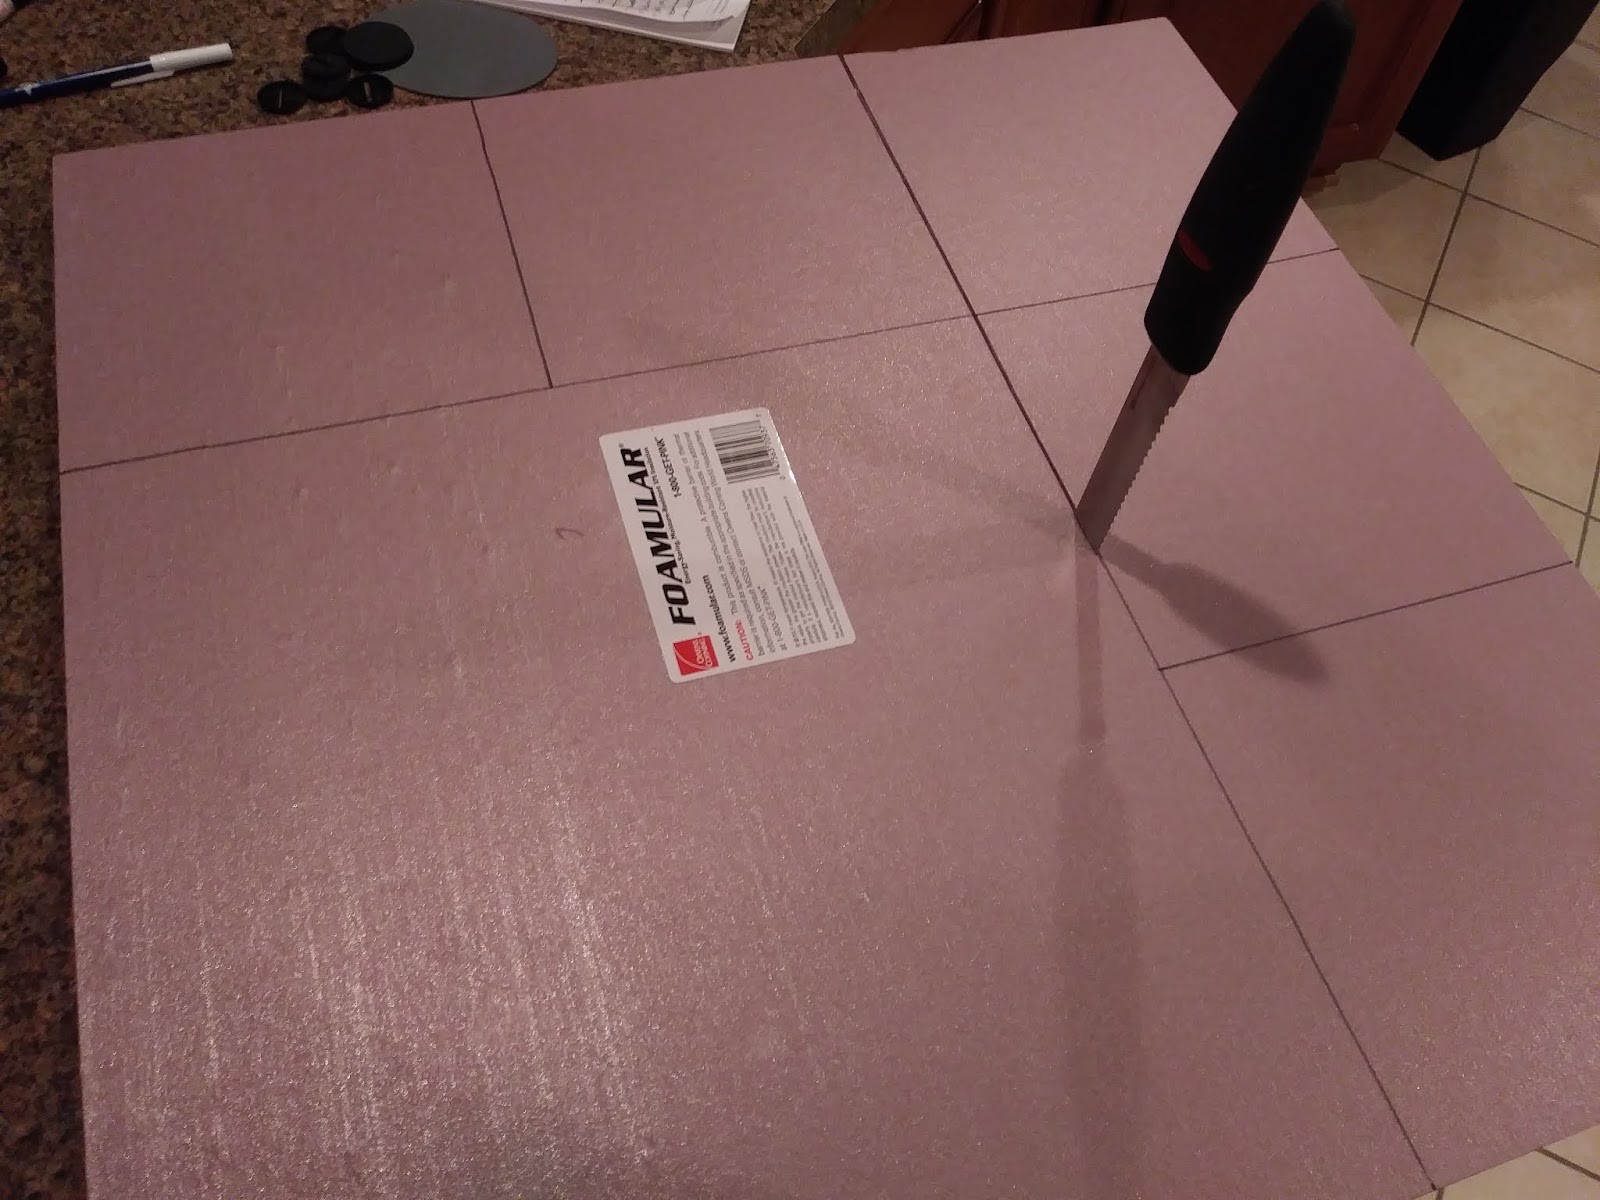
In this picture, you can see how I've marked off the dimensions for the first five hills:

I use a medieval arming sword for my straight edge, 1) because it's cool, and I don't get as much use out of it as I would like, 2) because the edge is straight, so it serves the purpose (just don't line up the crossguard with the polystyrene and you're good), and 3) I haven't bought a yardstick yet, so I figure this will have to do, :P
Each hill is an 8x8" square, which will then be beveled down to be more circular and sloped. But this allows me to see how big they'll be at their widest points before I cut my polystyrene. It also conveniently allows you to do 3 on each side of the square, as 24" divides evenly by 3.
Step 2: Cutting
I cut on a kitchen island, as it gives room for my knife on the other side of the polystyrene, making it easier to cut. Just make sure you don't cut your landlord's island in the process! :P

Polystyrene cuts pretty easily, so this shouldn't be a hard process. The hardest part is not rushing it so that you don't bend the blade, as that will cause it to cut at an angle which will mess up your dimensions. This is helpful, though, when not cutting in straight lines: you can actually make jigsaw-style cuts with a bread knife in polystyrene if you are careful in how you bend the blade.

When you reach the halfway point, switch angles and cut toward the center again. This allows your piece to stay more stable as you're severing it from the rest of the board, and keeps it from snapping in places you don't want it to. Take it from one who knows: switch sides halfway through.
Here's what the hills look like once they are cut out:

I know, they don't look like hills. So let's make them look like hills.
Step 3: Shaping the Hill
So this part can take a while, as you have to be careful: whatever you cut off you can't really put back on, so cut conservatively. I like to start by measuring off how big I want the top of the hill to be, as I want to set a boundary line for cutting. In this case it has to at least house a 25mm base at the top (for the King of the Hill), but I'm going to go wider in case of larger models (so that trolls, mumakil, and other creatures on larger bases don't slide down the hill, disrupting game play). I place my template on top of the hill, and then mark where the edge is:

So naturally you won't need to do the middle circle for your hills, but for the tournament they will be clearly marked and set apart so that everyone knows where you have to stand (more on that once we get to spackling and flocking it).
Then starts the shaving process. I like to start with sloping it (as I want to know how steep the slope is, so that models don't topple while on it), then rounding out the exterior, as I feel like it gives me more control over the final result. You can do it either way, but in this portion we'll be cutting both down at an angle (to form the slope) and inward to make it less square.
I also typically use a cutting board underneath, just because we're sloping, so I want to protect the table. When you're done, it will look something like this (don't laugh - I'm not that good at this, :P ):
Now you might be thinking to yourself, "Wow: I'm wasting a lot of polystyrene by shaving the sides." That's what I first thought when I started building terrain. But I've discovered that since these pieces are 1) irregular in shape and width, but 2) generally pretty straight and thin, they work great for making roofs for shingled or thatched buildings (as you can simply score and paint them), rock protrusions, or (as we'll be doing for another terrain project), flat stones used by a troll for his lair.
So we've got a sloped hill. Now to make it look less like a purple mass with a rough slope.
Step 4: Spackling
Spackling is the "secret sauce" of natural terrain features. Spackle does four things for the terrain piece that are essential to both functional and beautiful terrain pieces:
We apply the spackling, making sure to spread as we go, but not spreading so thin as to reveal the polystyrene. You also need to remember to keep your center point marked if you're planning to use an objective at the top (as we are for King of the Hill), so what I do is I apply that spackle first, let it dry, and then I can retrace my line on top of the spackle:

Continue spackling the rest of the hill after marking your center. When we're done, it looks like this:

By the way, I don't spackle the bottom - I typically leave that so that it sits more evenly on the table surface.
One last step before we have a functional (albeit not beautiful) hill: sanding down the surface.
Step 5: Sanding and Priming
So, there are two things to keep in mind about sanding spackle: 1) the dust is going to get everywhere (so I recommend doing it outside or over tile, as it's easier to clean), and 2) the dust is going to get everywhere (so wear clothes that you don't mind getting dirty, can easily wash, and don't sand near your fiancee's hair - I don't know this from experience, but my intuition says it's a bad plan).
So now that the disclaimers are done, start sanding. The trick to sanding spackle is to always go in the same direction, and not to sand down too far, as you could sand a whole piece of spackle off the polystyrene. So gentle, small motions, working a given spot down until it's level with some roughness remaining.
Once it's sanded, prime it with paint; I like using spray paints as it's faster, but you can paint by hand if desired. This gives something for the flocking (or rocks or whatever) to grab onto, and also insures that all of the sanding dust is covered (so that it doesn't cause your flocking to fall off when you start gluing).
If you are priming with a darker color (as I am), make sure to retrace lines that you need for future work (in this case, my center circles, as I'll want to flock those differently to make them stand out). When you're done it should look like this:

And now you have a functional hill: you could put miniatures on it and play a game. But if you want it to look good from a distance, we will want to dress it up a bit. But that we'll save for the next post.
Watching the stars,
Centaur
"(Your teacher) is a human...and is therefore blinkered and fettered by the limitations of your kind." ~ Firenze, Harry Potter and the Order of the Phoenix
I'm working on terrain for Brawler Bash 2019, so I decided to venture out from my usual posts to do a terrain tutorial. I'm not particularly good at terrain (I have my moments), but since I am working on this, I figured I'd show you a bit of what's going on in preparation for the tournament.
Brawler Bash 2019 requires several pieces of terrain: hills for the King of the Hill match in Round 3, as well as lairs for fell wargs and cave trolls in the Living Wild match in Round 2. This means that the next few weeks you'll find me making terrain, requisitioning terrain from the gaming group, and painting up the last model I need for my force (which I'll post on the 17th when registration closes).
I'm starting with the hills for King of the Hill, as I want those to be standard across all maps. Thankfully, building hills is easy. You will need:
- Polystyrene (or another form of styrofoam)
- Measuring devices (including a good, steady straight edge if you are doing any lines longer than 12"/30cm)
- A marking device (as measuring off where you cut to is important)
- Spackle (for covering the styrofoam) and a putty knife (for applying the spackle, though believe it or not cookie spatulas also work - not as well, but they do work)
- Potentially glue and other elements for flocking and surface work (more on that in a future post), or other things you'd like to attach to your hill (trees, rocks, etc.)
- A trusty cutting instrument
So here's what I'm doing to build the hills for the tournament.
Step 1: Pre-Measure
As a former apprentice carpenter who now does carpentry and home repair jobs on the side, I carry the same mindset over to building terrain: measure, measure, measure. Use notes on it if you have to if there's something you need to remind yourself of. The most frustrating thing is cutting a piece and then finding it doesn't work and you have to start over again, so measure thoroughly and mark off what you need.
In this picture, you can see how I've marked off the dimensions for the first five hills:

I use a medieval arming sword for my straight edge, 1) because it's cool, and I don't get as much use out of it as I would like, 2) because the edge is straight, so it serves the purpose (just don't line up the crossguard with the polystyrene and you're good), and 3) I haven't bought a yardstick yet, so I figure this will have to do, :P
Each hill is an 8x8" square, which will then be beveled down to be more circular and sloped. But this allows me to see how big they'll be at their widest points before I cut my polystyrene. It also conveniently allows you to do 3 on each side of the square, as 24" divides evenly by 3.
Step 2: Cutting
I cut on a kitchen island, as it gives room for my knife on the other side of the polystyrene, making it easier to cut. Just make sure you don't cut your landlord's island in the process! :P

Polystyrene cuts pretty easily, so this shouldn't be a hard process. The hardest part is not rushing it so that you don't bend the blade, as that will cause it to cut at an angle which will mess up your dimensions. This is helpful, though, when not cutting in straight lines: you can actually make jigsaw-style cuts with a bread knife in polystyrene if you are careful in how you bend the blade.
When you reach the halfway point, switch angles and cut toward the center again. This allows your piece to stay more stable as you're severing it from the rest of the board, and keeps it from snapping in places you don't want it to. Take it from one who knows: switch sides halfway through.
Here's what the hills look like once they are cut out:

I know, they don't look like hills. So let's make them look like hills.
Step 3: Shaping the Hill
So this part can take a while, as you have to be careful: whatever you cut off you can't really put back on, so cut conservatively. I like to start by measuring off how big I want the top of the hill to be, as I want to set a boundary line for cutting. In this case it has to at least house a 25mm base at the top (for the King of the Hill), but I'm going to go wider in case of larger models (so that trolls, mumakil, and other creatures on larger bases don't slide down the hill, disrupting game play). I place my template on top of the hill, and then mark where the edge is:

So naturally you won't need to do the middle circle for your hills, but for the tournament they will be clearly marked and set apart so that everyone knows where you have to stand (more on that once we get to spackling and flocking it).
Then starts the shaving process. I like to start with sloping it (as I want to know how steep the slope is, so that models don't topple while on it), then rounding out the exterior, as I feel like it gives me more control over the final result. You can do it either way, but in this portion we'll be cutting both down at an angle (to form the slope) and inward to make it less square.
I also typically use a cutting board underneath, just because we're sloping, so I want to protect the table. When you're done, it will look something like this (don't laugh - I'm not that good at this, :P ):
 |
| True story: I've cut more limbs for conversions and styrofoam for terrain on my cutting board than loaves of bread. By a long shot. |
So we've got a sloped hill. Now to make it look less like a purple mass with a rough slope.
Step 4: Spackling
Spackling is the "secret sauce" of natural terrain features. Spackle does four things for the terrain piece that are essential to both functional and beautiful terrain pieces:
- Color: Polystyrene not only soaks up paint when sprayed or painted on it, it can also warp in shape. Spackle provides something for paint to be applied to that is hard and calloused, not changing in shape or consistency when applied, and gripping onto the color more easily.
- Rough but Even: Spackle, when properly smoothed out, also allows for a surface that is rough (allowing it to catch the lip of a miniature base) but not uneven (as we'll be sanding it down to make it level while still rough). This is the ideal terrain piece for a miniature model: it helps them stand, even when on a slope.
- Glue: You can glue flocking, gravel, sand, or other embellishing terrain elements to spackle with greater ease (generally) than polystyrene. And if you intend to paint your sand to look more like rocks, for example, you can do so with impunity because of the previous notes on paint.
- Natural Look: When spackle is painted, flocked, or in other ways embellished, it just looks more natural than polystyrene. Whereas polystyrene can develop bulbs, creases, cutting marks from places where you started cutting and then stopped, spackle allows for a more natural look and feel for your terrain piece.
We apply the spackling, making sure to spread as we go, but not spreading so thin as to reveal the polystyrene. You also need to remember to keep your center point marked if you're planning to use an objective at the top (as we are for King of the Hill), so what I do is I apply that spackle first, let it dry, and then I can retrace my line on top of the spackle:

Continue spackling the rest of the hill after marking your center. When we're done, it looks like this:

By the way, I don't spackle the bottom - I typically leave that so that it sits more evenly on the table surface.
One last step before we have a functional (albeit not beautiful) hill: sanding down the surface.
Step 5: Sanding and Priming
So, there are two things to keep in mind about sanding spackle: 1) the dust is going to get everywhere (so I recommend doing it outside or over tile, as it's easier to clean), and 2) the dust is going to get everywhere (so wear clothes that you don't mind getting dirty, can easily wash, and don't sand near your fiancee's hair - I don't know this from experience, but my intuition says it's a bad plan).
So now that the disclaimers are done, start sanding. The trick to sanding spackle is to always go in the same direction, and not to sand down too far, as you could sand a whole piece of spackle off the polystyrene. So gentle, small motions, working a given spot down until it's level with some roughness remaining.
Once it's sanded, prime it with paint; I like using spray paints as it's faster, but you can paint by hand if desired. This gives something for the flocking (or rocks or whatever) to grab onto, and also insures that all of the sanding dust is covered (so that it doesn't cause your flocking to fall off when you start gluing).
If you are priming with a darker color (as I am), make sure to retrace lines that you need for future work (in this case, my center circles, as I'll want to flock those differently to make them stand out). When you're done it should look like this:

And now you have a functional hill: you could put miniatures on it and play a game. But if you want it to look good from a distance, we will want to dress it up a bit. But that we'll save for the next post.
Watching the stars,
Centaur
"(Your teacher) is a human...and is therefore blinkered and fettered by the limitations of your kind." ~ Firenze, Harry Potter and the Order of the Phoenix
Great post buddy - as a note, the Terrain Tutor (check YouTube) has a great post on the slant you want for hill slopes you intend for models to walk on (not all hills are good for this, but paths need this). He recommends 3" long for every 1" up, in case you need this for a later project.
ReplyDelete