Today's post all but completes the Weathertop terrain project I've been working on. In order to provide a bit more detail into the work that's been going on, I decided to call up my good buddy Glenstorm and have him help me try it out in a batrep. Here are the forces:
Servants of the White Hand: 603 points
Saruman the Colorful [Army Leader] - 170 points
7 Uruk Warriors with shields - 70 points
Lurtz - 60 points
4 Uruk Warriors with shields - 40 points
7 Uruk Scouts with Orc bows - 63 points
Mauhur - 60 points
Mauhur - 60 points
10 Uruk Marauders with shields - 100 points
35 units, 8 Orc bows, 3 heroes, 8 Might
The Halloween Army: 602 points
The Dwimmerlaik [Army Leader] - 120 pts
3 Spectres - 45 pts
2 Cave Trolls - 160 pts
2 Orc Trackers - 10 pts
Barrow Wight (Taradan) - 50 pts
4 Orc Warriors with shields - 24 pts
4 Orc Warriors with shields and spears - 28 pts
1 Orc Warrior with banner - 30 pts
2 Orc Warriors with two-handed weapons - 12 pts
Angmar Orc Shaman - 50 pts
4 Orc Warriors with shields - 24 pts
4 Orc Warriors with shields and spears - 28 pts
3 Orc Trackers - 15 pts
1 Orc Warrior with two-handed weapon - 6 pts
33 units, 5 Orc bows, 1 Might, 6 casters, 2 monsters
The scenario we will be playing is a Domination game on a board that is 48" x 48". To simulate gameplay in the upcoming The Hunter's Red October tournament, we're going to be capping this game to 90 minutes. This scenario features the usual scoring method (see bullets), as well as a special variation used in some of our most recent tournaments for To The Death games. Points are scored as follows:
- 1 point for each objective where the army has the majority of models (3 points for each objective where the army has the only models, 0 points if there are no models/an equal number of models for each army);
- 2 points for killing the enemy army leader;
- 1 point for breaking the enemy (or 3 points if the enemy is broken and your force is not broken); and
- 1 point for bringing the foe down to 25%
In addition to these scoring rules, we have the following "wild animal" special rules:
- The three objectives that are not controlled at the start of the game will have 1-3 wild beasts occupying them. In this game, two will be claimed by two Wild Wargs, and one will be claimed by three Moria Goblin Warriors with Orc bows.
- Normal army constraints are ignored by the wild creatures (i.e. bow limit).
- Wild creatures are moved after the priority roll but before the player with priority moves (controlled by the player who lost priority).
- Wild creatures will not venture further than 6" from their lair (except to charge/cast magic against/shoot units that come within 12" of the lair), and will charge the nearest valid character (even if the model is owned by the player who is controlling the wild creatures).
- Any objective with at least one wild creature still alive at the end of the game does not award any points to either side. As a result, unlike past versions of "Where the Wild Things Are," there is no respawn for wild creatures in this scenario.
Tiberius' Pre-Game Thoughts: I know going into this game that Saruman is going to be crippled early - I've played against a similar list with Gandalf before, and after two turns, Gandalf was a "very impressive" F5 S5 one attack melee brawler. I think the technical term is "useless." My captains aren't likely to do much either, so my goal is just to bring the strength of my Uruks against the Orcs and best them as quickly as I can. I'm also not planning on charging terror units if I can possibly help it to make sure my men aren't rooted in place (which will make me susceptible to magical attacks, but it's the risk I need to take).
Glenstorm's Pre-Game Thoughts: I'm making a tactical switch in preparation for the tournament by replacing one of the barrow wights with a shaman (primarily for Fury). What this also means, though, is that since the shaman has a Might point and can cast Transfix on a 5+, for one round in the game I can get Transfix off on a 4+, which is almost as good as casting Paralyze (and functionally more or less the same for the purpose of this army). So we'll give it a try. Other than that, just going to run a vintage Halloween Army attack (that has worked quite successfully in practice games so far): hammer with three elements - horde of orcs, courage- and magic-based damage, and 2 monsters.
Glenstorm's Pre-Game Thoughts: I'm making a tactical switch in preparation for the tournament by replacing one of the barrow wights with a shaman (primarily for Fury). What this also means, though, is that since the shaman has a Might point and can cast Transfix on a 5+, for one round in the game I can get Transfix off on a 4+, which is almost as good as casting Paralyze (and functionally more or less the same for the purpose of this army). So we'll give it a try. Other than that, just going to run a vintage Halloween Army attack (that has worked quite successfully in practice games so far): hammer with three elements - horde of orcs, courage- and magic-based damage, and 2 monsters.
Turn 1: Racing Across the Wild (Priority - tied, Isengard)
 |
| This is the map after the first move. During the first turn, Saruman cast Terrifying Aura on himself (free + 0/6W), while the Angmar Shaman failed to cast Fury, rolling a 1 (1/3W). Lurtz is leading the small contingent up the left board edge, while Mauhur advances ahead of Saruman to claim the objective before anyone else gets there. |
Turn 2: Reaching for the Top (P - Isengard)
No pics for this round, but the Shaman casts Fury successfully this round (2/3W), providing some resiliency to the main Orc battle line. The Uruks continue to advance towards each objective, and begin climbing to the peak of Weathertop in the attempt.
Turn 3: The Winds of Magic (P - Isengard)
 |
| A lot happened in the Move phase. Saruman began by casting Transfix (free + 0/6W) on the Warg you see here. The Uruks then trapped these unfortunate wargs who charged into their ranks. During the Angmar move phase, the Dwimmerlaik cast Sap Will on Saruman (2/12W), but Saruman managed to block it (2/3M, 2/6W). The three Angmar spectres targeted three Uruk Warriors with their Fell Sight is in Them rule, and two of those Uruks (you see them in the center and bottom of this picture) ran backwards 6" to get away from the spectres. Elsewhere on the battlefield, the other two Wargs charged the Uruk lines. |
 |
| And not to anyone's surprise, the Uruks crushed both of these Wargs. |
 |
| The other Uruks dominated and slew the other pack outright - not a bad fight. (Wow - that was fast...) |
Turn 4: The Clash of Steel (P - Angmar)
 |
| The Trolls advance on the Uruk position and Lurtz lures the Trolls away from the objective (leaving that to the Orcs) in order to help his four Uruk warrior buddies. TERRAIN BUILDER NOTE: You can see in this picture and the next one the approaches into Weathertop - two roads that form a serpentine path around the mountain. The walkway is large enough for two cavalry bases or three infantry bases, which should be plenty of room for most fighting. Armies that aren't afraid of taking climbing tests will find a slight advantage, as narrow choke-points can be avoided by climbing one level higher. |
 |
| The Dwimmerlaik continued the barrage of spells against Saruman by again casting Sap Will (4/16W), but Saruman successfully blocked it (free + 4/6W). This attack was followed up by a Paralyze spell from the Barrow-Wight (2/5W), which Saruman resisted (free + 5/6W, 3/3M) (Almost there...). Nearby, the spectres targeted more Uruks and one successfully moved him far away. Thanks to the magical assault from Angmar, Saruman was not able to cast magic this turn, unless he wanted to lose his terror spell. (so he high-tails it out of there, like any self-respecting wizard) |
 |
| In the Fight phase, the banner from the Orcs made things pretty even. Two Orcs were killed, while one Uruk was killed on the other side. (While you can see several Uruk Warriors waiting to get into the action, the support team for the Orcs all cause terror and thanks to the Dwimmerlaik, my guys don't charge Courage units very well...) |
Turn 5: The Palantir of Orthanc (P - Palantir, Isengard)
 |
| On this turn, Saruman claimed priority for Isengard with the Palantir. (Dumb Palantir) While everyone's moving, let's take a look at the objectives. The Angmar starting objective contains three Orc trackers. (My hope at the start of the game was to get my Marauders (or maybe just Mauhur) into these guys...that's not going to happen.) |
 |
| In the northwest corner, the Angmar Orcs are preparing to charge the Uruks, who have just arrived in the smithy ready to do battle! |
 |
| At the southeast objective, two Uruk Marauders have claimed the building for Isengard, though a heated war rages outside its walls. |
 |
| In the southwest corner, two Uruk Scouts with Orc bows await the arrival of their foes. |
 |
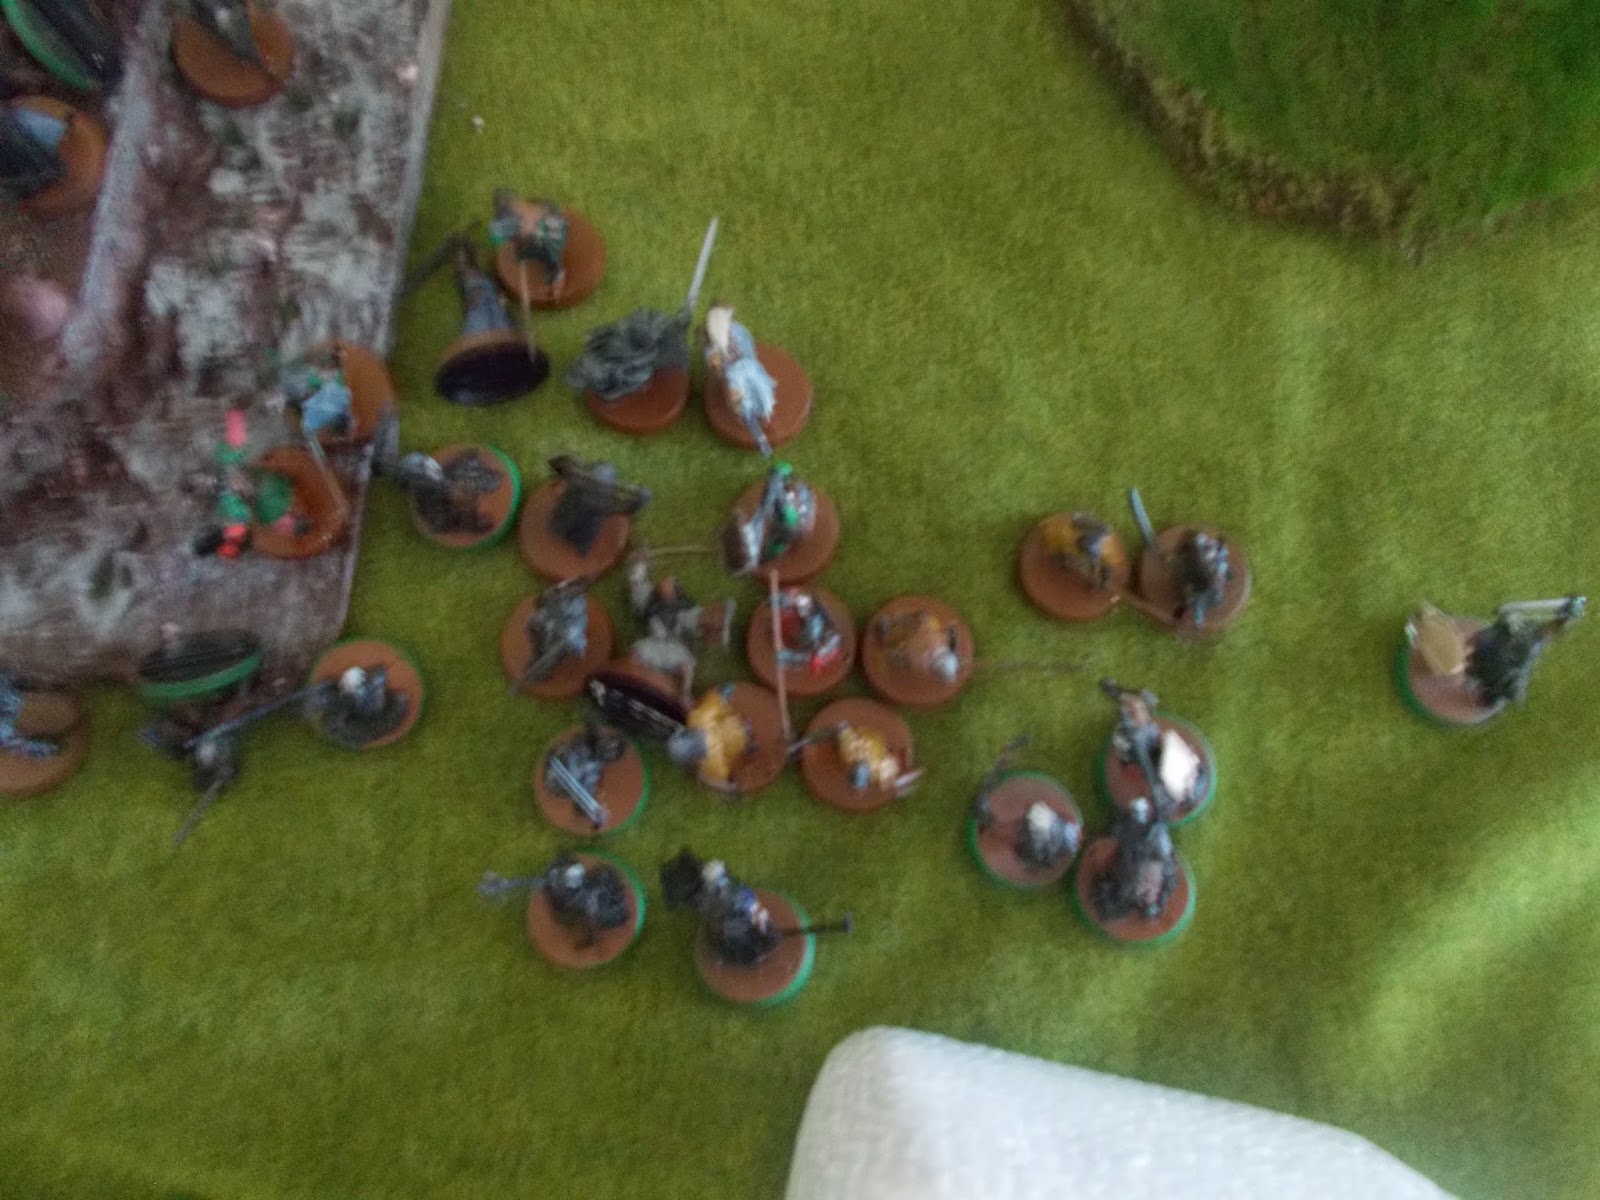
| Finally, the center objectie still has three Goblins on it (one hidden by the top level), and they are challenged by two Uruk-Hai. As a reminder, if there are any wild creatures remaining at the end of the game, no one scores points! TERRAIN BUILDER NOTE: Here in the seat of power, we have some rough stonework with grass growing in certain pockets. I still need to add the pillars, but those will remain movable pieces after I found storing this thing is SO much easier when you don't have a few odd things poking up. There will be space between each pillar for units to climb up, if they choose not to use the stairs (infantry sized bases only). |
 |
| In the Move phase, Saruman avoided being within range of the Dwimmerlaik and cast Sorcerous Blast on a single dice against an Orc warrior (free + 5/6W). Though the target Orc and two of the other Orcs don't die from the impact, one shield Orc does. (That was lucky) The rest are then charged by Uruks all over the place. In response, the Barrow-Wight casts Paralyze on one of the Uruk Warriors (4/5W) and two of the spectres are successful in controlling some of the Uruks. The Dwimmerlaik attempts to cast Black Dart on Mauhur, but fails to get it off (6/16W). |
 |
| In the Shoot phase, the Orc Trackers shot one Uruk Warrior. In the Fight phase, one Orc and three Uruks died, one of which died to a Goblin bowman in close combat. Another Goblin fell, so there are now two remaining Goblins to challenge the one remaining Uruk. |
 |
| On the far end, the most of Lurtz' crew were knocked over by the grey Cave Troll, but against all odds, the Cave Troll didn't wound anyone. (How often does that happen?) (In a tournament prep game? Better than you'd think, :P ) |
Turn 6: The Ranks Are Muddied (P - Isengard) (Wow, can I ever get priority!?!?! :P )
 |
| No pics of the Move phase, but in the Move Phase Saruman cast Compel on the Orc shaman (free + 5/6W), who failed to resist the spell (3/3W). In return, the Barrow-Wight failed to cast Paralyze on Mauhur, which would have really changed some of the battlespace (5/5W). In the Fight phase, not many people were killed, though one Orc was triple-teamed while on the ground and died, as well as a spectre, while the Uruks lost two guys, including one who was attacking the shaman (Fury is still up, unfortunately). |
 |
| Not much else happened on the battlefield, as in the Shoot phase, the Uruk bowmen killed their own man while trying to slay the brown Cave Troll. This worked out for the best, as the troll would have likely beat his foe and thrown him into everyone else. |
 |
| Also, the last remaining Uruk was shot by a Goblin arrow while engaged in combat, making the objective clear of any army's units. TERRAIN BUILDER NOTE: As the armies advance up the mountain, they pass crags (top right), which give some limited protection from enemy archery and give those in base-contact with the rocky elevations an in-the-way against volley fire. The vertical face is climbable, so units may be forced to abandon the protection of these ramparts in order to keep their height advantage. |
 |
| An hour into the game, the fighting is intense between the Uruks and the Orcs in this Fight phase. Each turn has a roughly even loss of troops, with mostly Marauders being slain by the Orcs and this turn a spectre was killed by the Uruks (only one left). (Man, I wanted those...) |
 |
| Up above, the Orcs fell another Uruk, but the shielding of the Uruks is keeping the overwhelming number of Orcs away. (I don't know if two can hold them back at this point, but we'll see). |
 |
| In the fight with the Trolls, the grey troll loses to Lurtz (dumb...just dumb...why do I even have these guys...), who shields against his great enemy. (Being able to best a troll without spending Might is always a good thing) |
Turn 7: The Sun Sets (P - Isengard)
 |
| As the time ticks away, the fighting remains fierce down below. The Uruks receive the worst of things, though Mauhur is finally free to kill someone. (YAYE!!!) |
 |
| In the Shoot phase, an Orc Tracker was able to shoot one of the Uruk Scouts who are racing towards the center objective, giving up the one they're working on here as lost. (I'm actually just glad that the trolls stayed away from my main force - that makes losing this objective worth it). The brown troll rended his target, while Lurtz lost his fight and was forced to pay all of his Might points to make his Fate point work (1/1F, 3/3M, 1/2H) (OUCH!!!). |
Game called for time, score computed:
- Objectives: two objectives were held uncontested by Isengard (though one had a lot of battle around it), one objective was held uncontested by Angmar, one objective had three Angmar units in base contact with it and two Isengard units on the objective, and the center objective still had two Goblins on it and therefore scored no points. In total: Isengard 6, Angmar 4.
- Break: neither army was broken, though the Uruk-Hai were very close. Since neither army was broken, neither army was reduced to 25%.
- Army Leaders: neither army leader was killed, though Saruman was out of Might and almost out of Fate, while the Dwimmerlaik was diminishing with use.
Result: Isengard 6, Angmar 4. Minor Victory for Isengard!
Conclusion:
Assessment by Tiberius:
The Angmar list that Glenstorm showed here is a rough list to fight - especially when you bring a mage of your own. The fact that there are two magical casters hitting you with spells means that that in two turns, you can't cast your hard spells anymore. Though Saruman could get by transfixing single units over and over again, it really hinders showing what Saruman can do. In today's game, I was blessed that the Trolls stayed far away from where my main body of troops was, and that some of the Orcs didn't whip around up to the top of the mountain crest while I was busy fighting (and dying to) the Goblins who were guarding it.
Assessment by Glenstorm:
Wow, that game ended faster than I thought it would. I wasn't well-placed to take any of the other objectives, and my strategy of breaking his force to force his archers at the back objective to courage test (like I always do with this army) backfired when I couldn't break them. I suppose part of that is spectres failing to wound on 4s, trolls failing to wound on 3s, and a host of other things, but hey - it's good to know before heading into the tournament. I'm really pleased with the new list, though - having Fury makes me a lot less scared to run a C2-3 army, and I'm looking forward to testing it out some more as we enter September!
Stellar unit for Isengard: Uruk Marauder with shield
Uruk Marauders are great - their fast movement means that they can race toward objectives and claim good ground early. In addition to this, once you're in combat, they can very quickly race around the enemy lines to attack spearmen (as Mauhur and a handful of his men did late in the game). I do regret not sending a squad of three or four of them to the far objective, as it may have drawn off some of spectres or Orcs from the fighting near Saruman, but they did a great job of holding the line and filling gaps where necessary.
Stellar unit for Angmar: Orc Warrior with Spear and Shield
Interesting choice for me - these guys saved me this game. Whether it was shielding on the front line when the troop block got cracked, or spear supporting in fights to force the uruks to shield, these guys snuck kills in and broke the frontline of the uruk army. I don't usually highlight my orcs, but these guys really pulled their weight this time.
Interesting choice for me - these guys saved me this game. Whether it was shielding on the front line when the troop block got cracked, or spear supporting in fights to force the uruks to shield, these guys snuck kills in and broke the frontline of the uruk army. I don't usually highlight my orcs, but these guys really pulled their weight this time.
Interesting read - I always enjoy your analysis of the game.
ReplyDelete