Dear Reader,
Greetings again from the Forge! Scenery pieces are pouring out of my ears over here, and the creative juices have been flowing like the Brandywine River (which flows pretty swiftly, in case you haven't seen it for yourself). Today's post will examine three pieces I've designed from scratch, which may or may not make an appearance at the upcoming TMAT Grand Tournament this March, as well as an update on two of the pieces that was still "In Progress" from my last post.
1. City Well
You all have seen the well in several battle reports and tactical posts in various stages,but I finally broke down and put the masonry into it. I started by spackling it all around (except the interior), and then followed up with another layer once the other dried, so that I'd have a hardened core before cutting into it. I then used the spackle knife to cut straight(ish) ridges into the side to form the mortar between the stones...

I painted over it with Mechanicus Standard Gray, and here is the result:
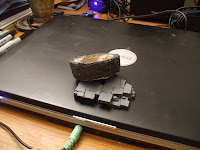
And just like that, you have a simple well! I'm still deciding what to do with the interior (water? If so, how?), so we'll see what happens. For now, it will serve as a welcome refreshment to a weary traveler, and a good plot-developer for an encounter with the unkind....
2. Statue of the "Axe King"
The original statue bears a scroll, and comes with the Ruins of Osgiliath set sold by GW. I took one of my Fantasy Minotaur axe heads and glued it on like so:
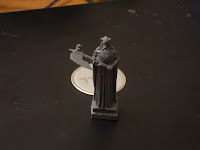
I then painted it up, and viola! We have a new statue. I also took my Agrax Earthshade wash and textured one of the "Sword Statues," giving him a bit more "wear and tear" than his purely white counterpart:

Very straightforward, very easy. I didn't notice until I glued on the axe that there is a skull on the back of it - I"m still debating on whether to take it off, or leave it on (orc defiled it, :P ). We'll see in coming posts.
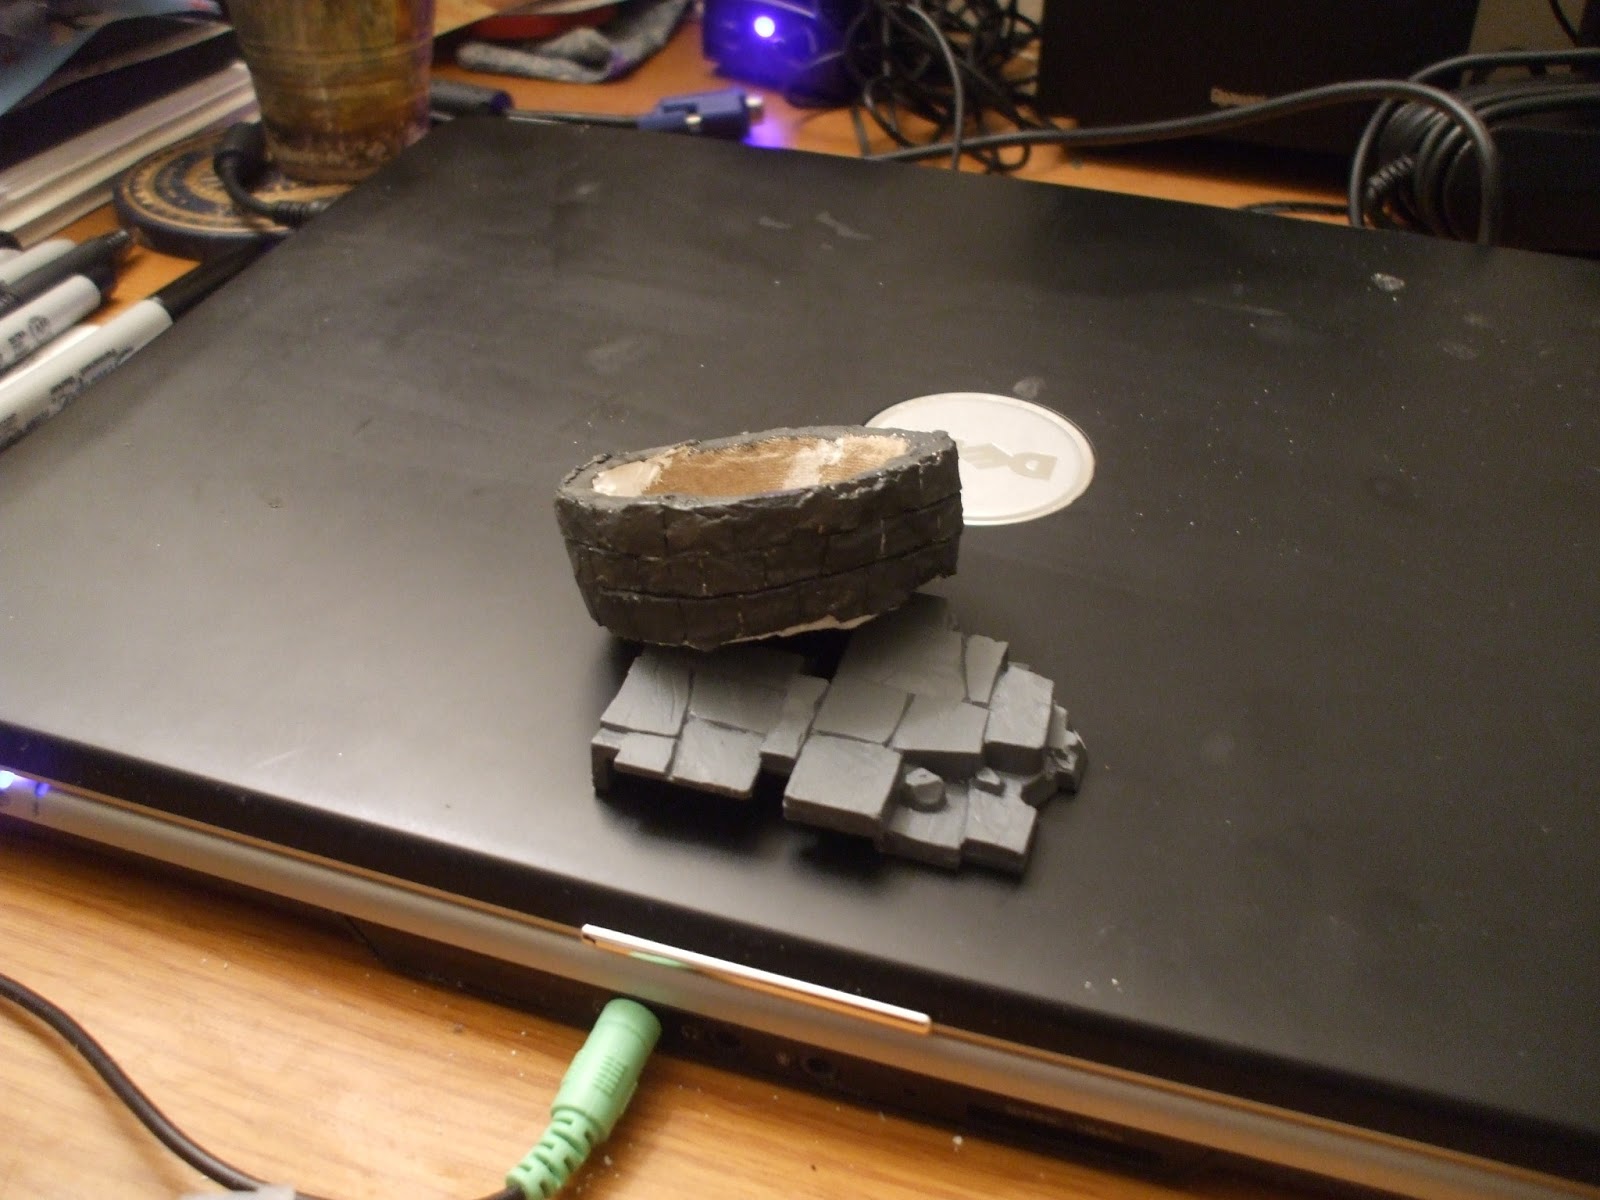
3. Mound of Rubble
Ever wanted to do a fight in a city, and have some "wear and tear" that shows that this is not the first assault that these forces have made at each other? Glenstorm's plan: throw a few piles of rubble here and there. This piece was actually inspired by a mound that Tiberius made (and we have used in a couple of battles with each other, most memorably for me in a skirmish between the Wood Elves of Galadriel and the Space Wolves of Ragnar Blackmane, but we won't revisit that memory...). I started with a mound of styrofoam glued together, attached to a (you guessed it) Pop Tarts box piece (because it makes for convenient grounding for terrain pieces). I then painted over them with Skavenblight Dinge Gray, and then glued a few of the extra bits from one of my Minotaurs under part of it, just for a little more character:

And just like that - a terrain piece that will add a bit of color and splash to any scenario. :) I then painted up the Minotaur, and the current product looks like this:

4. UPDATE: Lord of the Rings Scenery Pieces
In my last post, I noted that my scenery pack from GW hadn't arrived yet. Here's an update on what those pieces look like:

As you can see, I have a number of simple "L" walls (three in White Scar White, three in Mechanicus Standard Gray), a number of broken pillars and statues, a campfire with Rohanesque weapons next to it, and a scary statue, all painted up and ready to roll. Nothing amazing here, but definitely a lot of options for spicing up a dull battlefield somewhere in Middle Earth.
5. And the Surprise Piece...

Pretty quaint and comfortable, right? :) This is the "In Progress" piece I'm most proud of, as it is 1) completely of my own design (though I looked at a lot of concept art as I designed it), and 2) can be made by anyone. Don't believe me? Here's how I did it:
1. Take a large piece of foam, and cut a semi-circle out of it, using a Sharpie to trace your line, like this:

It's going to look rough after cutting it; mine looked like this (sorry for the blur):

That's okay - we'll smooth it out next.
2. Spackle over that, aiming for overcompensating in terms of spackle used.
Spackling does two things for you: 1) it provides a layer that we can then sand down evenly to give it a smooth, sloping look, and 2) it gives us something rigid and hard that can absorb the paint and glue that we'll use later, rather than the porous surface of the foam. Overcompensating on the spackle allows you more room to work with so that you can perfect the slope and texture of your hill.
When you are done spackling, you should have the proper shape with a number of ridges and extra bumps everywhere. Unfortunately, I moved directly into the next step before taking a WIP picture, so there's no pic here. Now let's take care of those ridges...
3. After letting it dry (I let mine sit for a few days, just to make sure it took well to the foam, which was my major concern), I sanded it down very, very, VERY carefully (mine took only about 10 minutes, though you need to be careful not to sand too far, and not to sand too hard, as you'll break off spackle chunks - which you can see happened to mine), until you get a more smooth, sloping surface. Base paint and texturize:

It doesn't have to be completely even - if you add hobby grass, the small anomalies will be covered easily. I'm thinking I'll add hobby grass to the top and edges of it, though I'm currently price checking hobby grass to find good deals on it (as I'm not impressed with how much this could cost for fake grass...). For now, I'll settle for this, :)
5. Fashion a door, which I did by cutting out a cardboard circle from a Pop Tarts box (predictable, I know), and then gluing bits of coffee stirrers to it:

7. And build a fence and sill (I like to use coffee stirrers, as they're thinner than the popsicle sticks that Tiberius uses, and highly pliable, so you can make rounded fences. They are easy to grab on your way up to work, so it doesn't cost you a penny), coupled with some bricks from one of those Ruins of Osgiliath I own:
...And you're done! It took me about 2 hours to do (not including spackle drying time), though I'm guessing that it will be faster now that I know what I'm doing. Expect more of these with a few changes to them as we head into the summer months (my ETA of when I'll get to Smial #2 and Smial #3), as they will complement some of the new units I'm adding to my army.
So, anyway, a few projects we've been working on over here, :) Hope you've enjoyed it! Now back to getting my army spruced up for a tournament and making some final conversions,
Watching the stars,
Glenstorm
"We watch the skies for the great tides of evil or change that are sometimes marked there." ~ Firenze, Harry Potter and the Order of the Phoenix
Greetings again from the Forge! Scenery pieces are pouring out of my ears over here, and the creative juices have been flowing like the Brandywine River (which flows pretty swiftly, in case you haven't seen it for yourself). Today's post will examine three pieces I've designed from scratch, which may or may not make an appearance at the upcoming TMAT Grand Tournament this March, as well as an update on two of the pieces that was still "In Progress" from my last post.
1. City Well
You all have seen the well in several battle reports and tactical posts in various stages,but I finally broke down and put the masonry into it. I started by spackling it all around (except the interior), and then followed up with another layer once the other dried, so that I'd have a hardened core before cutting into it. I then used the spackle knife to cut straight(ish) ridges into the side to form the mortar between the stones...

I painted over it with Mechanicus Standard Gray, and here is the result:
And just like that, you have a simple well! I'm still deciding what to do with the interior (water? If so, how?), so we'll see what happens. For now, it will serve as a welcome refreshment to a weary traveler, and a good plot-developer for an encounter with the unkind....
2. Statue of the "Axe King"
The original statue bears a scroll, and comes with the Ruins of Osgiliath set sold by GW. I took one of my Fantasy Minotaur axe heads and glued it on like so:

I then painted it up, and viola! We have a new statue. I also took my Agrax Earthshade wash and textured one of the "Sword Statues," giving him a bit more "wear and tear" than his purely white counterpart:

Very straightforward, very easy. I didn't notice until I glued on the axe that there is a skull on the back of it - I"m still debating on whether to take it off, or leave it on (orc defiled it, :P ). We'll see in coming posts.
3. Mound of Rubble
Ever wanted to do a fight in a city, and have some "wear and tear" that shows that this is not the first assault that these forces have made at each other? Glenstorm's plan: throw a few piles of rubble here and there. This piece was actually inspired by a mound that Tiberius made (and we have used in a couple of battles with each other, most memorably for me in a skirmish between the Wood Elves of Galadriel and the Space Wolves of Ragnar Blackmane, but we won't revisit that memory...). I started with a mound of styrofoam glued together, attached to a (you guessed it) Pop Tarts box piece (because it makes for convenient grounding for terrain pieces). I then painted over them with Skavenblight Dinge Gray, and then glued a few of the extra bits from one of my Minotaurs under part of it, just for a little more character:

And just like that - a terrain piece that will add a bit of color and splash to any scenario. :) I then painted up the Minotaur, and the current product looks like this:

4. UPDATE: Lord of the Rings Scenery Pieces
In my last post, I noted that my scenery pack from GW hadn't arrived yet. Here's an update on what those pieces look like:

As you can see, I have a number of simple "L" walls (three in White Scar White, three in Mechanicus Standard Gray), a number of broken pillars and statues, a campfire with Rohanesque weapons next to it, and a scary statue, all painted up and ready to roll. Nothing amazing here, but definitely a lot of options for spicing up a dull battlefield somewhere in Middle Earth.
5. And the Surprise Piece...

Pretty quaint and comfortable, right? :) This is the "In Progress" piece I'm most proud of, as it is 1) completely of my own design (though I looked at a lot of concept art as I designed it), and 2) can be made by anyone. Don't believe me? Here's how I did it:
1. Take a large piece of foam, and cut a semi-circle out of it, using a Sharpie to trace your line, like this:

It's going to look rough after cutting it; mine looked like this (sorry for the blur):

That's okay - we'll smooth it out next.
2. Spackle over that, aiming for overcompensating in terms of spackle used.
Spackling does two things for you: 1) it provides a layer that we can then sand down evenly to give it a smooth, sloping look, and 2) it gives us something rigid and hard that can absorb the paint and glue that we'll use later, rather than the porous surface of the foam. Overcompensating on the spackle allows you more room to work with so that you can perfect the slope and texture of your hill.
When you are done spackling, you should have the proper shape with a number of ridges and extra bumps everywhere. Unfortunately, I moved directly into the next step before taking a WIP picture, so there's no pic here. Now let's take care of those ridges...
3. After letting it dry (I let mine sit for a few days, just to make sure it took well to the foam, which was my major concern), I sanded it down very, very, VERY carefully (mine took only about 10 minutes, though you need to be careful not to sand too far, and not to sand too hard, as you'll break off spackle chunks - which you can see happened to mine), until you get a more smooth, sloping surface. Base paint and texturize:

It doesn't have to be completely even - if you add hobby grass, the small anomalies will be covered easily. I'm thinking I'll add hobby grass to the top and edges of it, though I'm currently price checking hobby grass to find good deals on it (as I'm not impressed with how much this could cost for fake grass...). For now, I'll settle for this, :)
5. Fashion a door, which I did by cutting out a cardboard circle from a Pop Tarts box (predictable, I know), and then gluing bits of coffee stirrers to it:

7. And build a fence and sill (I like to use coffee stirrers, as they're thinner than the popsicle sticks that Tiberius uses, and highly pliable, so you can make rounded fences. They are easy to grab on your way up to work, so it doesn't cost you a penny), coupled with some bricks from one of those Ruins of Osgiliath I own:
...And you're done! It took me about 2 hours to do (not including spackle drying time), though I'm guessing that it will be faster now that I know what I'm doing. Expect more of these with a few changes to them as we head into the summer months (my ETA of when I'll get to Smial #2 and Smial #3), as they will complement some of the new units I'm adding to my army.
So, anyway, a few projects we've been working on over here, :) Hope you've enjoyed it! Now back to getting my army spruced up for a tournament and making some final conversions,
Watching the stars,
Glenstorm
"We watch the skies for the great tides of evil or change that are sometimes marked there." ~ Firenze, Harry Potter and the Order of the Phoenix
I like it. Did you make the fences out of balsa sheet or something? Can't quite tell what those are made of.
ReplyDeleteAnd I know, right? Its really cool how stuff can be so easy to make, cheap(ish) to buy and still come out looking great. Nice stuff. I especially like the hobbit hole.
Now, Glenstorm... I happen to have a rather large amount of grass turf. I would be most happy to give you a bag of it, if you wish.
Or if you want I could just give you the website I bought it from. Your call.
I'll gladly buy the grass from you, or you can shoot me the grass - I'll really need grass for some of the other pieces I'm doing, so I'm open to either, :)
Deletecool stuff Glenstorm. you should take a photo with all of your terrain laid out on a board - just to show how awesome it is all together. ;)
ReplyDeletethe hobbit hole is clever. Either someone has been playing too much smallworld, or I sense a passal of halflings in the mail...
13 hobbits and 3 dogs at least, to be precise, :) I'll likely never field a full hobbit army, but I'll have an easy 150-pt addendum for a warbands scheme, so we'll see what happens in the future, :)
DeleteAnd, under LOME, if I ever want to use a boss set of rangers with a bunch of cute little people... :)