The High Ground: the game lasts for 10 rounds and the goal is to have the most units on the high ground at the end of the game. Any round where there is a tie for priority, all units on the high ground are knocked to the ground.
Ill Met by Moonlight: archers cannot shoot at anyone further than 12" away, but when they shoot they have a +1 to wound bonus. Both armies try to destroy or rout the other.
Take and Hold: when one side is broken, roll a dice during each End phase - on the roll of a 1-2, the game ends and the team with the most units with their complete bases within 3" of an artifact in the center of the map wins.
After rolling to determine what games will be played by which combatants, the Elves will face the Goblins in a game of "Take and Hold," while the Dwarves and Uruk-Hai will fight for "The High Ground." The winners of each match will play an "Ill Met by Moonlight" scenario. Should one player win both games, he may choose which army to cede to his opponent to play with (hear that, Gaius? :-P).
The Dwarves of Erebor: 401 points
Gimli, Son of Gloin - 90 points
Dwarf Shield-bearer (two-handed axe unit) - 60 points
Peregrin Took - 10 points (ally: Fellowship of the Ring)
8 Dwarf Warriors with shields - 72 points
Peregrin Took - 10 points (ally: Fellowship of the Ring)
8 Dwarf Warriors with shields - 72 points
6 Dwarf Warriors with two-handed weapons - 48 points
8 Dwarf Warriors with Dwarf bows - 72 points
1 Dwarf Warrior with banner - 38 points
1 Dwarf Warrior with banner - 38 points
1 Khazad Guard - 11 points
27 units, 8 bows + 1 thrown weapon, 2 heroes
The Fist of Isengard: 401 points
Uruk Captain with shield and heavy armor - 60 points
17 Uruk-Hai Warriors with shields - 170 points
16 Uruk-Hai Warriors with pikes - 160 points
1 Uruk-Hai Warrior with crossbow - 11 points
35 units, 1 crossbow, 1 hero
Uruk Captain with shield and heavy armor - 60 points
17 Uruk-Hai Warriors with shields - 170 points
16 Uruk-Hai Warriors with pikes - 160 points
1 Uruk-Hai Warrior with crossbow - 11 points
35 units, 1 crossbow, 1 hero
The scenario we will be playing is a The High Ground game on a board that is 24" long by 24" wide. In this game,as mentioned above, both teams are trying to have as many units on the High Ground after 10 rounds of playing. The team with the most units on the High Ground wins (but the game could end earlier if one side is completely routed, as they will have no units on the high ground). All units start in base contact OFF of the board edge and move in from wherever their starting position is.
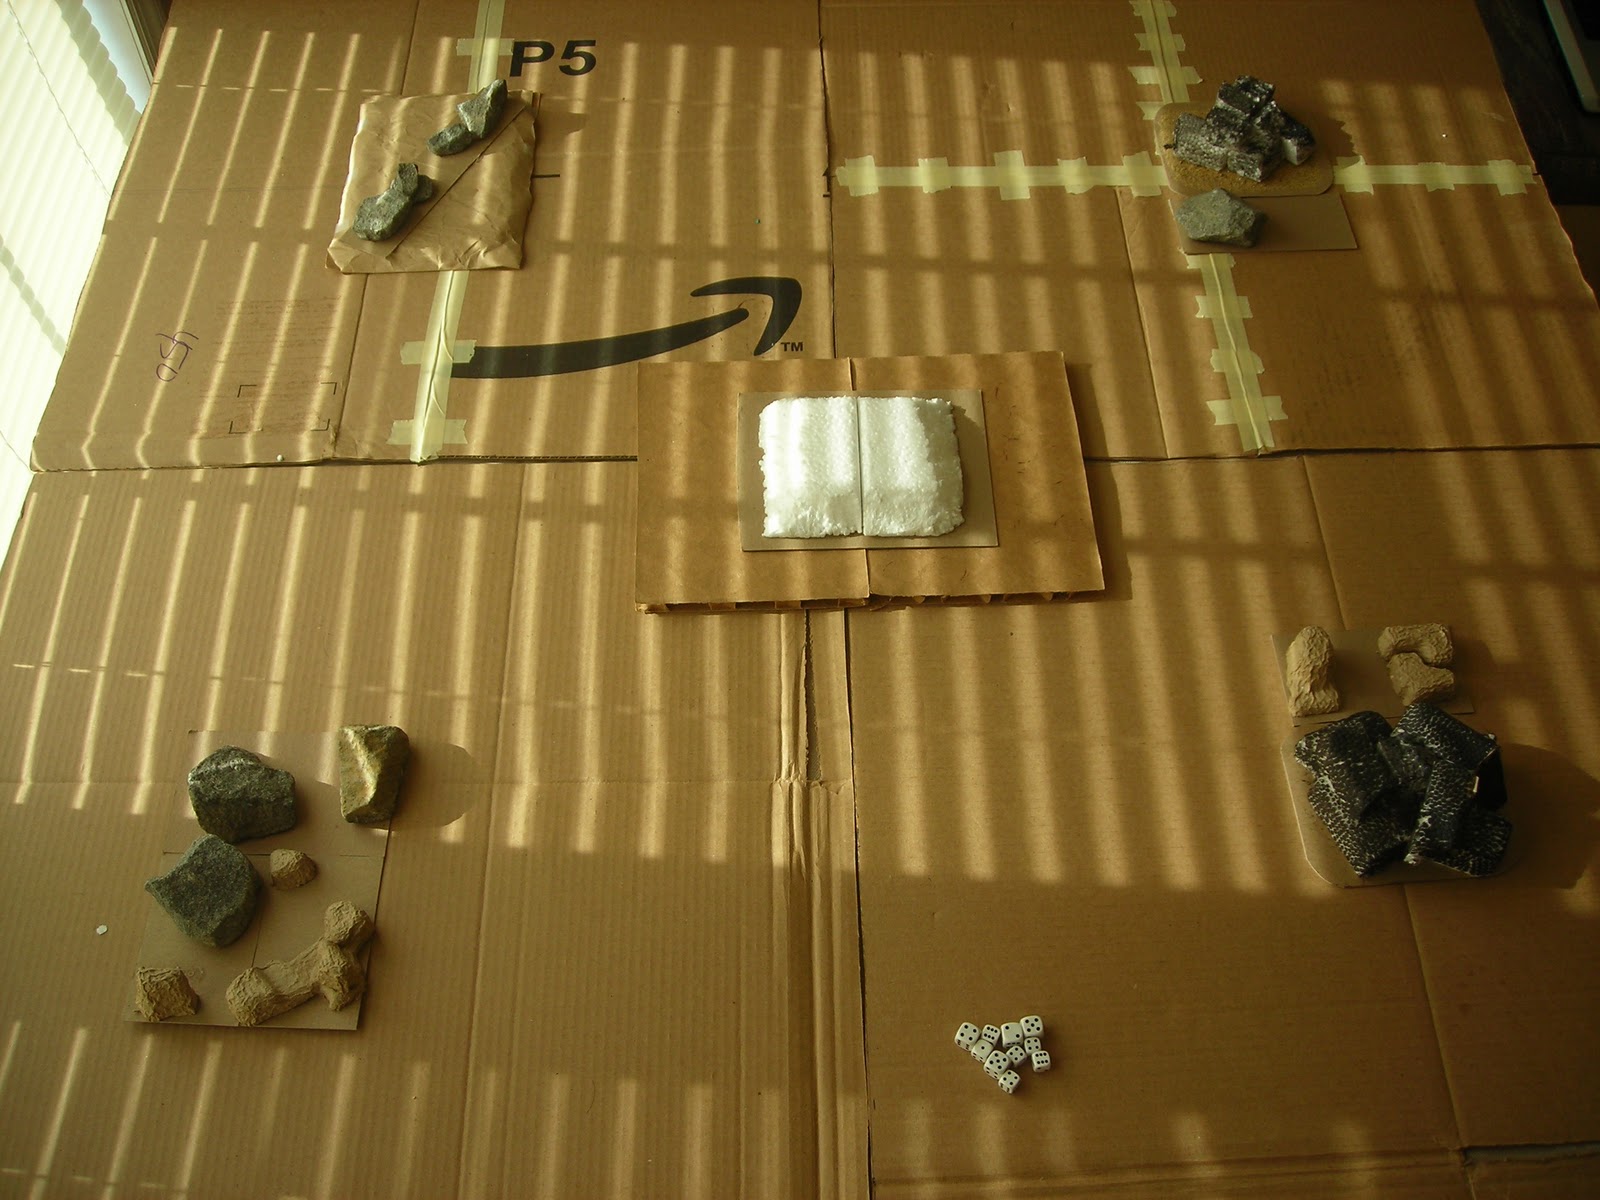 |
| The map is set up as follows: On the east there are cairns of rock (climb test required), while the western side has a rocky ridge and a rocky outcrop (difficult terrain). In the center of the map is our "high ground," which does not require a climbing test to scale. For the purposes of victory conditions, anyone on any elevated part of the map's center counts as scoring a point (brown or white areas). The Uruks won the roll off and have chosen to seize priority, allowing the Dwarves to choose their starting position (eastern board edge). The board is prepared as set up in the picture above. Note that the Dwarves have left the Uruks with difficult terrain between some of their men and the high ground. |
Turn 1: The Armies Amass (Priority - Uruk-Hai)
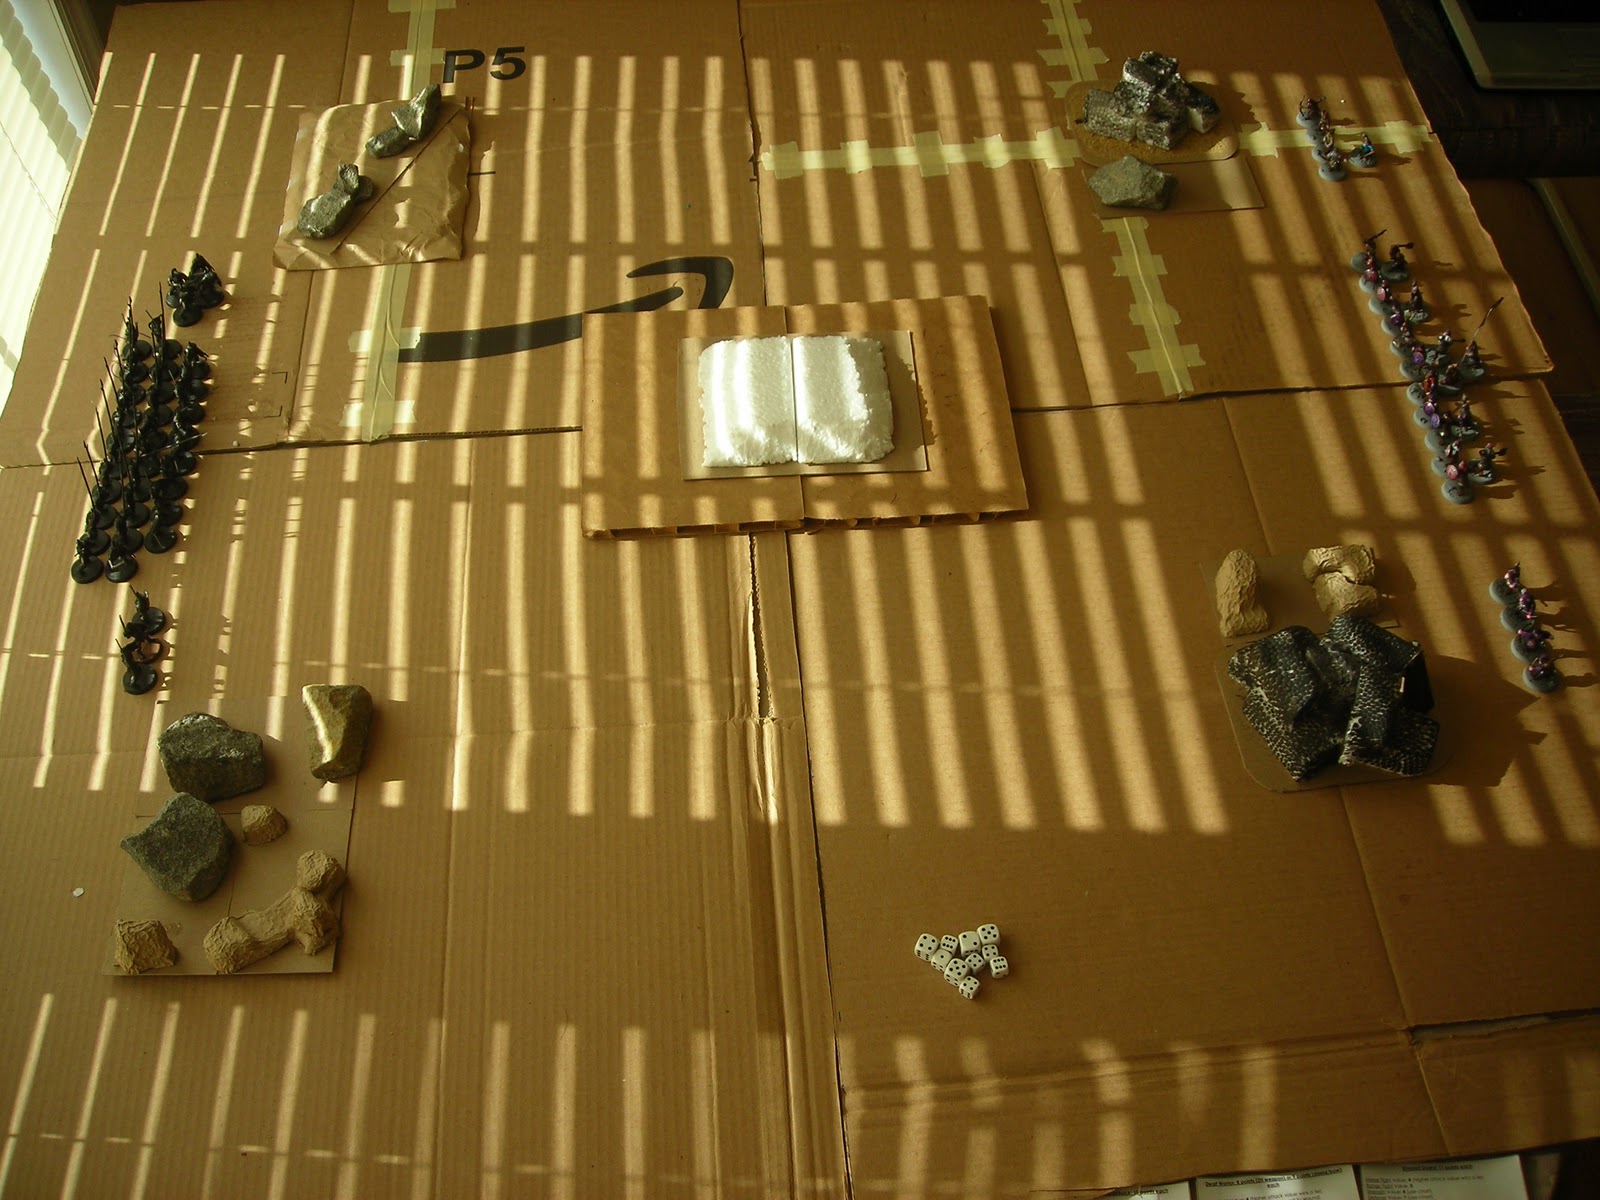 |
| The Uruk-Hai enter the field and avoid the difficult ground where possible. Nothing interesting to report, as there are no volley teams this game. |
Turn 2: The Slow Advance (P - Dwarves)
 |
| Both armies still move towards each other...nothing interesting here as well. The Dwarves are climbing the rocks to gain a better vantage point against the advancing Uruk-Hai phalanx. Hopefully these archers will be able to find the softer targets of the Uruk pikemen and not be forced to shoot all day at the shield troops (who I wound on 6s). |
Turn 3: Taking Good Ground (P - Dwarves)
 |
| Perhaps the most interesting thing about this round is that the Uruk-Hai are in base-contact with the High Ground. Besides this, nothing of interest happens here. You can see at the top-left corner that an Uruk-Hai Warrior with crossbow has stationed himself behind some rocks to shoot at the Dwarves as they come. He can basically cover everything on the High Ground, though he will have some problems seeing some areas because of the terrain. |
Turn 4: The Arrows Fly (P - Uruk-Hai)
 |
| Slightly different angle of the camera, but as the fourth turn nears a conclusion, we're seeing the armies approach each other in battle. This turn, we actually have shooting to do, so hopefully that will be interesting... |
 |
| Though not very interesting, there were two casualties in the Shoot phase: an Uruk-Hai Warrior with shield (who Gimli killed with a throwing axe, paying 1 Might to do it) and an Uruk-Hai Warrior with pike (shot by an archers). |
Turn 5: The Gust Of Change (P - TIED, Dwarves!)
 |
| COMBATS! The Dwarves have attempted to get in defensive positions, preventing the Uruk-Hai from getting around their flanks. Unfortunately, Gaius knows he has a lot of Uruk-Hai and so he is sneaking some of his men past me (and a few at my archers). We'll see what comes of this. |
 |
| Two units died in the Shoot phase: a Dwarf Warrior with two-handed weapon and an Uruk pikeman. Two Dwarf archers paid for so far and almost the crossbowman. |
 |
| The Shield-bearer comes into a field all his own (for 60 points, that is) by calling free heroic combats. In his fight against the Uruk-Hai, he killed the Uruk he was fighting and will rush to join Gimli in his fight. |
 |
| Here's the result of the combats. The Uruk-Hai Captain is the only unit who wounds the Dwarf warriors with shields on a 5+ and he successfully killed the Dwarf he was fighting. Three other Dwarves were killed and Gimli lost his fight, scooting down the mountain with the loss. Bummer. In return, only one Uruk-Hai Warrior was killed. That bites... |
Turn 6: The Battle Rages (P - Uruk-Hai)
 |
| The situation has grown perilous, with the Uruk-Hai sweeping around my flanks and threatening to trap my soldiers. Gimli has been kept from rising to the upper levels of the high ground and will need to kill one of his opponents to climb up. |
 |
| The Shoot phase for this round resulted in one dead Dwarf archer, pierced by a quarrel from the Uruk-Hai crossbowman. This 11-point archer has now killed 17 points worth of Dwarves...and there are still some turns for him to work. |
 |
| Heroic combat by the shield-bearer on the hill should give Gimli the opportunity to rise to the top. After slaying yet another Uruk-Hai Warrior, one of the other Uruk-Hai with shield is to be charged! |
 |
| And here's the carnage of the round: as you can see, Gimli and the shield-bearer won their fights, slaying their opponents. Unfortunately, only one other Uruk-Hai Warrior was killed by the Dwarves, and the Uruks slew two Dwarves in return (one of which was killed by the Uruk-Hai Captain). |
Turn 7: The Lines Are Muddied (P - Dwarves)
 |
| The situation is becoming dire for my Dwarves: my lines are stretched thin or completely gone, making my attempts at defending the High Ground rather slim (in every sense of the word). As I'm writing this up, it probably would have been good for me to have kept some of my archers with my attack force, instead of counting on them to take out spearmen, as they have only killed three units so far this game. If I had kept them with the rest, they would have also added some numbers to my force. |
 |
| Despite not having any archers here on the High Ground (and my comments about them in the previous picture), the Dwarves manage to kill two Uruk pikemen this round, bringing their grand total up to 50 points worth of units (I paid 72 points for my archers, so they've got a little catching up to do). |
 |
| Heroic combat number 3 and it's successful again! I cut through an Uruk pikeman and raced down towards Gimli, but got caught int he control zone of a supporting Uruk-Hai pikeman. Gimli called a heroic combat just before the Shield-bearer did and killed the pikeman he was fighting (the one at hte bottom of the screen). Both of these heroes are within range of the banner, so we'll see how their fights go. |
 |
| Lots and lots of carnage this round. The three heroes won their fights, which ensures their dominance. This round, three Uruk-Hai were killed and two Dwarves died (one of which was the Khazad Guard, who wounds all of the Uruk-Hai on a 5+ with his HAND WEAPON...pity he's gone). |
Turn 8: A Fateful Gust (P - Tied, Uruk-Hai)
 |
| It has been many games since I forgot to take pictures during a round, but here's the end of the carnage of the round. Gimli is on the ground after the tied priority knocked him and the rest of the Dwarves off their feet. This caused some huge logistical problems (especially for my banner). Four Dwarves (including the banner) bite the dust, while no Uruk-Hai were killed (mostly because Gimli lost his fight on the ground and the Shield-bearer won his fight but stood up instead of wounding his attackers). |
Turn 9: The Last Effort (P - Uruk-Hai)
 |
| Here's the movements of the ninth round. None of the Dwarves fled, though, and we finally see some action from Pippen in this fight. |
 |
| Not much happening this round...Gimli stood up and no one else died. Not good for my troops. Pippen didn't die though, even though he lost his fight. |
Turn 10: The Sun Sets (P - Uruk-Hai...grrr)
 |
| Gaius knows he just needs numbers, so he swarms the High Ground with more units than I can stop. I try to get as many of my troops on the objective as well, but my archers are going to need to do something to help. None of my units flee, which was really good - thanks guys! As typical of the last few rounds, the archers do nothing. |
 |
| Final heroic combat of the round goes to the Shield-bearer, who slays his pikeman and charges another unit. |
 |
| Here's the view of the carnage of this round. Two Dwarves fell to the Uruk Warriors and only one Uruk pikeman fell in return. The Uruk-Hai Captain lost his fight and suffered a wound from Gimli, but the shield-bearer did not kill his foe. Pippen won his fight, but unfortunately didn't roll the 6 required to kill him. Bummer, but good job Pippen! |
Assessment by Gaius:
Wow, that was a good game. It really helped that I got to charge on one turn when the winds knocked over our units. This was incredibly helpful for charging the Dwarf heroes and keeping them from killing people (as my force was only one unit away from breaking and losing some of my warriors on the High Ground could have been costly). The Uruk-Hai Warriors won a surprising amount of fights and usually did well when it came to wounding the enemy. I was also surprised that the crossbow unit killed more than his points worth of units, as that doesn't always happen.
Assessment by Tiberius:
If the archers had killed more Uruk-Hai, things might have been easier this game, but the greatest problem in the game was when Gimli and the Shield-bearer were knocked to the ground and unable to kill people for at least one round (Gimli was down for two rounds). With my Dwarves having the hardest time ever staying alive (let alone killing people), losing the heroes sealed the game. Being outnumbered by an army with pikes is not good at all for warriors like mine, so I'm looking forward to when the number of Dwarf Warriors I have is doubled...which will be Christmastime.
Stellar unit for Dwarves: Shield-bearer
I try not to pick heroes, but none of the Dwarf units did particularly well this game. Three Dwarf Warriors with shields did a notable work in keeping Uruk-Hai Warriors on the northern front off of the High Ground until the final round, but no one else did anything good. The Shield-Bearer, on the other hand, did a great job of staying close to Gimli and smashing through one Uruk-Hai Warrior at a time. He killed 6 units, which means he paid for himself, but unfortunately that wasn't good enough to win.
Stellar unit for Uruk-Hai: Uruk-Hai Warrior with Shield
These guys are absolutely great. With Fight 4, Strength 4, Movement 6", and Defense 6, these guys are amazing at taking on the hardest of enemy positions. Their high Defense makes them a less-appealing target than their pike-supporting comrades, but deal an incredible punch when they arrive to fight (especially against Fight 3 enemies, but in these games, the Fight 4 doesn't really help).
is it just me, or did y'all forget about the wind gusts in turn 5?
ReplyDeleteI was rather impressed with the shieldbearer. His ability to draw troops off your primary hero seems like a very handy asset - not that I'm particularly keen on facing even more D8.
The reason why it seems we didn't do the wind gusts on Turn 5 is as follows...Dwarves are slow. :-P Once knocked over, none of the Dwarves on the high ground could charge the knocked-over Uruk-Hai. Two guys (one two-handed Dwarf and a Khazad Guard) charged two knocked-over Uruks on the northern side of the hill, but the other Dwarves (including Gimli and Co.) couldn't charge, so they took up defensive positions as far as they could.
ReplyDelete