Good morning gamers,
We’ve already reviewed how you can build different lists for Minas Tirith, Isengard, Rivendell, Mordor, Lothlorien, and Angmar with scoring victory points in mind. All of these armies (what I've binned in "Volume II" - Volume I included the elements of balanced list building) are armies that easily meet all five requirements - they have access to fast models (all have cavalry options, some have fast-infantry options), they can all get 30+ models with relative ease, they can all take banners, and they have ways of neutralizing enemy heroes while augmenting their own.
In this post, we begin Volume III of our discussion on list building and look at factions that don't automatically pass all five of the criteria we set forth in our original posts. We’ll be looking at the faction of Numenor today to see how you can work around their very limited list of profiles (hopefully to be solved in a supplement someday) and come up with a competitive list that gives you more options.
In this post, we begin Volume III of our discussion on list building and look at factions that don't automatically pass all five of the criteria we set forth in our original posts. We’ll be looking at the faction of Numenor today to see how you can work around their very limited list of profiles (hopefully to be solved in a supplement someday) and come up with a competitive list that gives you more options.
Numenor: Pure Vs. Last Alliance
You know what the biggest problem with running Numenor is? You only have 1 Warrior profile and 3 Hero profiles (though we’ve been given a hint that an Anarion profile will be released someday . . . maybe before we die?). There are several factions (but not many) that only have a single Warrior profile – Fangorn, the Misty Mountains/Radagast’s Alliance, or the Wildmen of Druadan immediately come to mind. While most of these are monster armies (so their warriors basically have hero stats), the Wildmen of Druadan have a niche ally in Rohan to give them a good selection of warriors to ally in (and that can benefit greatly from spear-carrying infantry) and a great selection of heroes to ally in. Sure, there are some factions that don't get warrior choices at all (and the Desolator of the North only gets a single hero profile), but since Numenor is a "conventional army," it's a shame that they are limited in their choices for models. Or are they?
The good thing about Numenor (if you're running it pure) is that while there aren’t a lot of Numenor profiles, the equipment options given to the generic profiles in this army (Warriors and Captains of Numenor) is quite diverse, so you can build an army off of it (plus there are weapon swaps - see my previous post on weapon swaps for more on that). Still, there are some glaring holes in your army - the two largest of which are that your only cavalry options are heroes and no warriors can be higher than Defense 5. That being said, as a Numenor player, I’m very happy that they got some love in the new release (having S4 on your Warriors is nice, though it would have been awesome to see those Captains of Numenor get the boost to S5 - just sayin').
The good thing about Numenor (if you're running it pure) is that while there aren’t a lot of Numenor profiles, the equipment options given to the generic profiles in this army (Warriors and Captains of Numenor) is quite diverse, so you can build an army off of it (plus there are weapon swaps - see my previous post on weapon swaps for more on that). Still, there are some glaring holes in your army - the two largest of which are that your only cavalry options are heroes and no warriors can be higher than Defense 5. That being said, as a Numenor player, I’m very happy that they got some love in the new release (having S4 on your Warriors is nice, though it would have been awesome to see those Captains of Numenor get the boost to S5 - just sayin').
I go back and forth every day between whether Numenor should be played as a pure army or always be used in an allied force with Rivendell. Numenor supplements the “we don’t kill things” problem that Elves tend to face and the High Elves solve the “we don’t get D6” problem that Numenoreans grumble about. Rivendell also solves the "we can't get mounted warriors" problem - though Rivendell Knights are pretty expensive to field in large quantities. So, why not put them together? Whether you choose Gil-Galad or Elrond (or both), you’ll get a great hero to supplement your Numenor force.
Whether you choose Elendil or Isildur (you could do both, though Isildur won’t have the Ring and so is about twice as expensive as a Captain with some-but-not-many benefits), you’ll get a great S5 combat hero to supplement your Elven force (with the ability to two-hand or be D8 - which is amazing). Numenoreans are marginally cheaper than Elves while Elves are marginally better in combat (higher Fight, higher Defense, better bows, lower Strength), so they complement each other well. By choosing to ally them together, however, you get less of both – it’s rare that you’ll run three of the four epic heroes from the Last Alliance in any game below 1000 points. In all likelihood, you’ll only get two out of the four, which means you need to make some hard choices about whether to include Elendil OR Gil-Galad OR Elrond (and you’re probably picking only one or two of these).
Whether you choose Elendil or Isildur (you could do both, though Isildur won’t have the Ring and so is about twice as expensive as a Captain with some-but-not-many benefits), you’ll get a great S5 combat hero to supplement your Elven force (with the ability to two-hand or be D8 - which is amazing). Numenoreans are marginally cheaper than Elves while Elves are marginally better in combat (higher Fight, higher Defense, better bows, lower Strength), so they complement each other well. By choosing to ally them together, however, you get less of both – it’s rare that you’ll run three of the four epic heroes from the Last Alliance in any game below 1000 points. In all likelihood, you’ll only get two out of the four, which means you need to make some hard choices about whether to include Elendil OR Gil-Galad OR Elrond (and you’re probably picking only one or two of these).
Since I’ve already done a post on Rivendell, I was going to focus on a pure Numenor force. However, in the interest of making an army that plays scenarios well, I’ve decided to do an allied list today because of Numenor’s inability to get fast units on its own (outside of spamming captains and mounting Elendil/Isildur). Since one of the scenarios (Reconnoitre) requires you to get models off the board – and that usually means running your fast models off the board – I didn’t think Numenor had a very good chance of doing this on its own, since running your captains off the board isn’t normally a good idea (see my post on Mordor for a counter-example). For those who think Numenor is good without allies, I will provide a pure Numenor list at the end, but I don’t see it being as balanced as an allied list (which is the whole goal of these posts, right?). So, let’s look at the Last Alliance!
The List
 |
| The Survivors of Dagorlad: 700pts |
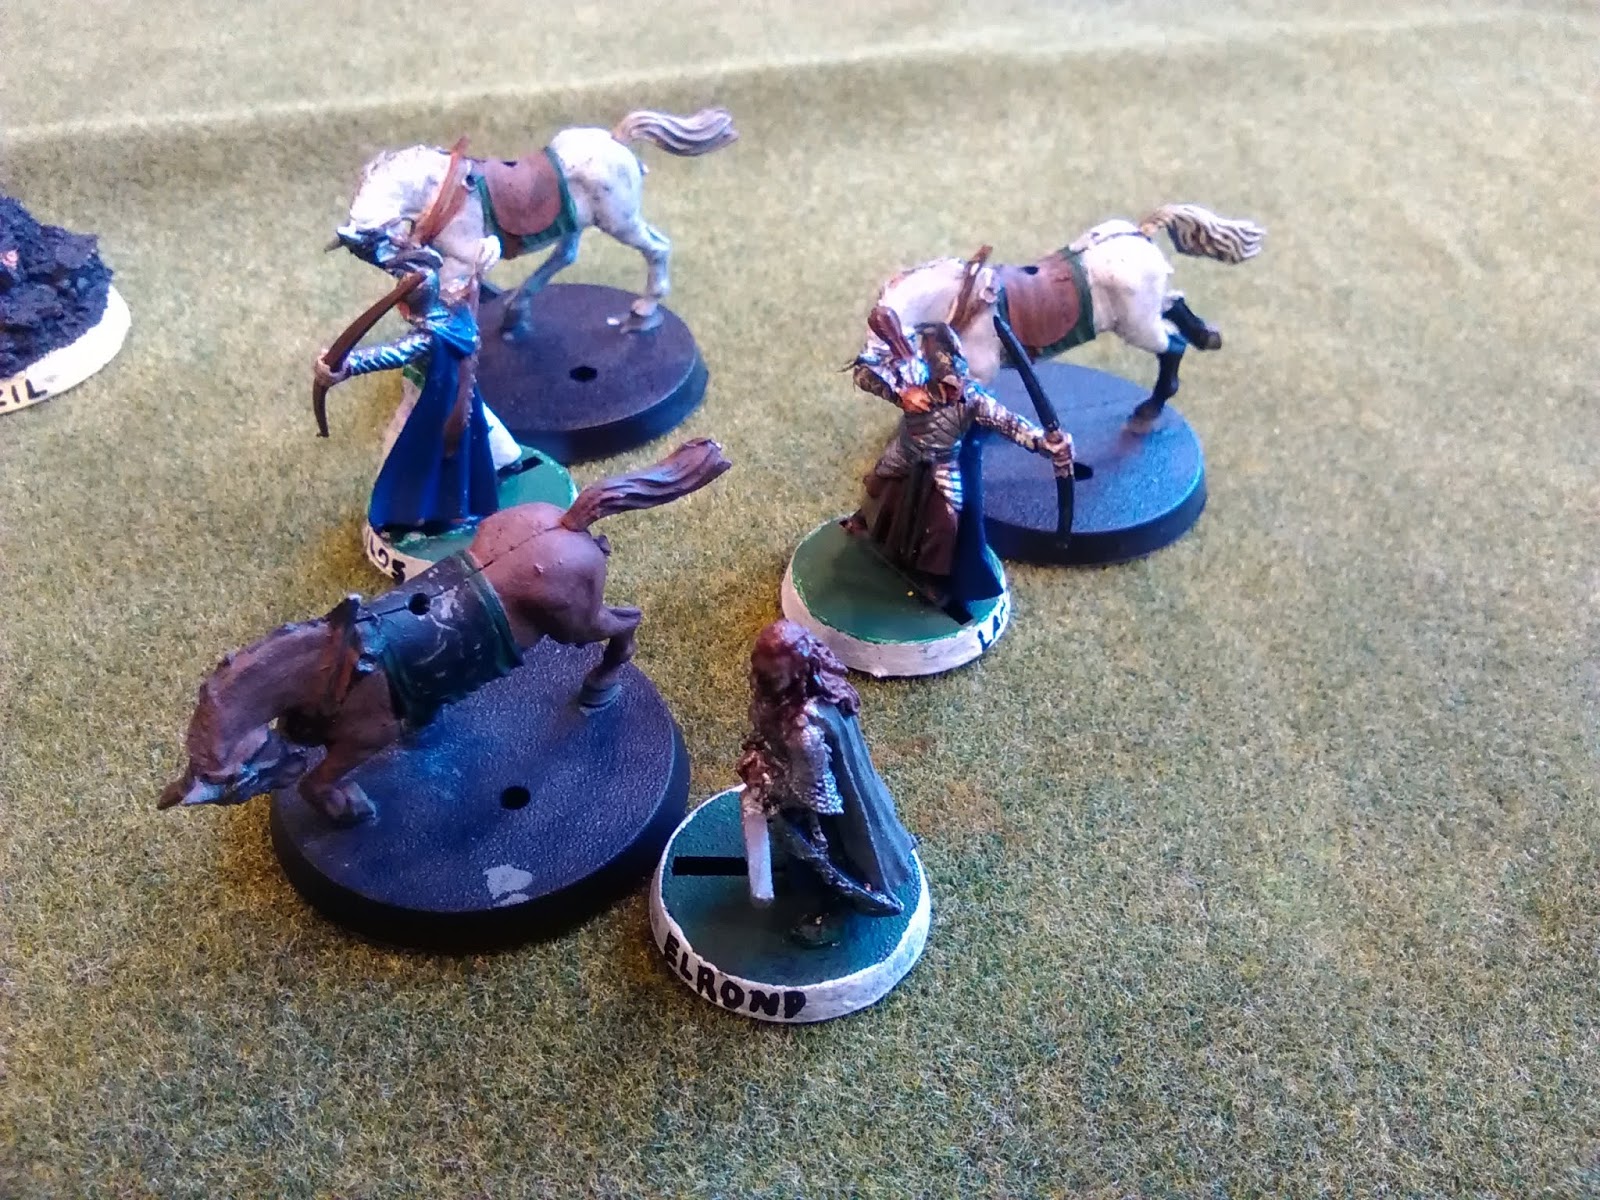
- Elrond, Master of Rivendell on horse with heavy armor [Army Leader]
- 2 Rivendell Knights with shields
- Isildur with shield
- 3 Warriors of Numenor with shields
- 1 Warriors of Numenor with shield and flail
- 5 Warriors of Numenor with shields and spears
- 1 Warrior of Numenor with shield, spear, and banner
- 3 Warriors of Numenor with spears and bows
- Captain of Numenor on horse with lance, bow, and heavy armor
- 6 Warriors of Numenor with shields
- 6 Warriors of Numenor with spears and bows
30 models is actually the lowest number of models we’ve looked at to date – but it still follows the rule of 30, so we’re okay. :-) Note that if you were running a pure Numenor list, you’d likely have a few more models if you ran Elendil (who costs roughly the same as Elrond). Given the choice between having 31 models with 3 cavalry (assuming all three Numenorean heroes were mounted) or having 30 models with 4 cavalry (and more of those horsemen free to run off early in a game of Reconnoitre), I’m going to take the slightly smaller army. Let’s look at each part of the army.
Warband #1: Elrond’s Guard
Okay, let me say this straight-away: the only reason I went with Elrond over Gil-Galad is because he can bring Rivendell Knights without them counting towards the bow limit. This allowed me to take more Numenoreans (since this post is about Numenor, after all). If you ran Gil-Galad (who, mounted with a shield, would have saved us 5 points), you could turn some of your Numenoreans into High Elves (even King’s Guard) and run a larger contingent here. You would only need 2 High Elf Warriors (or King's Guard) to field 2 Rivendell Knights, for what it's worth. A more optimized approach would probably to run a nearly one-to-one pairing of High Elves to Numenoreans, but this is a post on Numenor, so I've taken as few High Elves as possible. Gil-Galad fans, do not lose heart - read to the end of the post for what might be the best actual list for the Last Alliance...
 |
| Elrond's Guard: 234pts of speed and power |
The warband we've chosen here is designed to be able to go wherever it wants and harass, with Elrond free to sling into whatever part of the enemy’s force that he so desires (knocking people to the ground with Wrath of Bruinen as he goes) and a small bodyguard to keep him from being overwhelmed (and they can shoot too). Paired with the Captain of Numenor (who we'll view in a minute), this is a great skirmishing force that can move very quickly and deal damage along the way (without being encumbered by infantry or worrying about leaving them behind).
Warband #2: The King of Gondor
There’s always a choice between Elendil and Isildur when you play with a Last Alliance list: while Elendil has the better profile (+1FV, +1C, +2W, master-forged weapon that gives a free Heroic Combat each turn, +1 die to resist magic, larger Stand Fast), he’s also a lot more expensive than his son (coming in at 200 when fully decked out, while Isildur only costs 125 when not mounted but given a shield). Not including Elendil also makes Isildur more competitive, since he gains the One Ring, which you should read my write-up on the Ring if you haven’t already to see the benefits of running Isildur with the Ring.
 |
| The King of Gondor: 277pts and surprisingly hard to beat with a conventional shieldwall |
Short discussion is this: while wearing the One Ring, Isildur can run towards (most) enemy casters without fearing their magic, while giving himself and friendly Numenoreans around him Resistant to Magic (this would be true even if he didn't have the Ring). He ignores most enemy archery while wearing the Ring (he can be hurt by area-of-effect damage from siege weapons), he automatically wins tied fights while wearing the Ring in combat thanks to halving his opponent’s Fight Value and having Fight 6 himself (though he can't call Heroic Combats while wearing the Ring), and he can move through enemy models so they can’t hedge him off from wherever he needs to go. Pretty nifty that - though the not being able to call Heroic Combats means wearing the Ring isn't a shoe-in choice all the time.
There are downsides to wearing the Ring: Isildur can be moved by the opposing player or attempt to remove the Ring if he rolls a 1-2 at the start of the turn, and he is likely to not take a mount due to being thrown if he puts the Ring on while mounted. He also can't participate in heroic actions, which is fine if you get locked into combat with a big hero and just need to get the FV advantage over him. By and large, though, the Ring provides great benefits and makes Isildur (in my mind, at least) a very competitive alternative to Elendil (and he'll be at least 50 points cheaper).
Supporting Isildur are 13 Warriors of Numenor: nine of them have spears, so you can support not only Isildur (when he's not wearing the Ring, I believe) and all of the other melee grunts in front of them. A small set of these warriors have bows as well, so they can shoot from the protection of the second rank and then support with spears later. One of the Warriors of Numenor in the front rank has a flail - this is a neat trick that I've been theorizing for a while, where instead of charging into a single model that's ahead of you, you charge into two models that are in front of you and choose to Whirl. Like Feint, Whirl doesn't reduce the Fight Value of a model that supports you, so once you're spear-supported, you get 2 dice to win the fight (at your normal Fight Value) and 3 dice to wound (one die against each person the Whirling guy charged, one die against whoever survives from the supporting model). That's a free wounding die! While I could have equipped up to 2 more Warriors of Numenor with flails and been fine with the spear-supporting ratio, I'm not sure I can commit to this strategy at a larger scale until I've tried it out more.
By doing this with more warriors, you may face 2-4 enemy dice against only 2 of your dice, but it's worth it as it will make your otherwise very small battle line longer (engaging 2 guys with 1 guy = longer line). With 1-3 flailing models (depending on how many you use), you can charge into 2-6 models in the center of your opponent's battle line and then work on charging the flanking/supporting models with your other troops (and we have a lot of other models).
Warband #3: The Numenorean Hedge
 |
| The Numenorean Hedge: 189pts of flexible anvilness |
Your captain can also participate in the bow fire (or march your army quickly up the field) and when the enemy gets close, he can attack their flank with F5/S4 and 2 Attacks (3 on the charge with knock-down) and a lance – beware fully upgraded Captains of Numenor on the charge!
Scenario Overview
Let’s take a look at each of the available scenarios and see some thoughts/considerations for using this list:
- Domination: Your blocks aren’t very resilient, so you don’t want to grind for too long. Use Elrond’s Knights to harass far away objectives and use Elrond to supplement the damage that’s being dealt by Isildur and the Captain. Aggression and fast pace is important here, since your army could break against a prolonged onslaught, so get Isildur working quickly. While wearing the Ring, he can’t call Heroic Combats, so if you need the Ring, lock him into combats with multiple people quickly (you are able to both Feint and two-hand in safety against models that are F4 or less). Use your Numenorean warriors to screen off the heroes from being overwhelmed (especially Elrond).
- Capture and Control: Use your captain and the Rivendell Knights to race to far objectives and tag them (then leave them). His bow gives him some flexibility as well, since he doesn’t have to race off somewhere to be useful (as he would if he had a shield instead). Station some of Isildur’s archers at objectives that you pass to tag and hold for a bit, but fade away if your opponent brings a larger force to take an objective back. Skirmishing is the key, but once you’ve got numerical advantage, race in and hit him hard.
- Hold Ground: Getting there first is unlikely, so take your time and skirmish for a bit. Get your Rivendell Knights, Elrond, and your Captain around the flanks to harass before the main body attacks. When the assault happens, rely on Wrath of Bruinen to get one flank to fall. When it does, take advantage quickly and overwhelm whoever is there. That should even the numbers a bit and give your heroes on that flank some breathing room.
- Seize the Prize: A hard scenario, but your best bet is to race your cavalry up as fast as you can to try to get the prize. If anyone has to dismount, your Captain is the best bet (the Rivendell Knights will become D5 if they do). Hand the prize off to Elrond as quickly as you can and have him run it up for you. Should enemies get too close to Elrond, he can always pop a Wrath of Bruinen on them as he races past, cutting down their pursuit range because any survivors will have to stand up first – a mean, mean trick in a scenario where speed is really important!
- To The Death: Don’t get caught in a grinding battle here either – your average Defense will not help you much. Still, this army has plenty of killing pieces, so find good places to attack, skirmish as long as you can, and then pile on in melee when your opponent’s line has been weakened.
- Lords of Battle: This army can get a lot of kills (especially with Elrond) but it can also suffer casualties quickly. Like To The Death, don’t get caught in a protracted grind or you’ll see your ranks falling apart. Strike where your opponent is weak and soften him up as best you can with archery.
- Contest of Champions: Elrond is a great killer and Isildur can be used to get into combat with the enemy leader if you’re clever to make it harder for him to win and get any kills. If Isildur gets lucky, he might be able to kill the enemy army leader before he can kill anything.
- Reconnoitre: Obviously this is the scenario that bites: you’ve got four mounted models (our ideal minimum) but two of them are warriors and two are heroes (one of which is our army leader). As I recommended with the Witch-King for both Angmar and Mordor, get some use out of Elrond and then get him off the board. He won’t count as a casualty (and it will deprive your opponent of getting points for killing him). Your Captain would do well to march twice at the beginning of the game to slingshot the Rivendell Knights as quickly as possible towards the enemy’s board edge, but keep in mind that marching early in the game might give your opponent time to react, so slingshot them when you’ve gotten around the enemy’s lines. Your army should have no problem getting quartered quickly if you throw models into the enemy recklessly (just not before you get some models off yourself). Use your archers to snipe any fast troops that your opponent tries to use to get around your flanks.
- Storm the Camp: Another hard scenario, but you should have enough models to hold the enemy near the center of the map for a while so your Elven contingent (supported by your Numenorean Captain) can ride into their camp and kill things. Whether you employ Wrath of Bruinen on the main force in the center of the map or in the camp of the enemy, Elrond will be the most important piece here. Remember though that you don't want to get into a prolonged grind with your Numenoreans, so skirmish as long as possible and then get locked in with Isildur getting some kills!
- Heirlooms of Ages Past: Random deploys can hurt some teams, but not really this one. Yes, your blocks are small (the Numenorean warbands are average size and the Rivendell one is small but fast). Your team doesn’t have any real synergies it needs to keep up (though Resistant to Magic can be nice), so don’t worry too much about where you deploy – just find the Heirloom as fast as possible. If you don’t find the Heirloom right away and there are 3 possible spots left, be careful to maneuver your army towards all three just in case you race to the other duds and leave your opponent with the heirloom and none of your models can touch it. When it is found, centralize your army as best you can, playing keep-away with one of the Elven models (ideally Elrond - he'll need to dismount to pick it up, but will be really hard to kill) if you manage to get the heirloom.
- Fog of War: This scenario is harder for this faction than any other we’ve covered in this series, because it normally turns into a grind. You don’t want that – pick a piece of terrain that’s central. Use Elrond there to knock units to the ground so you can clear them out. Your opponent will probably pick your Captain to kill (Isildur’s pretty tough to kill), so keep him running away from your opponent (his horse should be able to keep him out of reach). As for a hero you need to kill, pick someone who isn’t mounted so Isildur or Elrond can find them easily and slay them.
- Clash By Moonlight: A pretty rough scenario because you’ve got average Defense, but you’ve also got a good number of bows that would benefit from the shooting boost. Use that to your advantage as best you can, but don’t be afraid to have just Isildur (with the Ring on, of course) race off ahead of the army to throw them into disarray while your archers pelt them from behind cover. Eventually, you want to get locked in, but you can rely on "Isildur the Invisible" to clear out some models before the real fighting begins (and if things go poorly for him, he wasn't your army leader, so you haven't coughed up any points).
There are three major modifications that I can see most generals considering when looking at this list:
- Get Gil-Galad – While Elrond is a great hero, either of the other Lords of the West would be good additions too (Gil-Galad would be more thematic than Glorfindel, so I’ll talk about him). As we've discussed already, this will require you to drop some of the Numenorean warriors in order to add some melee Rivendell warriors, due to the Rivendell Knights now counting against the Rivendell bow limit. You might prefer the Rivendell shieldwall anyway, so maybe this was a given. Either way, you’ll be fighting to keep 30 models in the army by taking Gil-Galad – and if you want a decent Rivendell contingent to aid him, you’re probably looking at losing the Captain of Numenor as well (which means you can’t March your infantry). A list with just Gil-Galad and Isildur and their honor guard would have slightly less starting Might than our original list (though we've stayed at 30 models and can regain Might on Gil-Galad through Blood and Glory and potentially Heroic Challenge):
- Gil-Galad, High King of the Elves on horse with shield [Army Leader]
- 4 Rivendell Knights with shields
- 6 King’s Guard with shields
- 3 King’s Guard with spears and shields
- 1 King’s Guard with spear, shield, and banner
- 2 King’s Guard with Elf bows and spears
- Isildur with shield
- 5 Warriors of Numenor with shields
- 2 Warriors of Numenor with shields and spears
- 1 Warrior of Numenor with shield, spear, and banner
- 4 Warriors of Numenor with spears and bows
- Drop the Elves and Run Pure Numenor – As I mentioned previously, if you drop the Rivendell contingent (-234pts), you’re probably adding in Elendil. If you add Elendil, you can’t have the Ring, so if you want to keep Isildur, you should probably give him a horse. If you add a maxed-out Elendil and give Isildur a horse (+210pts), you can add 2 models to your army (or 3 models if you're willing to drop 3 spears). This nets you 0-1 extra models - which isn't very good. Your best option, in my opinion, is to drop Isildur and the Rivendell contingent from the original list (-359pts), add a maxed-out Elendil (+200pts), add a second Captain on a horse with a lance and heavy armor and your choice of shield or bow (+75pts), and add 9 more models. Your 37-model list might look something like this (you’ll need to focus on Heroic March for scenarios that require speed as you only have three mounted models and one of them is REALLY important):
- Elendil, High King of Gondor and Arnor on horse with shield [Army Leader]
- 3 Warriors of Numenor with shields
- 1 Warrior of Numenor with shield and flail
- 5 Warriors of Numenor with spears and shields
- 1 Warrior of Numenor with shield, spear, and banner
- Captain of Numenor on horse with lance, bow, and heavy armor
- 6 Warriors of Numenor with shields
- 6 Warriors of Numenor with spears and bows
- Captain of Numenor on horse with lance, shield, and heavy armor
- 6 Warriors of Numenor with shields
- 6 Warriors of Numenor with spears and bows
- Get Elendil in the Last Alliance – Elendil is great in his own right (and one of my favorite heroes to use). With a statline that makes him hard to shoot and fight in melee and a special rule that makes him hard to neutralize with magic, Elendil is going to be rough for anyone to break through without really focusing on him with their best pieces. That said, his expense left him out of our original list. If you want to use him well (and wanted to keep the Last Alliance theme), I’d recommend pairing him with Elrond (which I did at Brawler Bash) or Gil-Galad (Mik has a list on his blog at 800 points for this). This will drop you below 30 models, but you'll have a tough army to crack - I've chosen Elendil as the army leader so you can be more reckless with Gil-Galad (and your opponent will have to choose Gil-Galad to kill in Fog of War, which has its benefits too):
- Elendil, High King of Gondor and Arnor on horse with shield [Army Leader]
- 6 Warriors of Numenor with shields
- 2 Warriors of Numenor with shields and spears
- 4 Warriors of Numenor with spears and bows
- Gil-Galad, High King of the Elves on horse with shield
- 4 High Elf Warriors with shields
- 1 King's Guard with shield, spear, and banner
- 3 King's Guard with shields and spears
- 4 Rivendell Knights with shields

Well, that’s it for Numenor. I’ve enjoyed running Last Alliance lists in the past and have really enjoyed using my Last Alliance battle company this season. Our next post takes us deep below the Misty Mountains to the ancient Dwarf realm of Khazad-Dum. We’ll begin by looking at the evil Goblins of Moria before looking at their dour foes (and my favorite bearded fellows) the Dwarves of Moria. Until next time, happy hobbying!
Why did you dismount your "Elrond-guard" knights? They can't remount and the horses with 0 attacks would flee immediately
ReplyDeleteThey're not actually dismounted - I just don't have the models, so I used High Elves and Rohan horses. :-)
DeleteRecently purchased a pure Numenor army. With the added upgrades of the new additions but now minus a banner. What would be the best way to Run a Pure Numenor army? I like the idea of running both big hero’s but I wonder if that is still the most competitive.
ReplyDeleteI need to see the new list (it's unclear to me if they will be able to be run pure), but previously, the issue I ran into with both big heroes is that Isildur is a lot less scary if he doesn't have the Ring. With Elendil likely losing his horse in the new edition, Isildur backed by Captains (don't think they'll have mounts - hard to tell because there never was a captain model) seems like the stronger option. Isildur with a shield and mount with two foot Captains might still be around 250pts and gives you almost 40 warrior slots. This can fit easily into a 650-point limit and if you have 42 models at that points level (and plenty of March for speed), I think things will be fine. :-)
DeleteWith the updated edition I’m curious about y’all’s thoughts on this! Idea is to have front row of elves to get whirl special rule backed by Numenor.
ReplyDelete700 Last Alliance (28 models,8 might,4 bows)
Gilgalad
-9 kings guard shield
-1 kings guard banner
-3 kings guard spear and shield
-4 kings guard elf bows
Isilduir on horse
Numenor caption
-8 Numenor spear and shield
My thoughts on the Last Alliance are many - frankly, I haven't distilled them down yet, but my initial thought is that you may be better served with Elrond instead of Gil-Galad (option for a horse, got stronger this edition, brings more tricks to the table). Since there are more than 15 King's Guard, it's a 1:1 swap to get Elrond instead.
DeleteMy other thought is that there aren't enough guys in the list - and there is basically only one way to get more: drop the Captain. With the six scenarios we have, you don't always need March, but I expect that will change as the other scenarios get released. For the moment, though, dropping the Captain can get you+7 models, which brings the list into the mid-30s instead of the high-20s. A list idea would look like this with Gil-Galad:
Gil-Galad
14 King's Guard with shield
1 King's Guard with banner
3 High Elf Warriors with Elf bows
Isildur on horse
14 Warriors of Numenor with shields and spears
One last thought: I could be convinced to swap up to 8 King's Guard with shields for High Elf Warriors with Elf bows. Yes, it makes the list predominantly D5 - and yes, you would have less F6 in your list - but 3 bows and no March means any shooting list is gonna have an advantage over you. It seems to me like having more bows (the Numenoreans are cheaper with a lower Defense/Shoot Value) could give you an option to compensate for the loss of March
After playing a few of these lists I think Elrond and Isildur are the best combo. At least in my local and regional community it seems the average points level has shifted from playing 700 points at tournaments to 800 and above. Wanted to get your opinion again on these lists. Do I jump to another big hero with points and lose the ring? Or stack with numbers on a captain
Delete850 (9 might,34 models,6 bows)
Elrond on horse
-11 warriors with shield
-1 elf banner
Elendil
-13 shield and spears
Isildur on horse
-6 Numenor bows
Or
Elrond on horse
-14 warriors with shield
-1 elf banner
Isildur (ring)
-15 warriors shields and spears
Rivendell captain horse , elven bow, and lance
-8 elf bows
I think the second list would be better with a Numenor Captain instead of the Rivendell one - your list does have the advantage of three heroes who have the option for mounts, but the Numenorean bowmen and the Captain are cheaper, which gives you F5 troops still with S3 bows still but you can get an extra few Elves out of it.
DeleteThe first list does lose the Ring, but you do get insurance with the Shards of Narsil now, so getting a S5 hero with+1 To Wound would be pretty good if you're making up for losing Elendil. With Elendil and Elrond, I don't know if you need the Ring . . .