

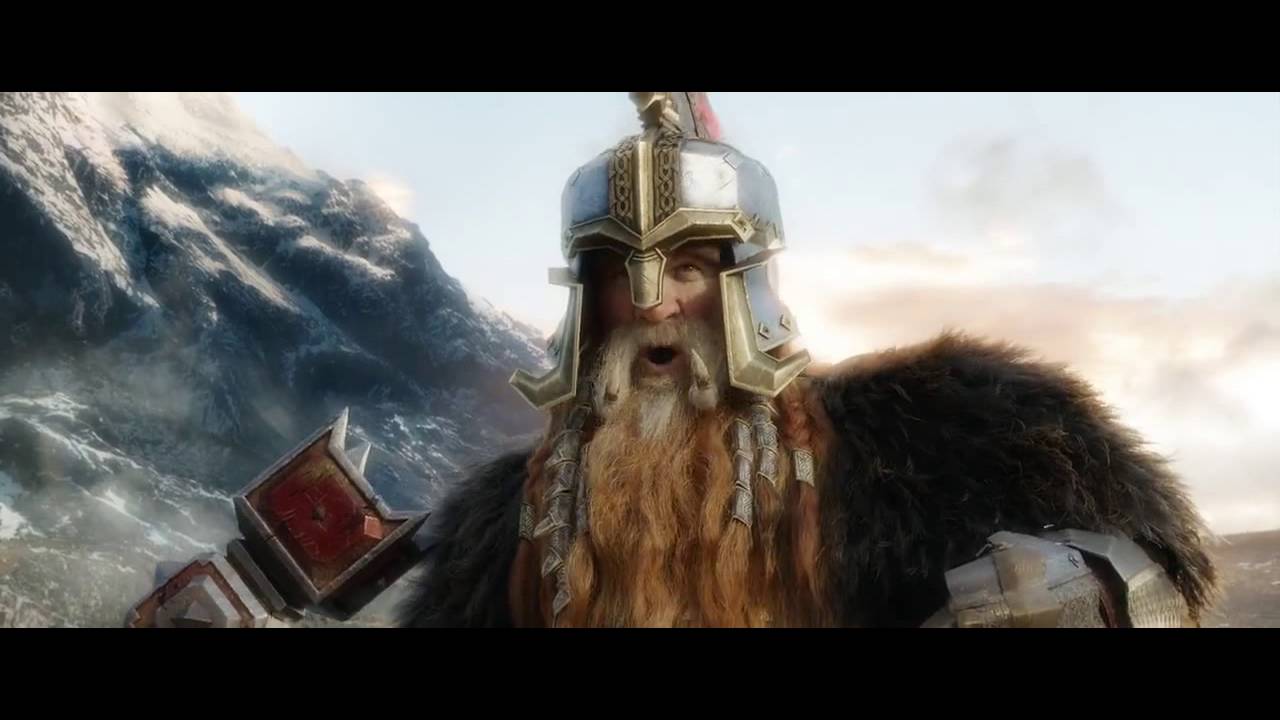
No discussion of the Iron Hills and Erebor Reclaimed army
lists would be complete without Dain Ironfoot, the Lord of the Iron Hills
himself. He made a name for himself (in the books, anyway) by slaying Azog at
the gates of Moria in the Drimrill Dale, and in the Middle Earth Strategy
Battle Game, he’s on any short-list of top-tier dwarf heroes. He is the
undisputed commander of some of the slickest-looking dwarves in Middle Earth,
and has some incredibly thematic rules to pair with an exceptional profile
(plus an iconic mount). So if you want to indulge your reckless side, or just want
an excuse to tell Sauron’s messenger to shove it or call an elven lord “princess,”
Dain’s your man (er, dwarf).
(Oh. And his maths are
pretty good, too…)
Basic Profile and Duel Stats
Let’s start with the obvious: Dain has monstrously good
combat stats. Fight 6 with three attacks is a very good sweet-spot for combat,
as you have an excellent chance to win every duel you’re in, as long as you
have the higher fight value (which you will against all but a handful of elite
troops, like Kingsguard and Guards of the Galahdrim Court).
Dain pairs those Fight and Attack characteristics with
Strength 5 and a two-handed Hammer, which he can use without penalty thanks to
his Burly special rule. This means
he’s wounding your basic Defense 6 (or Defense 7) troops (or monsters, like
trolls) on a 5+ base, which becomes a 4+ with Burly. Defense 5 troops will be wounded on a 3+ with Burly, and even Defense 8-10 heroes
and monsters can be wounded on 5s (or a 5/3+, both of which are very good against models with
those kinds of Defense stats).
On the defensive side of things, Dain has the proverbial “3s
in all the right places”: three wounds with three Fate (plus three Might, Will, and Attacks, to complete the set), which means you have to deal seven
wounds to him before you can guarantee a kill. That won’t be easy, because at
Defense 8, most troops (Strength 3), heroes (Strength 4), and especially archers will need 6s to
wound him, or worse. And even heroes supplemented by lances or other two-handed
weapons will need 5s to score a wound.
The combination of these profile stats make him incredibly durable
in combat, with the highest kill ratios we’ve seen to-date. Here’s how Dain
performs on foot, in combat against generic S3/D6 infantry models who have one
attack and a lower Fight Value (Fight 2, 3, 4, or 5):
Dain Ironfoot
(F6, S5, D8, A3, Burly, 2H Hammer, on-foot, charged) vs. X Infantry Warriors
(F2-5, S3, D6)
|
|||||
vs. 1 Infantry
|
vs. 2 Infantry
|
vs. 4 Infantry
|
vs. 6 Infantry
|
vs. 8 Infantry
|
|
Duel Win %
|
82.64%
|
71.93%
|
59.72%
|
53.23%
|
49.40%
|
Kill %
|
72.31%
|
62.94%
|
52.26%
|
46.58%
|
43.23%
|
Avg wounds
|
1.24
|
1.08
|
0.90
|
0.80
|
0.74
|
Death %
|
1.45%
|
4.48%
|
11.84%
|
19.02%
|
25.37%
|
Avg wounds
|
0.01
|
0.05
|
0.13
|
0.23
|
0.34
|
Kill Ratio
|
49.98
|
14.04
|
4.41
|
2.45
|
1.70
|
The star of the show is that absurdly-high kill ratio
(nearly fifty times more likely to wound than to be wounded!), but there’s a lot of good stuff here. First off, while our
basic Iron Hills dwarves (and especially
our Goat Riders) tend to lose their
combat effectiveness once they’re in combat with two or more enemy models, Dain
is comfortably winning fights with minimal risk to himself with up to four
infantry models (nearly 60% chance of winning the duel, with a 4.41 kill
ratio).
It takes eight lower-Fight enemy infantry to wrest control
of the duel away from Dain, and even then, he has just under an even chance to
win the fight (49.4%) and a favorable kill ratio (1.70). This is harder than it
sounds, especially if Dain is on foot. The “simplest” way is to get four
infantry in base-contact with Dain, who are then supported by four models with spears
(or their equivalent—pikes, Chittering
Hordes, etc.). Assuming there’s sufficient space to maneuver these eight models
around Dain (which is hard to do unless he’s out in the open all by himself), you then have to
protect those eight models so none of them are peeled off by other combats
(which means, in reality, unless your opponent is super careless/reckless with
Dain, you’ll need more than eight models to pull it off). And if Dain has
already charged that round, the attempts may be further complicated by his Fearsome Charge special rule, which
requires enemy models to take Terror
tests before they can charge Dain. Depending on the courage of your models (and
the presence or absence of Bodyguard
units), this may prove incredibly daunting.
But wait—it gets worse. (Of course it does.) Because if
Dain’s smartly brought a banner along, he’ll comfortably win a fight
even against those eight opponents:
Dain Ironfoot
(F6, S5, D8, A3, Burly, 2H Hammer, on-foot, charged) + Banner vs. X Infantry
Warriors (F2-5, S3, D6)
|
|||||
vs. 1 Infantry
|
vs. 2 Infantry
|
vs. 4 Infantry
|
vs. 6 Infantry
|
vs. 8 Infantry
|
|
Duel Win %
|
87.41%
|
78.93%
|
68.50%
|
62.58%
|
58.94%
|
Kill %
|
76.48%
|
69.07%
|
59.94%
|
54.75%
|
51.58%
|
Avg wounds
|
1.31
|
1.18
|
1.03
|
0.94
|
0.88
|
Death %
|
1.05%
|
3.36%
|
9.26%
|
15.22%
|
20.59%
|
Avg wounds
|
0.01
|
0.04
|
0.10
|
0.19
|
0.27
|
Kill Ratio
|
72.90
|
20.53
|
6.47
|
3.60
|
2.51
|
Yes, that’s nearly a 60% chance to win a fight against eight
high elves (of the non-Kingsguard variety, of course), with a 2.51 kill ratio
(two-and-a-half times likely to deal a wound than to take a wound). Against a
much more realistic four High Elves, Dain’s odds climb to nearly 70% to win the
duel, and a 6.5 kill ratio (against Defense 6 High Elves!).
But why stop there? If you want to get an idea of just how
game-changing this banner effect is for Dain, consider this: if the enemy had
an Easterling Pike Block made up of Black Dragons, and all of them charged Dain
three-deep (we’re talking 18-20 Fight 4, Strength 3, Defense 6 pikemen against
Dain, on foot, all by his lonesome), Dain would still have a better than 50%
chance (52.52% vs. 20 lower-fight models) to win the fight if supported by a Banner
(and a slightly favorable kill ratio of 1.17). In fact, you could throw an
absurd number of lower-fight enemy models at Dain (Jeremy Hunthor’s combat calculator
stops at 200, which his sufficiently absurd), and Dain would still
have a better than 50% chance of winning the duel if supported by a Banner
(with only a slightly unfavorable kill ratio of just under 1 (0.94))—again,
that’s against two hundred enemy models:
Dain Ironfoot
(F6, S5, D8, A3, Burly, 2H Hammer, on-foot, charged) + Banner vs. X Infantry
Warriors (F2-5, S3, D6)
|
||||||||
vs. 1 Infantry
|
vs. 2 Infantry
|
vs. 4 Infantry
|
vs. 6 Infantry
|
vs. 8 Infantry
|
vs. 12 Infantry
|
vs. 20 Infantry
|
vs. 200 Infantry
|
|
Duel Win %
|
87.41%
|
78.93%
|
68.50%
|
62.58%
|
58.94%
|
55.07%
|
52.52%
|
51.77%
|
Kill %
|
76.48%
|
69.07%
|
59.94%
|
54.75%
|
51.58%
|
48.19%
|
45.96%
|
45.30%
|
Avg wounds
|
1.31
|
1.18
|
1.03
|
0.94
|
0.88
|
0.83
|
0.79
|
0.78
|
Death %
|
1.05%
|
3.36%
|
9.26%
|
15.22%
|
20.59%
|
29.11%
|
39.15%
|
48.23%
|
Avg wounds
|
0.01
|
0.04
|
0.10
|
0.19
|
0.27
|
0.45
|
0.79
|
8.04
|
Kill Ratio
|
72.90
|
20.53
|
6.47
|
3.60
|
2.51
|
1.66
|
1.17
|
0.94
|
Lest you think Dain is alone in this, he’s not: while his
kill ratio is higher than most (he has above-average hero Strength combined
with a Burly 2H weapon and Defense
8, after all), any three-attack model will have similar Duel Win % stats against
similarly-absurd numbers of enemy troops as long as (1) they have higher fight
than the models they’re fighting, (2) they have no duel penalties (from
carrying banners, 2H weapons, etc.), and (3) they have a banner (or banner
effect supporting them). So think very carefully before you charge your generic
troops into Aragorn the King or Boromir with Banner: the odds are that you
won’t beat them no matter how matter how many troops you throw at them (unless
you can manage to knock them prone first).
Dain also has Courage 7, which is fantastic. It never comes into play for courage tests (because he’s Fearless), but against special rules like Blades of the Dead, it’s phenomenal. Strength 4 heroes with Blades of the Dead will still need a 6 to wound Dain, unless they have Harbinger of Evil nearby (in which case they need a 5+, unless you have a War Horn allied in an Army of Thror or Thranduil’s Halls contingent, in which case they’re back to 6s only). And your generic Army of the Dead warriors will need 6s to wound Dain, even with the King of the Dead’s Harbinger. Pretty good, right?
Last but not least, Dain is a Hero of Legend. This means he can take 18 models in his warband, which is very good in an army like Iron Hills (he's a Hero of Valor in an Erebor Reclaimed list), where both the heroes and the troops are expensive. It also means Dain gets an auto-pass Stand Fast the first turn after you break, which would be more awesome if Dain didn't have Fearless (which means he auto-passes his Stand Fast! every time), and in a pure Iron Hills force, it's probably overkill (because of his Lord of the Iron Hills special rule), although if you have an allied contingent with low courage in your list, they won't notice the difference.
Heroic Stats and Actions
Dain’s beefy combat profile is backed up by three Might, Will, and Fate, which is as much as any hero (who isn’t Boromir, Aragorn, a Wizard, a Sorcerer, or a Dark Lord) has any right to expect. We’ve already discussed the Fate, but having multiple Fate is always good, especially if you’re facing any auto-kill models like dragons, Nazgul/castellans with Morgul Blades, or the King of the Dead.
Dain’s Will pool is also very good. He doesn’t cast any
spells, which means you can use his three Will solely to resist spells (he doesn’t
like Shatter, Immobilize, or Compel in particular). His spell resistance also
got a boost from the new rules (per Rules p. 95, you regain any Will from your
store spent on a resist if you roll a natural 6), and you can supplement his
pool with Heroic Resolve if you have to (which essentially converts a Might
point into a Will point for Dain and any friendly models within 6” of him--a life saver if Dain is about to absorb three or more spells in a single round). A
store of 3 Will eventually runs out, but hopefully not before you’ve managed to
do some real damage. And, of course, you can always get a
certain Wizard in a historical alliance (or Bombur in an Erebor Reclaimed
army list) if you want to refresh your Will pool mid-game.
Which brings us to the three Might. There’s no shortage of
things Dain can do with his Might, starting with his selection of Heroic
Actions. In addition to the basic three (Move, Shoot, Combat), Dain has access
to nearly all of the coveted specialty actions:
· Heroic March (Move Phase): Iron Hills
Captains have this, too, and are phenomenal in their own right. So do
Lake-Town Militia Captains, Palace Guard Captains, Mirkwood Captains, Mirkwood
Ranger Captains, Erebor Captains, and Grim Hammer Captains, all of whom can be
taken in various historic alliances with Dain. If you have any of these
supporting captains, it’s probably best to use their Might to March, and save
Dain’s for doing… other Dain things (he has a lot of things). Where you
typically don’t have access to March (and probably want it) is in a pure
Erebor Reclaimed list, as none of the Champions of Erebor believe in marching
(apparently). If you have to seize the prize, or hold ground, or capture an
heirloom, that extra 3-5” movement on your dwarves, goat riders, and heroes can
be massive. You can take Iron Hills Captains in Erebor Reclaimed, too, but
realistically you’re probably not: why spend the points on an Iron Hills
Captain when I can spend the same points (or a little more, or a little less) to get Nori, Gloin,
or Dwalin on goat? Because Dain is such a boon for the warriors in an Erebor Reclaimed list, he becomes the only means of calling Marches.
· Heroic Resolve (Move Phase): Generally
you won’t spend Dain’s Might on this either, as Heroic Resolve is almost always
a gamble: you have to spend Might on it at the start of the Move Phase, which
means your opponent can always choose not to cast a spell in the ensuing Move
Phase, thereby “wasting” your Might Point (although depending on the spell that
isn’t cast, you may not feel the Might point was in fact wasted). But there are
some times when it’s useful, or even necessary. Case in point: Elrond and Arwen
are closing in, and you know double-Wraths of Bruinen are coming your way. Iron
Hills dwarves hate Wrath of Bruinen, not so much because of the damage it does
but because it knocks them prone (which means they can’t wound elves on a 5+ with
their Strength 4 if they win the fight, and they won’t have Shieldwall up if they lose the fight).
Your plan A would be for Dain to resist both spells, because he has three Will
backed up by as much as three Might. But Dain can only be in one place at one
time (Elrond and Arwen don’t have to worry about his Might and Will if they
cast more than 6” from Dain), and even three Will backed up by Might is not
much to resist two spells (which are almost certainly going to be cast with two
or more dice each). A Heroic Resolve would give Dain two additional dice (one
for each resist test) in addition to his store, and would give every
friendly model within 6” of him one die to resist (making it that much harder
for Elrond and Arwen to cast around Dain while maximizing the impact of their spell). Just to be sure to use different dice for your Heroic Resolve and Will dice when resisting--you want that Will point back if you roll that "6"!
· Heroic Strike (Fight Phase): If you’ve
followed my
musings on Heroic Strike, you know that I’m generally skeptical of its
value if we’re involved in strike-offs with other enemy heroes (especially if
those heroes start off with higher fight). That said, the option to Strike is still
a good option to have, especially on defense. While I’d probably avoid charging
Dain into Gil-Galad or Glorfindel willingly (more on that below), if my opponent
charges Gil-Galad or Glorfindel into Dain (or charges Dain with a Fight 5 hero,
who usually wouldn’t pose much of a threat—more on that below, too--and that Fight 5 hero calls a Heroic Strike), I’m going
to be glad I have the option to call Heroic Strike. Strike is also very useful
for monster hunting (particularly Fight 6 or Fight 7 trolls), which Dain gets to
do from time to time (he loves it, by the way). Since most monsters don’t have Might, a Strike against a
cave troll is going to result in Dain automatically having the higher Fight,
and even against a Fight 7 Mordor or Gundabad Troll, Dain is going to have the higher Fight
Value unless he fluffs the Strike roll on a “1”. Since he wounds Mordor Trolls
on a 4+ (Strength 5, 2H hammer with Burly),
he’s got a very good chance of killing them, especially if he’s supported by
neighboring Iron Hills dwarves (and a banner, of course).
· Heroic Strength (Fight Phase): I’ve written
separately about this heroic action as well, and am much bigger on it than most,
especially for Strength 5 heroes like Dain. Even the jump from Strength 5 to
Strength 6 (which Dain is guaranteed to get) is massive if you win or lose the
fight: if you lose, you can’t be knocked prone by cavalry models, you can’t be
hurled by monsters who are Strength 6 or less (which is many of them), and you
wound Defense 8 models/heroes on a 4+ if you win (and Defense 6 models/heroes on a 3+).
You also have a 67% chance of getting to Strength 7 (you can’t be hurled by
anything except Ents and mega-monsters like Sauron and Smaug), most monsters
need 4s or 5s to rend you, you wound Defense 7 models/heroes (which includes
most elites and heroes) on a 3+, and you have a pretty good crack at Defense 9
or 10 models. Strength 8 (33% chance) will wound Defense 7 or 8 on a 3+ and Defense
6 or below on a 2+ (let that sink in for a minute), and not even Sauron can
hurl you if you lose (and he’ll only Rend you on 4s). And if Dain is mounted
(more on that below—we’re almost there, sorry!), his odds of getting multiple
bonus wounds out of Heroic Strength are phenomenally good. Pair it with another
hero in the same fight calling a Heroic Combat (Thorin in an Erebor Reclaimed
list can do this indefinitely), and you can get double-effectiveness out of it.
· Heroic Challenge (Fight Phase): This is
another one that doesn’t get called much, and I haven’t played around it with
nearly enough to opine on the strategy behind when you’d call it and when you
wouldn’t. All I’ll say is that Dain (unlike other heroes, like Theoden, who can
call this) actually has the sorts of combat stats (Fight 6, 3 Attacks, Strength
5, Defense 8, 3 Wounds, 3 M/W/F), war gear (2H hammer, two-wound mount),
special rules (Burly, Fearless), and heroic actions (Heroic Strike, Heroic
Strength) you’d want to pull off a successful challenge (though bear in mind you can't call a Heroic Strike or Strength on the same turn you declare a Heroic Challenge, since the Challenge counts as your single Heroic Action for that Fight Phase--but if you are Challenged, you can Strike up (sneaky, sneaky)). He may not be the
favorite against Elrond, King Aragorn, Elendil, Gil-Galad, or Sauron, but he’ll
have a good go at them, especially if they have to start burning Might to
Strike or modify dice at a faster rate than Dain. Which leads us to…
Iron Hills Army Bonus: Master of
Battle (4+)
So this isn’t a heroic action, but it is a special rule
conferred on Dain in a pure Iron Hills list or historic alliance (along with
their +1/-1 to maelstrom/deployment/reinforcement rolls, which is good in its
own right). Whenever an enemy hero declares a Heroic Action within 6” of Dain,
Dain may call the same Heroic Action without spending Might on the roll of a 4+,
even if Dain doesn’t usually have access to that Heroic Action (Rules p. 105).
Let’s start with that last part first. Dain has so many of
the good heroic actions that he can live without most of them he doesn’t have
(Heroic Accuracy, Heroic Channel). The big one he is missing is Heroic Defense,
which means Dain can only be wounded on the roll of a natural 6 (or a natural
“6” followed by a natural “4+,” if the enemy is Strength 3). Most models will
be wounding on 6s anyway (you have to get to Strength 6 before you wound D8 on
a 5+), but it’s very good against Strength 4 troops using two-handed weapons (a
5+ becomes 6) and against Strength 4 heroes with lances, two-handed weapons,
and Might (as none of those modifiers will result in wounds). What this means
in practice is that your Defense 8, three wound, three Fate dwarf lord—who is
already tough to kill—is even tougher to kill than usual (although Dain’s War
Boar doesn’t get the defense boost; see Rules p. 72).
Then there’s this: Heroic Defense is one of the few things
that can drastically reduce Dain’s effectiveness in combat. A Strength 5, Burly
hero with a 2H weapon will wound most heroes (Defense 6 or 7) on a 4+, so
wounding on natural 6s (instead of a 4+) is a massive penalty for Dain. But
if Dain’s in combat with another model, and that model calls Heroic Defense (to
try to stave off the inevitable), they run the risk that Dain will be able to
copy that Heroic Defense through Master
of Battle for free, without expending Might. If you’re fighting Dain on
your last wound, with your last Might point, you probably still call Heroic Defense and chance whether he'll be able to copy you.
But if you’re at full-stats and no wounds, I don’t know that you decide to spend the Might on Heroic
Defense… which is exactly what Dain wants.
Lastly, remember that while copying Heroic Actions Dain
doesn’t have is very cool, he can copy Heroic Actions he has, too (like Heroic
Strike, Heroic Combat, or even Heroic Move). This makes things like Heroic
Move-offs (if you won priority) very dicey for your opponent. If your opponent
calls a Heroic Move and you counter, your opponent only has a 50-50 chance of
winning anyway (and thus a 50-50 chance of “wasting” one of their precious Might
points). If you also have a chance (another 50-50 chance) of calling your
Heroic Move for free thanks to Master of
Battle (4+), the mathematical odds of the opponent “wasting” that Might
point is no higher than it was before (50-50), but the psychological odds of
your opponent “wasting” their Might seems higher somehow (I have to spend might, but if I do, my opponent may get to challenge me
for free!?! And I may still lose!I can’t risk that!).
So your opponent hems and haws (internally, probably) about whether to call
that Heroic Move in the first place, even in situations when calling the Heroic
Move should be a no-brainer (like when you have no more Might left on the
board). Meanwhile, you sit calmly and serenely, waiting to see if they make a mistake you can exploit.
Special Rules
We’ve already touched on Burly and Fearless in
passing, but they’re both very good: Fearless
ensures Dain can charge anything he has to charge, and Burly gives him the tools he needs to wound almost anything. Couple
these with Fearsome Charge, and
enemy models who want to charge Dain (after he’s charged something else) will
have to take courage tests to trap and surround him. In games against swarm
opponents (like Moria, Goblin Town, or even the Shire), this special ability
can be a lifesaver. It's also sneaky good against Trolls, who generally aren't Fearless, covered by Fury, or have Will points to spend on courage tests. (Not that Dain couldn't take on a Troll on its own, but he prefers to fight it when and where he wants to fight, not when and where the troll wants to fight.)
Then we have Lord of
the Iron Hills. I discussed this quite a bit in our discussion
of Iron Hills Dwarves, but the tl;dnr version is that it makes your basic
troops extremely dependable. They can charge trolls, they can ignore spectres,
they can contest and hold far-flung objectives, they can charge Elrond so he
can’t cast Wrath of Bruinen, and they care not for breaking (if you can break
them). Dain has many special rules, but over the course of a points-match game,
this is often the most important one. Even if Dain is transfixed the entire game (which would suck), this special rule continues to improve your army's performance, and contributes to its success. It is not to be underestimated.
Finally, we have two combat-oriented special rules: Headbutt and Fiery Temper. Headbutt
is largely a fluffy rule that I originally thought only applied if Dain fails to kill any opponents (which doesn't happen much, because Dain is so good at wounding anything he touches, especially when
mounted). But subsequent discussions over on the Great British Hobbit League Facebook page seem to suggest that at least some players allow Dain to Headbutt as long as at least one model
he’s fought (or maybe attempted to strike—there’s not total agreement on the finer details) remains alive
at the end of the fight, which would make it proc far more often. Either way, if
you win a duel and then fail to wound, you can knock a single man-sized model
(who was in the fight, so no spear supports) prone on a roll of a 5+. It
doesn’t have as many tactical applications as the War Goat’s Devastating Charge (because it happens
at the end of the Fight Phase, instead of during the Move Phase), but it’s a
nice little rejoinder to that annoying hero who called Heroic Defense against
you (Oh yeah? Take that, you bugger!).
Banner Boromir, beware…
Fiery Temper is
the closest Dain has to a weakness: “As soon as Dain Ironfoot, Lord of the Iron
Hills, kills an enemy model, for the rest of the game, if Dain is in range to
Charge, he must do so if he is able to” (Armies of the Hobbit p. 27). Forced
charges are rare but not unfamiliar. Elrohir and Elladan have had Unbreakable Bond for a long time, and
Faramir and Theodred gained forced-charge rules of their own in the new
edition (Theodred all the time, Faramir sometimes). Dain’s rule can still get him into trouble (especially if a skilled
opponent sets-up models to force charges), but there are a few ways to mitigate
it:
· First, the special ability only triggers after
Dain “kills an enemy model.” This sets him apart from a model like Theodred or
Faramir, who have to charge as soon as they’re in range (which could be as
early as turn one), and can lure them away from the rest of your force
(especially if they’re mounted). Dain’s forced charge only comes into play
after you’re in contact with the enemy. So if we don’t want Dain to be forced
to charge all by his lonesome, we simply keep Dain with the rest of our army,
and resist the urge to have him charge into the enemy before the rest of the
army is ready to charge with him.
· Second, Dain has a certain degree of control
over when
he kills something, because he has a two-handed hammer. This gives Dain
an out if he wins a fight before you want him charging, because instead of
striking (and probably wounding his opponent), you can opt to Bash (which, with a 2-handed, Strength
5 hammer, you have a pretty good chance of proccing successfully). Because this
will knock the model Dain is fighting prone, it’s still possible you can kill
it (if Dain is supported by an Iron Hills warrior or Goat Rider, which will get
double-dice to-wound), while preventing Dain from going berserk before you want
him to.
· Once Dain has killed a model (and for his point
cost, you will eventually want him to kill some models), you still have
some options to keep him killing in the direction you want him to go, or even
to shut-off his ability to charge completely. Bear in mind that Dain has to Charge
if able, but he doesn’t have to charge the nearest enemy model (like some
models must do). So if your opponent has moved a single model near Dain but out
to a flank (clearly attempting to bait you away from the action) and you happen
to notice he has other models that are further away (but within Dain’s charge
range) closer to the action, don’t take the bait! Keep Dain where the fighting
is thickest (or at least where you intend to fight thickly—if that makes any
sense).
· As long as Dain hasn’t called a Heroic Move at
the start of the Move Phase, it’s also possible to “screen off” enemy models
that you don’t want to charge, with a variation on the tried-and-true “Bodyguard”
approach, like you’d use for Denethor’s Broken
Mind, or to prevent a Spectre from making your banner retreat. I'm hoping to do a more detailed write-up of how you can position models to do this, but the general idea is that you surround
Dain with some friendly troops (who move before Dain does), so that when his turn
comes to move, he can’t physically move past them (and thus is not able to
charge past them, which gets you around Fiery
Temper since Dain is not able to Charge). It’s also quite a bit safer doing this to Dain than it is for
someone like Denethor, since Dain’s Temper is not so great as to make him
attack his friendly bodyguards. It’s also possible to take more of a “shepherding”
approach with Dain: rather than surrounding him completely, you can sometimes screen
off unfavorable models by placing models to one side of Dain (between him and
the “bait”) that Dain will have to go around in order to Charge. If going
around these models places the “bait” beyond Dain’s maximum movement, he is no
longer able to charge (and thus, doesn’t have to Charge).
· Finally there’s the cheeky approach: if you
really don’t want Dain to charge on a particular turn, but can’t work out a
bodyguard approach, have Dain call a Heroic March. Models who are marching are unable
to charge… which means Dain doesn't have to Charge (because he can't Charge). Problem solved.
So that takes us to the end of Dain’s profile proper. But there’s
still one important aspect of his profile that we should talk about…
War Gear Options: To Mount, or Not
to Mount?
Let me save you some suspense:
Always.
Mount.
Dain.
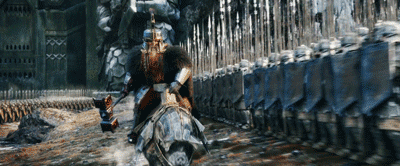
As Kalhman Steels-Wright opined in Blackmist’s Fog of War series, there is no such thing as 140 point Dain—he does not walk. There are lots of reasons for this.
· He gets an 8” move. An 8” move on any hero is
fantastic. On dwarf heroes, it’s incredibly fantastic, especially if Dain is
your only big hero and you’re facing an opponent with multiple big heroes
(Gondor, Mirkwood elves, etc). You can’t be everywhere at once, so being able
to be everywhere as quickly as possible is the next best thing.
· It helps Dain buff your dwarves with Lord of the Iron Hills. A 12” range is
great, but it’s limited. What helps extend those limits? Putting it on a larger
base (for an extra half-inch of coverage) with greater movement so you can
shift that Fearless bubble where you need it most (again, as quickly as possible).
· Because the War Boar Buffs Dain’s damage
significantly (more on that in a minute), opponents are highly incentivized to try to kill it (as
they have to try to kill all hero mounts). But with Defense 6 and 2 wounds, the
War Boar is incredibly survivable. This translates into increased survivability
for Dain, because every strike put on the Boar (several of which are likely to fail to wound) is a strike that could be going at Dain, but isn’t. Dain is hard enough
to beat in combat, and hard enough to wound on his own (Defense 8, 3 wounds, 3 Fate).
If your opponent is wasting their few precious strike opportunities on the boar
instead, it’s bought Dain time to do his thing.
But the real star here is the combat output. We’ve already
seen just how beastly Dain is in combat on his own, and supported by a banner. Giving
him an extra attack on the charge (4 attacks to win the duel) and two extra strikes
against infantry models (8 attacks to-wound, all +1 to wound from Burly) turns him into a combat god,
with a favorable kill ratio even against two hundred enemy models (as long as
Dain has the higher Fight value):
Dain Ironfoot
(F6, S5, D8, A3, Burly, 2H Hammer, mounted, charging) vs. X Infantry Warriors
(F2-5, S3, D6)
|
||||||||
vs. 1 Infantry
|
vs. 2 Infantry
|
vs. 4 Infantry
|
vs. 6 Infantry
|
vs. 8 Infantry
|
vs. 12 Infantry
|
vs. 20 Infantry
|
vs. 200 Infantry
|
|
Duel Win %
|
87.41%
|
78.93%
|
68.50%
|
62.58%
|
58.94%
|
55.07%
|
52.52%
|
51.77%
|
Kill %
|
87.07%
|
78.62%
|
68.23%
|
62.33%
|
58.71%
|
54.86%
|
52.32%
|
51.57%
|
Avg wounds
|
3.50
|
3.16
|
2.74
|
2.50
|
2.36
|
2.20
|
2.10
|
2.07
|
Death %
|
1.05%
|
3.36%
|
9.26%
|
15.22%
|
20.59%
|
29.11%
|
39.15%
|
48.23%
|
Avg wounds
|
0.01
|
0.04
|
0.10
|
0.19
|
0.27
|
0.45
|
0.79
|
8.04
|
Kill Ratio
|
82.99
|
23.37
|
7.37
|
4.10
|
2.85
|
1.88
|
1.34
|
1.07
|
Add a banner supporting Dain, and it gets truly absurd: a
kill ratio of over 100 (100 times more likely to wound than to be wounded)
against a single infantry model (at Defense 6), and a favorable kill ratio of
nearly 4 against eight enemy infantry models:
Dain Ironfoot
(F6, S5, D8, A3, Burly, 2H Hammer, mounted, charging) + Banner vs. X Infantry Warriors (F2-5, S3,
D6)
|
||||||||
vs. 1 Infantry
|
vs. 2 Infantry
|
vs. 4 Infantry
|
vs. 6 Infantry
|
vs. 8 Infantry
|
vs. 12 Infantry
|
vs. 20 Infantry
|
vs. 200 Infantry
|
|
Duel Win %
|
90.52%
|
83.76%
|
75.00%
|
69.79%
|
66.50%
|
62.92%
|
60.52%
|
59.81%
|
Kill %
|
90.16%
|
83.44%
|
74.71%
|
69.51%
|
66.24%
|
62.67%
|
60.28%
|
59.58%
|
Avg wounds
|
3.62
|
3.35
|
3.00
|
2.79
|
2.66
|
2.52
|
2.42
|
2.39
|
Death %
|
0.79%
|
2.59%
|
7.35%
|
12.29%
|
16.80%
|
24.03%
|
32.55%
|
40.19%
|
Avg wounds
|
0.01
|
0.03
|
0.08
|
0.15
|
0.22
|
0.37
|
0.66
|
6.70
|
Kill Ratio
|
114.08
|
32.17
|
10.17
|
5.66
|
3.94
|
2.61
|
1.85
|
1.48
|
In other words, don’t try to take Dain on with only Fight 5
(or lower) infantry (or heroes on foot). If mounted Dain has a 60% chance of
beating 200 enemy dice, charging him with 6 or 8 infantry isn’t likely to end
well (unless you're trying to prevent him from getting off a Heroic Combat).
So yes. Mount Dain. Don’t make him walk. It will annoy him, and you’ll regret it.
Heroic Combats: Dain vs. Enemy
Heroes
Lastly, let’s take a quick look at how Dain fares in combat against other heroes. There are way too many heroes to compare
individually (if you want to do that, I'll again commend Jeremy Hunthor’s combatcalculator to you), so I drew eight of the more popular (and powerful) combat
heroes from the game to give us a broad comparison. They broadly fall into
three categories:
· Fight 5 heroes: Faramir and the Witch-King.
Faramir has a slightly reduced combat profile (Strength 4, 2 Attacks) but does
have heavy armor and a shield for Defense 7 (which is pretty standard on Fight
5 combat heroes). The Witch-King (with the Crown of Morgul) gives us a more
heavily armored version (Defense 8) with 3 Attacks. He’s not two-handed whirling
in this example (for
obvious reasons), and he’s also not transfixing Dain (though
he probably should).
· Next are Fight 6 heroes: Boromir (White Tower
version, no Banner), Dwalin (Champion of Erebor version), and Aragorn (King
version, with Anduril and a 6” banner effect). These are very beat-stick-y
heroes, almost always the centerpiece of an army, and very dangerous to take head-on in combat (even if you have your own beefy combat beat-stick hero).
· Finally is the high-fight tier: Glorfindel, Gil-Galad,
and the Balrog. Glorfindel is your excellent Fight 7, Strength 4, Defense 7,
and 3 Attacks (with Lord of the West for extra duel and wound rolls). Gil-Galad
is the same, only Fight 9 (with a +1 to-wound from his spear). The Balrog is
there because Fight 10 is Fight 10, and he’s a monster (so he can rend). All
three are a good cut above the normal “beat-stick” heroes you’ll see: you
generally need mega-heroes (Sauron, Treebeard, Beorn, etc.) to deal with them,
and even then, they’ll have their hands full.
So how does Dain fair against each tier? We’ll start with
everyone on-foot first:
Dain Ironfoot
(F6, S5, D8, A3, Burly, 2H Hammer, on foot, charged) + Banner vs. Heroes on
foot
|
||||||||
Faramir (F5, S4,
D7, A2)
|
Witch-King (F5,
S4, D8, A3)
|
Boromir (F6, S4,
D7, A3)
|
Dwalin (F6, S5,
D8, A3, Burly)
|
Aragorn (F6, S4,
D7, A3, Anduril, Reroll)
|
Glorfindel (F7, S4,
D7, Lord of the West)
|
Gil-Galad (F9,
S4, D8, A3, LotW, Aiglos)
|
Balrog (F10, S9,
D9, A4, Rend)
|
|
Duel Win %
|
78.93%
|
72.92%
|
56.60%
|
56.60%
|
43.83%
|
31.50%
|
31.50%
|
31.50%
|
Kill %
|
69.07%
|
63.81%
|
49.53%
|
39.83%
|
38.35%
|
27.56%
|
27.56%
|
22.17%
|
Avg wounds
|
1.18
|
1.09
|
0.85
|
0.57
|
0.66
|
0.47
|
0.47
|
0.31
|
Death %
|
6.44%
|
18.01%
|
18.28%
|
30.54%
|
49.15%
|
35.47%
|
54.97%
|
67.65%
|
Avg wounds
|
0.07
|
0.27
|
0.22
|
0.43
|
0.84
|
0.46
|
0.91
|
1.83
|
Kill Ratio
|
10.73
|
3.54
|
2.71
|
1.30
|
0.78
|
0.78
|
0.50
|
0.33
|
First thing’s first: Dain (supported by banner, of course)
absolutely tears through Fight 5, two-attack heroes with odd defense (or any
defense less than 8). He’s almost eleven times more likely to deal a wound to Faramir
than Faramir is to wound him (10.73 kill ratio), thanks in large part to Dain’s
nearly 80% chance to win the duel. The Witch-King fares better thanks to his
extra attack (3 to Dain’s 3) and his Defense 8, but Dain is still winning the
duels at a very good clip (nearly 73% of the time) for a kill ratio of 3.54. I’m
telling you: three attacks with a banner reroll is incredibly difficult to beat
unless you have tied or equal fight value. And while Faramir and the Witch-King
could try to Heroic Strike, there are several risks in doing so against Dain:
first, Dain starts with +1 Fight, so he’ll only need a 4+ (50% chance) to get
to Fight 10, while Faramir and the Witch-King need a 5+ (33% chance); second,
if Faramir or the Witch-King call a Heroic Strike while in combat with Dain (or
within 6” of him, if they anticipate a Heroic Combat), Dain’s Master of Battle (4+) gives Dain a
50-50 chance of copying that Strike for free (not only giving Dain a free
chance of winning the Strike-Off, but allowing Dain to save
his Might to boost his rolls, which dramatically increases his odds of
winning the fight).
Dain has more trouble against Fight 6 heroes, because he’s
now only winning 50% of those many cases when both sides have a “6” to win the
duel, instead of the 100% he was winning against Fight 5 heroes. His kill ratio
is still pretty good against Boromir (2.71), since Boromir has Defense 7 (Dain
wounds him on a 4+). He’s stuck with 5s against Dwalin, who is also wounding
Dain on 5s as well (since both are Burly with a Strength 5 two-handed weapon). Dain
ends up with a slightly favorable kill ration of 1.3, which is entirely due to
the banner supporting him (which gives him a slightly higher 57% chance to win the
duel, to Dwalin’s 43%). If Dain didn’t have a banner (or if Dwalin did), they’d
be matched at 50-50 odds, with a perfectly even kill ratio of 1.0. Lastly there’s
Aragorn, who has several advantages against Dain. First, because Anduril is an
elven-made sword, Aragorn is winning two-thirds of all drawn combats against
Dain, which means Dain is now winning less than 50% of his fights for the first
time (43.83%). And while Dain is still wounding Aragorn on a 5+ (Aragorn is
Defense 7, after all), Aragorn is wounding Dain on a 4+ thanks to Anduril
(again), giving Dain an unfavorable kill ratio of 0.78. It’s still close, but
in Aragorn’s favor. It’d be even more in Aragorn’s favor if he decides to
two-hand with Anduril (wounding Dain on a 3+). And unlike Faramir or the
Witch-King (who may not want to Heroic Strike against Dain, for fear they’ll be
out-Mighted by Dain’s Master of Battle
(4+)), Aragorn’s Mighty Hero special
rule means he can keep calling Strikes long after every other hero has expended
all their Might, that Dain only has a 50% chance of matching. And even on turns when Dain does match it, Aragorn has that Elven-made weapon to give him an advantage even if Dain
matches his jump to Fight 10.
Dain really struggles against heroes with higher Fight (assuming
he doesn’t Heroic Strike against them). He keeps it close-ish against Glorfindel
(0.78 kill ratio, identical with Aragorn if Aragorn is one-handing with
Anduril), but only because he’s still wounding Glorfindel’s Defense 7 on a 4+.
Gil-Galad (and his +1 to-wound) thoroughly out-classes Dain, and the Balrog
(who is rending Dain on a 3+) poses a real challenge. Again, none of this is
surprising—all these heroes are really tough for most heroes to deal with. Dain
is a combat god against most enemy troops and many enemy heroes, but not
against everything.
Now to spice things up, let’s look at how Dain fares (on
foot) against enemy heroes if they’re mounted (and charge Dain):
Dain Ironfoot
(F6, S5, D8, A3, Burly, 2H Hammer, on foot, charged) + Banner vs. Heroes Mounted
|
||||||||
Faramir (F5, S4,
D7/5, A2, Lance)
|
Witch-King on FB
(F5, S6, D8/6, A3)
|
Boromir (F6, S4,
D7/4, A3)
|
Dwalin (F6, S5,
D8/5, A3, Burly)
|
Aragorn (F6, S4,
D7/5, A3, Anduril)
|
Glorfindel (F7,
S4, D7/4, Lord of the West)
|
Gil-Galad (F9,
S4, D8/4, A3, LotW, Aiglos)
|
Shelob (F7, S7,
D7, A2*, Venom)
|
|
Duel Win %
|
72.92%
|
68.50%
|
50.00%
|
50.00%
|
38.39%
|
25.00%
|
25.00%
|
52.57%
|
Kill %
|
63.81%
|
59.94%
|
48.15%
|
35.19%
|
36.96%
|
24.07%
|
24.07%
|
46.00%
|
Avg wounds
|
1.09
|
1.03
|
1.00
|
0.50
|
0.77
|
0.50
|
0.50
|
0.79
|
Death %
|
18.01%
|
30.27%
|
38.37%
|
48.05%
|
61.37%
|
62.89%
|
73.70%
|
45.58%
|
Avg wounds
|
0.27
|
0.84
|
0.67
|
1.33
|
2.46
|
1.25
|
2.50
|
1.05
|
Kill Ratio
|
3.54
|
1.98
|
1.25
|
0.73
|
0.60
|
0.38
|
0.33
|
1.01
|
Suddenly, those Fight 5 models are a lot more threatening.
Faramir (who is now rolling 3 dice to win the duel, and 6 dice to wound with a
+1 from a Lance) is still almost four times more likely to be wounded than to
wound Dain, but that’s quite a bit better than the 10.73 kill ratio he had
before. The Witch-King (now mounted on a Fell Beast) has cut his kill ratio down
to just under 2.0. The Fight 6 heroes are now pulling ahead of Dain as well,
with four duel dice (counteracting Dain’s banner bonus) and eight to-wound
dice. Dwalin and Aragorn in particular have very favorable damage leads on Dain
(and, of course, Dwalin has a 33%
chance of knocking Dain prone in the Move Phase with his war goat’s Devastating Charge, which would be very
good for Dwalin and disastrous for Dain). Mounted Glorfindel and mounted
Gil-Galad are terrifying to behold (figuratively and literally), and Dain has
little-to-no-chance of beating them in a straight-up fight. That leaves Shelob (since
the Balrog can’t be mounted), who is also rending Dain with two dice on a 3+
(or wounding him on a 5+ with double-Strikes) and rerolling failed to-wound
rolls thanks to her Venom. Dain
actually has a fighting chance against her (since he is wounding her Defense 7
on a 4+), but the odds are a lot closer than you’d think they would be, given
that he’s rolling twice her dice to win the duel (once you factor in his banner
reroll).
So how do we recover Dain’s combat prowess? By mounting him:
Dain Ironfoot
(F6, S5, D8, A3, Burly, 2H Hammer, mounted, charging) + Banner vs. Heroes
Mounted
|
||||||||
Faramir (F5, S4,
D7/5, A2, Lance)
|
Witch-King on FB
(F5, S6, D8/6, A3)
|
Boromir (F6, S4,
D7/4, A3)
|
Dwalin (F6, S5, D8/5,
A3, Burly)
|
Aragorn (F6, S4,
D7/5, A3, Anduril)
|
Glorfindel (F7,
S4, D7/4, Lord of the West)
|
Gil-Galad (F9,
S4, D8/4, A3, LotW, Aiglos)
|
Shelob (F7, S7,
D7, A2*, Venom)
|
|
Duel Win %
|
72.92%
|
72.92%
|
56.60%
|
56.60%
|
43.83%
|
31.50%
|
31.50%
|
52.57%
|
Kill %
|
63.81%
|
51.32%
|
49.53%
|
39.83%
|
38.35%
|
27.56%
|
27.56%
|
46.00%
|
Avg wounds
|
1.09
|
0.73
|
0.85
|
0.57
|
0.66
|
0.47
|
0.47
|
0.79
|
Death %
|
8.27%
|
19.05%
|
18.28%
|
30.54%
|
49.15%
|
28.86%
|
48.20%
|
26.35%
|
Avg wounds
|
0.09
|
0.27
|
0.22
|
0.43
|
0.84
|
0.34
|
0.69
|
0.26
|
Kill Ratio
|
7.71
|
2.69
|
2.71
|
1.30
|
0.78
|
0.96
|
0.57
|
1.75
|
As I mentioned in our discussion of Goat Rider counter-charges, cavalry models lose basically all of their expensive advantages if they are fighting other cavalry models: they don't get an extra +1 attack on the charge, and they don't get double to-wound dice if they win the duel. In Dain's case, this restores his decided edge against Fight 5, 2
Attack heroes (like Faramir), and gives him a favorable chance against high-defense
Fight 5 heroes as well as most Fight 6 heroes (we're assuming here that Dain charged, so no lance bonus for Faramir). Aragorn is still a problem
(because Anduril is as potent as ever), but Dain can have a surprisingly good
go at Glorfindel and Gil-Galad (they’re still more likely to win, but he’s got
an outside chance) and is very good against Shelob (who now has only one
attack, now that she’s not charging). And if Dain happens to catch a Fight 5
captain on foot while mounted, they’re in a heap of trouble (and even Glorfindel is sweating... a little):
Dain Ironfoot
(F6, S5, D8, A3, Burly, 2H Hammer, mounted, charging) + Banner vs. Heroes on
Foot
|
||||||||
Faramir (F5, S4,
D7, A2)
|
Witch-King (F5,
S4, D8, A3)
|
Boromir (F6, S4,
D7, A3)
|
Dwalin (F6, S5,
D8, A3, Burly)
|
Aragorn (F6, S4,
D7, A3, Anduril, Reroll)
|
Glorfindel (F7,
S4, D7, Lord of the West)
|
Gil-Galad (F9,
S4, D8, A3, LotW, Aiglos)
|
Balrog (F10, S9,
D9, A4, Rend)
|
|
Duel Win %
|
83.76%
|
78.78%
|
61.38%
|
61.38%
|
48.23%
|
34.84%
|
34.84%
|
31.50%
|
Kill %
|
83.44%
|
75.70%
|
61.14%
|
58.98%
|
48.04%
|
34.71%
|
34.71%
|
22.17%
|
Avg wounds
|
3.35
|
2.10
|
2.46
|
1.64
|
1.93
|
1.39
|
1.39
|
0.31
|
Death %
|
4.96%
|
8.94%
|
16.27%
|
27.18%
|
45.30%
|
27.45%
|
45.85%
|
67.65%
|
Avg wounds
|
0.05
|
0.11
|
0.19
|
0.39
|
0.78
|
0.33
|
0.65
|
1.83
|
Kill Ratio
|
16.82
|
8.47
|
3.76
|
2.17
|
1.06
|
1.26
|
0.76
|
0.33
|
Concluding Thoughts
All in all, Dain Ironfoot is an incredible addition to an
Iron Hills or Erebor Reclaimed army list (and if your force plans to include
Iron Hills dwarves, War Goats, or Captains, he’s pretty much a must-take). He
buffs your warriors, he can keep your army moving when the rest of your heroes
run out of Might, and he’s a beast in combat, especially on his War Boar. Just make
sure you’re not too reckless with him… unless you’re trying to keep it theme-y
(in which case, carry on)!

If you've liked what you read and want to learn more about the heroes and warriors of the Iron Hills, check out our Iron Hills / Erebor Reclaimed Army Page for more from the TMAT team and other members of the Middle Earth SBG community, along with links to battle reports, podcasts, and more. And let us know what you think in the comments!
If you've liked what you read and want to learn more about the heroes and warriors of the Iron Hills, check out our Iron Hills / Erebor Reclaimed Army Page for more from the TMAT team and other members of the Middle Earth SBG community, along with links to battle reports, podcasts, and more. And let us know what you think in the comments!
Another very excellent write-up - you're making me think I might pay the ForgeWorld tax to get Iron Hills instead of "only" paying $135 for the Army of Erebor I was eyeing. :)
ReplyDeleteI do disagree, on one small point: "You can take Iron Hills Captains in Erebor Reclaimed, too, but realistically you’re probably not: why spend the points on an Iron Hills Captain when I can spend the same points (or a little more, or a little less) to get Nori, Gloin, or Dwalin on goat?"
Getting _one_ Iron Hills Captain might be worth it even if it means you don't get one of the heroes above: this is not only because they have access to March (a must-have for any infantry army that moves at less than 6" unless you know the only scenarios you'll be playing don't require you to travel - like Brawler Bash 2019), but because they have Master of Battle 5+: while Gloin/Nori/Dwalin can all Strike-up, you can use your Iron Hills Captains as very effective bunkers (D8 with shield, D9 if Shieldwall is active) to engage enemy heroes, counter-calling Heroic Strike if a F5 hero they're pinning down tries to get an edge. Anyone who's F6+ and wants to crack through you more easily (S4 heroes wound D8 on 6s, D9 on 6/4+) might call a Heroic Strength, which your Captain could easily mimic to make killing the other guy easier too (these captains, like Numenorean captains are only S4, right?). And of course there's always the ability to have more free Heroic Moves...
All that said, as great as Nori/Dwalin/Gloin are (and truly, they are great), I think the Master of Battle rule itself is well-worth including (to say nothing of Shieldwall).
Very valid points. I definitely agree the captains are good, and there's certainly no reason why you couldn't take them in an Erebor Reclaimed list (and lots of reasons why you might want to take them).
DeleteMy thought was rather that if you're planning to take an Iron Hills Captain (for all the reasons you described), I think you're probably looking more at an Iron Hills army than an Erebor Reclaimed army, since the Captains get no benefit from the ER army bonus (they don't have the Erebor keyword) and their points cost is at the high-end of the ER hero scale (only three ER heroes cost as many or more points than a mounted IH Captain (Gloin, Dwalin, and Thorin), and at least two of them (Dwalin and Thorin) are (I think) appreciably better, with F6 and 3 attacks, plus the option to take a war goat as well (Gloin also has three attacks at F6, but can't be mounted, so I'm not sure he actually ends up better in combat than the IH captain mounted--will have to run those numbers later). At that point, it's a question of opportunity cost. If you take a Captain, you're looking at probably only two big ER heroes with full warbands, or perhaps up to 4 if you go with the mid-cost heroes and smaller warbands. The ER heroes are still good, even in batches of 3-4, and it doesn't take many IH dwarves to support them effectively in combat, but that's only 1-3 models that are benefitting from the ER bonus (Thorin doesn't benefit himself, sadly).
I think the larger issue is that if you're going with an ER list, the Captain is also going to be competing directly against Dain for that extra slot. Dain costs quite a bit more points (especially mounted), and doesn't have Master of Battle in an ER list, but he does have March and the buffs he gives the IH troops (to say nothing of his own combat prowess, and his ability to drop a Heroic Resolve when needed) makes him a very attractive piece in an ER list, and probably edges out the Captain (even with his higher point cost).
Of course, you could always take Dain _and_ an IH captain... but at that point, you're basically running an IH list instead of an ER list, right? ;-)
You make a good point - if you have Dain (mounted), Dwalin (mounted), and Thorin (mounted with Orcrist) in your list, you'll be tight on space. But if you need to get somewhere in a mission, do you run a larger list and rely on Dain spending Might to march your army across the field? Or do you forego a Champion of Erebor/8 warriors to get someone else to march for you? There's trades to be sure, but in a scenario where you don't want to show up last, I think marching would be very helpful (though it's really whether or not you want to save the Might on Dain or not).
DeleteWhile IHCaps don't benefit from the army bonus, not everyone will be within 6" of Thorin - and while I do see that passing on a banner rule for someone like Nori (who's already rerolling a die) or Gloin/Dori (who will effectively have 4 dice to win the fight) by taking an IHCap would have its problems, perhaps the IHCap is that hero who pushes the army up at the beginning of the game and then moves away from Thorin later in the fight? Just thinking out loud...
That’s definitely a way to run the force, which is one of the strengths of Erebor Reclaimed: they have so many heroes at varying points costs that there are a ton of configurations you could build around. If you’re most concerned about Heroic March, I think you probably take Dain over a Captain most of the time, but the captain would still offer Master of Battle (5+) (Dain loses his MoB in an ER list), and having a chance to copy Heroic Moves, Combats, Strikes, etc. for free could be a life saver in the late game.
ReplyDelete